Factory Pattern is among the most well-known patterns for creation available. I have personally used it in various projects. One of them can be described as an open-source cross-platform application that was written in the Dart Joker app. However, you can also look into CoffeeMaker in case you would like to know the code and don’t want to read the documentation.
Table Of Content:-
- factory design pattern in java example
- builder pattern android
- factory pattern example
- factory class in android
- abstract factory design pattern in java
- factory design pattern java
- facade design pattern android
- factory design pattern android
- what is the factory of android
- factory method
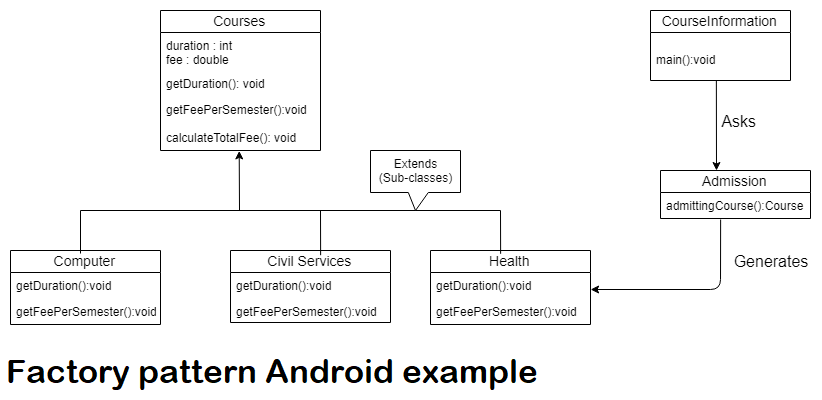
Factory pattern Android example
The Factory Pattern as its name implies , utilizes factory methods to address the problem of having create multiple objects, without specifying the exact type of the object to be created. In this Android Kotlin and Java class, this is perform by implementing a common interface in classes and providing access to the class objects through a Factory method.
The best way to understand how this is done is to develop an application that puts everything I’ve just described into actions. Launch Android Studio and Start a new project.We’re going to create an app in the form of a mini-sample that will creates an object that represents different variations of Coffee. To simplify things I’ll be focusing only on the pattern. The app will give the names and recipes for each variation of coffee in a string.
How to build a Factory Pattern
Step 1:- I’m guessing that you’ve made an entirely new project using Android Studio, now edit the MainActivity.java
Step 2:- Right-click on it to create an entirely new Kotlin Class or File of the interface named Coffee.
Step 3:- Edit the interface and add two ways, namely names and recipes in it.
interface Coffee {
 fun name(): String
fun recipe(): String
}
Step 4:- Make concrete class classes to implement the Coffee interface.
class CaffeLatte : Coffee {
override fun name(): String ="CaffeLatte"
override fun recipe(): String ="Expresso"
}

class Americano : Coffee {
override fun recipes(): String = "Expresso, Hot water"
override fun name(): String = "Caffè Americano"
}
Step 5:- Create a new class named CoffeeFactory which will look similar to the code in the snippet of code below.
object CoffeeFactory {
 enum class Type{
 LATTE, AMERICANO
 }

fun getCoffee(type: Type): Coffee{
if (type == CoffeeFactory.Type.LATTE){
return CafeLatte()
}
else if(type == CoffeeFactory.Type.AMERICANO){
return Americano()
 }
throw IllegalArgumentException("Can't handle your command ${type.name}")
 }
}
The Factory pattern is done Now let’s show the coffee recipes as well as the names on our screen.
Step:-6 Change the activity_main.xml layout. Copy/Paste the following code into it:
<?xml version="1.0" encoding="utf-8"?>
<android.support.constraint.ConstraintLayout
    xmlns:android="http://schemas.android.com/apk/res/android"
    xmlns:tools="http://schemas.android.com/tools"
    xmlns:app="http://schemas.android.com/apk/res-auto"
    android:layout_width="match_parent"
    android:padding="10dp"
    android:layout_height="match_parent"
    tools:context=".MainActivity">

    <TextView
        android:layout_width="wrap_content"
        android:layout_height="wrap_content"
        android:textStyle="bold"
        android:text="Hello World!"
        android:paddingBottom="5dp"
        android:id="@+id/coffee_name"
        android:textAppearance="?android:textAppearanceMedium"
        app:layout_constraintTop_toTopOf="parent"/>


    <TextView
        android:layout_width="wrap_content"
        android:paddingBottom="10dp"
        android:layout_height="wrap_content"
        android:text="Hello World!"
        android:id="@+id/coffee_recipe"
        android:textAppearance="?android:textAppearanceMedium"
        app:layout_constraintTop_toBottomOf="@id/coffee_name"/>


    <Button
        android:layout_width="wrap_content"
        android:layout_height="wrap_content"
        android:text="Change Type"
        android:id="@+id/coffee_btn"
        android:textAppearance="?android:textAppearanceMedium"
        app:layout_constraintTop_toBottomOf="@id/coffee_recipe"/>

</android.support.constraint.ConstraintLayout>
Step 7:- Modify your MainActivity.java file. Refer to TextViews TextViews in the layout, and then set the text. The button changes the text after it’s clicked.
class MainActivity : AppCompatActivity() {

private var isChanged: Boolean =false

        override fun onCreate(savedInstanceState: Bundle?) {
        super.onCreate(savedInstanceState)
        setContentView(R.layout.activity_main)

        //Set button click
        coffee_btn.setOnClickListener(this::changeCoffee)

        }

        /**
         * Change coffee recipe and name when button is clicked
         */
        fun changeCoffee(view: View){
        var factory: Coffee
        if (isChanged){
        factory = CoffeeFactory.getCoffee(CoffeeFactory.Type.AMERICANO)
        isChanged = false
        }else{
        factory = CoffeeFactory.getCoffee(CoffeeFactory.Type.LATTE)
        isChanged = true
        }

        changeCoffeeType(factory.recipes(), factory.name())
        }

/**
 * Method that changes the coffee type
 */
private fun changeCoffeeType(recipe: String, name: String){

        coffee_recipe.text = recipe

        coffee_name.text =name
        }
        }
Now you’re ready to launch your app on a real device or an emulator.
Read More Android tutorial