Android singleton class in java Before going into an example, we need to be aware of what a singleton design pattern is. A singleton is a pattern that limits the creation of a class only to one instance. It is useful for managing concurrency as well as making a central point of access for applications in order to connect with its database storage.
In object-oriented programming, the singleton class is one that can only have an object (an instance) at one time. After the first attempt, if we attempt to create this Singleton class then, that newly created variable is also pointing to the initial instance that was created. Therefore, any modifications made to any variable in the class, in any way alters the variable for the single instance created. This can be seen if we try to connect to that variable using any variable belonging to the class type.
Be aware of the main elements when you define class as one-ton classes that are when designing a singleton class:
- Create a constructor that is private.
- Create a static method that uses an object for return types from the class singleton. In this case, the concept of Lazy initialization is employed to create the static procedure.
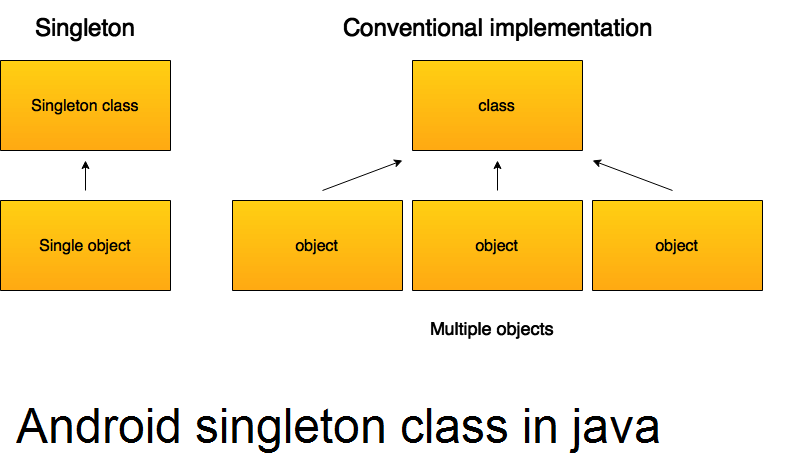
The purpose of singleton class
The principal purpose behind Single classes is to limit the number of objects’ creations to just one. This is often to ensure that there is control over access to resources, like socket or database connections.
The loss of memory space cannot be attributed to making use of the singleton classes because it restricts the creation of instances. Since the creation of objects is only done once, instead of being created every time a new request is received.
It is possible to use this one object in multiple instances in accordance with the specifications. This is why the multi-threaded database and database applications typically make use of singleton patterns in Java. Singleton model in Java for caching as well as the logging process thread pooling, setting settings, and more.
For instance, if we have authorization with us that we only have one database connection, or that our JDBC driver isn’t allowing us to use multithreading, then Singleton class enters the picture to ensure that at any given time, only one connection or thread is able to connect to the database.
How to design/create a Singleton Class using Java?
For creating a singleton class, you must follow these instructions below:
1. Make sure that only one instance of this class is present.
2. Give global access to the instance
- All constructors in this class as private.
- Offering a static method that gives a reference of the object. The lazy initialization idea is employed to write static methods.
- The instance is saved as a private variable.
A singleton class example is the Runtime class, Action Serverlet and Service Locator. Factory methods and private constructors are also examples for class singleton.
The difference in the Normal Class as well as Singleton Class
It is possible to distinguish the Singleton class from normal classes based on the method used to instantiate objects of that class. To instantiate a normal class, we use a java constructor. In contrast for instantiating the singleton class, we can use to use the method of getting an instance() method.
The other distinction is that a normal class disappears at the conclusion of the lifecycle of the application, whereas the singleton class will not disappear with the end of the application.
Types from Singleton Class Pattern
There are two kinds of singleton pattern design that are:
- Early Instantiation The creation of the object is performed at the loading time.
- Lazy Instantiation The creation of the object is performed in accordance with the specifications.
This example shows how to utilize singleton class in Android
1. Create a brand new project using Android Studio and go to File > Create a New Project and fill in all the required information to start a new project.
Step 2 – Add the following code to res/layout/activity_main.xml.
<?xml version = "1.0" encoding = "utf-8"?>
<LinearLayout
   xmlns:android = "http://schemas.android.com/apk/res/android"
   xmlns:tools = "http://schemas.android.com/tools"
   android:layout_width = "match_parent"
   android:layout_height = "match_parent"
   tools:context = ".MainActivity"
   android:orientation = "vertical">
   <EditText
      android:id = "@+id/Value_editText"
      android:layout_width = "match_parent"
      android:layout_height = "wrap_content"
      android:hint = "Enter Your vlaue " />
   <Button
      android:id = "@+id/saveBtn"
      android:text = "Save"
      android:layout_width = "wrap_content"
      android:layout_height = "wrap_content" />
</LinearLayout>
In the code above we have used edit Ext and a button. If the user clicks on the button in the above code, it’ll extract information from edit text and save it in an individual class, and display values from the singleton class in a toast.
Step 3 – Add the following code to src/MainActivity.java
public class MainActivity extends AppCompatActivity {
   EditText editText;
   Button saveBTn;
   @Override
   protected void onCreate(Bundle savedInstanceState) {
      super.onCreate(savedInstanceState);
      setContentView(R.layout.activity_main);
      editText = findViewById(R.id.Value_editText);
      saveBTn= findViewById(R.id.saveBtn);
      saveBTn.setOnClickListener(new View.OnClickListener() {
         @Override
         public void onClick(View v) {
            if(editText.getText().toString().isEmpty()) {
               editText.setError("Enter your value");
            }else{
               String editValue = editText.getText().toString();
               singleTonExample singletonexample = singleTonExample.getInstance();
               singletonexample.setText(editValue);
               Toast.makeText(MainActivity.this,singletonexample.getText(),Toast.LENGTH_LONG).show();
            }
         }
      });
   }
}
Step: 4 Make a SingleTon Class.
public class singleTonExample {
   String editValue;
   private static final singleTonExample ourInstance = new singleTonExample();
   public static singleTonExample getInstance() {
      return ourInstance;
   }
   private singleTonExample() { }
   public void setText(String editValue) {
      this.editValue = editValue;
   }
   public String getText() {
      return editValue;
   }
}
Let’s test your app. It is assumed that you have connected your current Android Mobile device with your computer. To run the application from Android Studio start by opening the project’s activities files and then click the Run icon in the toolbar. Select your mobile phone as an option, and then verify your mobile device. This will show your default screen.
Read More Android tutorial