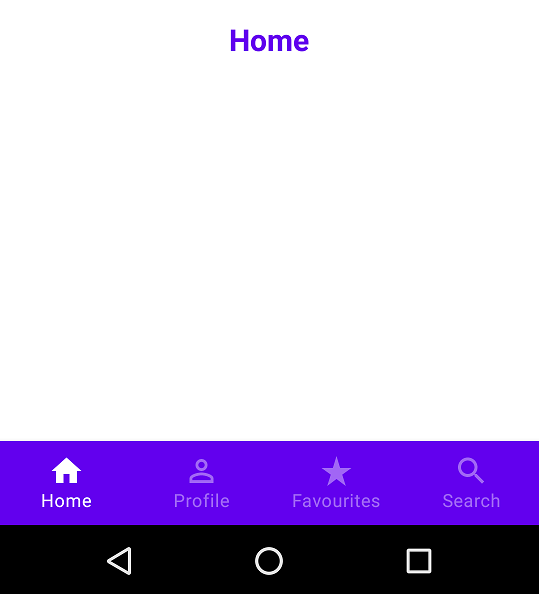
In this jetpack compose tutorial we learn about how to make an Android jetpack compose a bottom navigation bar. Navigation within Jetpack Compose has been somewhat difficult to implement prior to the most recent version by Compose’s Compose Toolkit Team.
The process of navigating between Android apps was challenging for many years, using parts and activities, with processes dying and lifecycles that surprise you I remember sifting through massive code bases to figure out where one screen was replaced with one as well as why. The Navigation component which came out in the last quarter of 2018 was an amazing step forward and enabled developers to design complex storyboards that have flows of screens while focusing the entire data set in XML graphs and offering actions and destinations in more comprehensible terms to navigate.
Android Jetpack Compose came along.
Jetpack Compose is the latest Android toolkit to make the native UI. It’s developed using Kotlin and has the performance and lower code as the primary goals, the basic understanding of Compose is necessary to implement the strategies that are suggested within this piece.
I would recommend beginning by using the Android Compose routes.
Navigation using Jetpack Compose
In the beginning, Compose did not offer an integrated way to navigate screens. We had to develop our own system of navigation keeping the track of back stacks as well as back button clicks which was difficult to keep track of because the screen count increased and the application grew.
Recently, the Toolkit team has released the first version of Compose’s navigation libraries. Compose this is a lot less code and improved performance.
jetpack compose bottom navigation bar Source Code
Step 1:- In this jetpack compose tutorial we used the below dependency is adding in module base gradel.
dependencies {

    implementation 'androidx.core:core-ktx:1.5.0'
    implementation 'androidx.appcompat:appcompat:1.3.0'
    implementation 'com.google.android.material:material:1.3.0'
    implementation "androidx.compose.ui:ui:$compose_version"
    implementation "androidx.compose.material:material:$compose_version"
    implementation "androidx.compose.ui:ui-tooling:$compose_version"

    implementation "androidx.navigation:navigation-compose:2.4.0-alpha02"
    implementation 'androidx.lifecycle:lifecycle-runtime-ktx:2.3.1'
    implementation 'androidx.activity:activity-compose:1.3.0-beta01'

    testImplementation 'junit:junit:4.+'
    androidTestImplementation 'androidx.test.ext:junit:1.1.2'
    androidTestImplementation 'androidx.test.espresso:espresso-core:3.3.0'
    androidTestImplementation "androidx.compose.ui:ui-test-junit4:$compose_version"
}
Step 2:- Project base gradle
buildscript {
    ext {
        compose_version = '1.0.0-beta08'
        kotlin_version = '1.5.10'
    }
    repositories {
        google()
        mavenCentral()
    }
    dependencies {
        classpath 'com.android.tools.build:gradle:7.1.0-beta04'
        classpath "org.jetbrains.kotlin:kotlin-gradle-plugin:$kotlin_version"

        // NOTE: Do not place your application dependencies here; they belong
        // in the individual module build.gradle files
    }
}

task clean(type: Delete) {
    delete rootProject.buildDir
}
Step 3:- Create a MainActivity Kotlin class Source Code.
class MainActivity : ComponentActivity() {
    override fun onCreate(savedInstanceState: Bundle?) {
        super.onCreate(savedInstanceState)
        setContent {
            MyApplicationTheme {
                MainView()
            }
        }
    }
}

@Composable
fun BottomBarMain(navController : NavHostController) {
    NavHost(navController, startDestination = Screen.Home.route) {
        composable(Screen.Home.route) {
            HomeScreen()
        }
        composable(Screen.Search.route) {
            SearchScreen()
        }

        composable(Screen.Favourites.route) {
            FavouritesScreen()
        }

        composable(Screen.Profile.route) {
            ProfileScreen()
        }
    }
}

@Composable
fun Greeting(name: String) {
    Text(text = "Hello $name!")
}

@Preview(showBackground = true)
@Composable
fun DefaultPreview() {
    MyApplicationTheme {
        Greeting("Android")
    }
}
Step 4:- Make a MainView kotlin File.
@Composable
fun MainView(){
    val navController = rememberNavController()
    Scaffold (
            bottomBar = {
            BottomBar(
                navController
            )
        }
    )
    {
        BottomBarMain(navController)
    }

}
Step 5: Make a routing class with the name Screen.
sealed class Screen(val route: String, val title : String, @DrawableRes val icon : Int) {
    object Home : Screen(route = "home", title = "Home", icon= R.drawable.ic_home)
    object Profile : Screen(route = "profile", title = "Profile", icon= R.drawable.ic_profile)
    object Favourites : Screen(route = "favourites", title = "Favourites", icon= R.drawable.ic_star)
    object Search : Screen( route = "search", title = "Search", icon= R.drawable.ic_search)

}
here you can set your tab name and icons of tab also set jetpack to compose navigation screen. so let’s make a screen class for your tab like home, search, favorites, profile.
Step 6: Make Controler fo table click and show data.
@Compo
sable
fun BottomBar(navController: NavController){

    val items = listOf(
        Screen.Home,
        Screen.Profile,
        Screen.Favourites,
        Screen.Search,


    )

    BottomNavigation(
        elevation = 5.dp
    ){
        val navBackStackEntry by navController.currentBackStackEntryAsState()
        val currentRoute = navBackStackEntry?.destination?.route
        items.map {
            BottomNavigationItem(
                icon= {
                    Icon(
                        painter = painterResource(id = it.icon),
                        contentDescription = it.title
                    )
                },
                label= {
                       Text(
                           text = it.title
                       )
                },
                selected = currentRoute == it.route,
                selectedContentColor= Color.White,
                unselectedContentColor= Color.White.copy(alpha = 0.4f),
                onClick = {
                    navController.navigate(it.route){
                        navController.graph.startDestinationRoute?.let { route ->
                            popUpTo(route) {
                                saveState = true
                            }
                        }
                        restoreState = true
                        launchSingleTop = true
                    }
                }
            )
        }

    }
}
Step 7:- Make Screen for Tab Home.
make a kotlin file with the name for Homescreen and a jetpack compose function and make Ui for home table see below code here we show just a text.
fun HomeScreen(){
    Box(
        modifier = Modifier
            .fillMaxSize()
            .background(MaterialTheme.colors.background)
    ) {
        Text(
            text = Screen.Home.title,
            fontWeight = FontWeight.Bold,
            color = MaterialTheme.colors.primary,
            modifier = Modifier.align(Alignment.Center),
            fontSize = 20.sp
        )
    }
Step 8: make a Kotlin file for the Profile tab
now we create a kotline file for profile tab same to home and make UI for it
@Composable
fun ProfileScreen(){
    Box(
        modifier = Modifier
            .fillMaxSize()
            .background(MaterialTheme.colors.background)
    ) {
        Text(
            text = Screen.Profile.title,
            fontWeight = FontWeight.Bold,
            color = MaterialTheme.colors.primary,
            modifier = Modifier.align(Alignment.Center),
            fontSize = 20.sp
        )
    }
Step 9. FavouritesScreen File source code
@Composable
fun FavouritesScreen(){
    Box(
        modifier = Modifier
            .fillMaxSize()
            .background(MaterialTheme.colors.background)
    ) {
        Text(
            text = Screen.Favourites.title,
            fontWeight = FontWeight.Bold,
            color = MaterialTheme.colors.primary,
            modifier = Modifier.align(Alignment.Center),
            fontSize = 20.sp
        )
    }
}
Step 10: Make search screen UI source code.
@Composable
fun SearchScreen(){
    Box(
        modifier = Modifier
            .fillMaxSize()
            .background(MaterialTheme.colors.background)
    ) {
        Text(
            text = Screen.Search.title,
            fontWeight = FontWeight.Bold,
            color = MaterialTheme.colors.primary,
            modifier = Modifier.align(Alignment.Center),
            fontSize = 20.sp
        )
    }
}
Now all steps are done you can run your app and test Android jetpack compose a bottom navigation bar. you can also read more android tutorials and solutions here
Related Post:-

