Hi android developer in this article we are learn how to use android mvvm login example java project setup and make a API for login with retrofit post method. In an Android app, the ViewModel, Repository, and Retrofit are commonly used components to implement the Model-View-ViewModel (MVVM) architecture pattern.
Android mvvm example retrofit ( ViewModel, Repository, and Retrofit )
ViewModel, Repository, and Retrofit are three important concepts in Android app development. Here’s a brief explanation of each one and how they work together.
- ViewModel: ViewModel is an Android architecture component that provides a way to store and manage UI-related data in a lifecycle-conscious way. It’s designed to survive configuration changes such as screen rotations, so that data can be retained across those changes. ViewModel does not contain any UI-related code and is responsible only for holding and managing data. It can be used to interact with repositories to fetch data from a remote data source or a local database.
- Repository: Repository is an architectural pattern that provides an abstraction layer between the app’s data sources and the rest of the app. A repository provides a clean API to access and manage data from different sources such as a remote data source (API) or a local database. It’s responsible for retrieving, storing, and managing data. In the MVVM architecture pattern, the repository is typically used by the ViewModel to fetch and manage data.
- Retrofit: Retrofit is a popular networking library for Android that simplifies the process of making HTTP requests to a remote data source. It allows you to define an interface for your API calls using annotations, and then generates code to make those calls at runtime. Retrofit also supports several serialization formats such as JSON and XML, and makes it easy to add custom headers and interceptors to your requests.
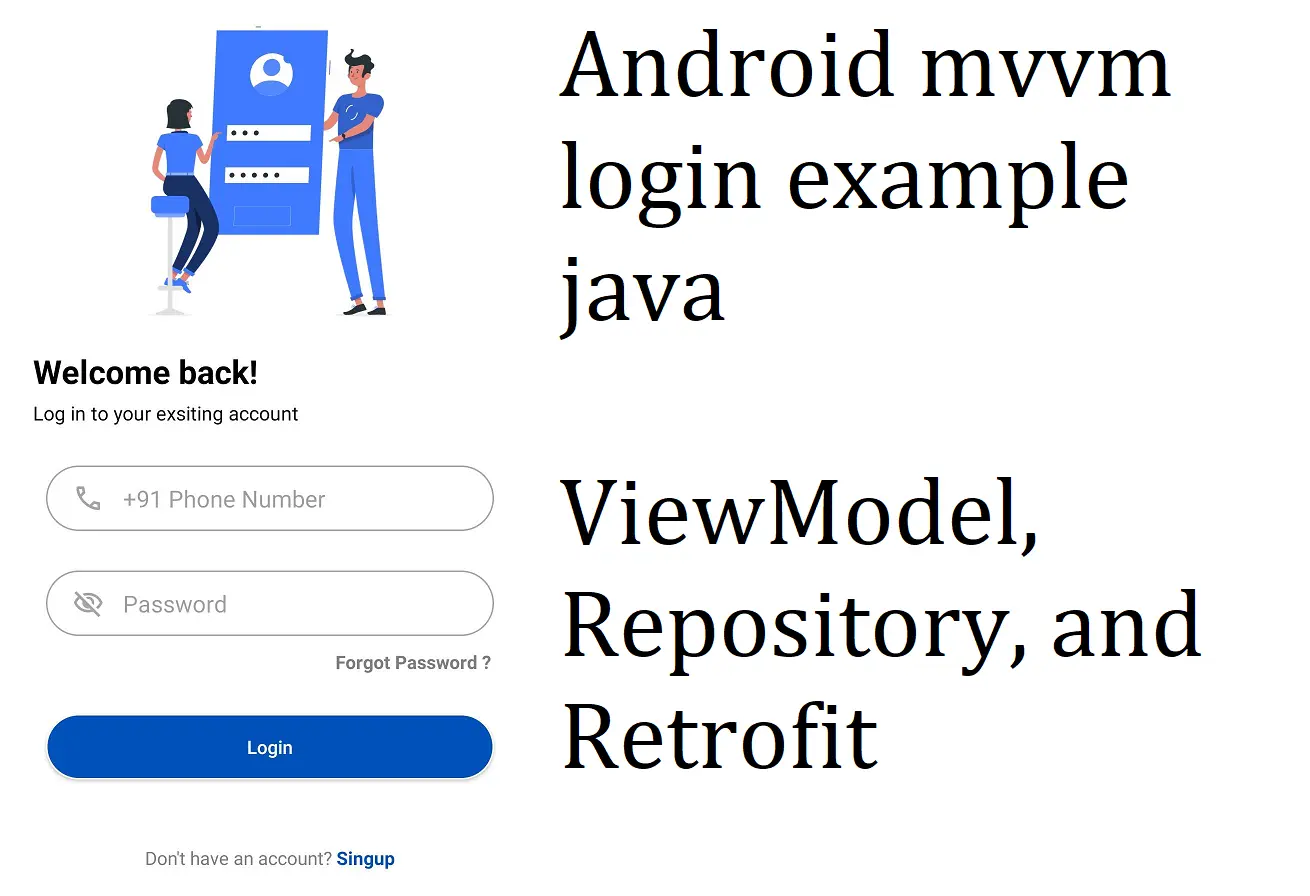
Android mvvm login example java.
So Let’s Start to Create an Android project with Java language. In this project i create a login screen and a post API request using with mvvm. So firstly add the dependency.
Step 1 : Add the following dependencies to your app’s build.gradle file:
dependencies {

    implementation 'androidx.appcompat:appcompat:1.6.1'
    implementation 'com.google.android.material:material:1.8.0'
    implementation 'androidx.constraintlayout:constraintlayout:2.1.4'
    implementation 'androidx.lifecycle:lifecycle-extensions:2.2.0'
    implementation 'com.squareup.retrofit2:retrofit:2.9.0'
    implementation 'com.squareup.retrofit2:converter-gson:2.9.0'
    implementation 'com.github.joielechong:countrycodepicker:2.4.2'
    testImplementation 'junit:junit:4.13.2'
    androidTestImplementation 'androidx.test.ext:junit:1.1.5'
    androidTestImplementation 'androidx.test.espresso:espresso-core:3.5.1'
}
After add dependencies sync your project. next steps lets create a login screen UI design.
Step 2: – login_activity.xml file UI design code.
<?xml version="1.0" encoding="utf-8"?>
<LinearLayout xmlns:android="http://schemas.android.com/apk/res/android"
    xmlns:tools="http://schemas.android.com/tools"
    android:layout_width="match_parent"
    android:layout_height="match_parent"
    xmlns:app="http://schemas.android.com/apk/res-auto"
    android:orientation="vertical"
    android:background="@color/blue"
    tools:context=".activity.LoginActivity">

    <ImageView
        android:layout_width="match_parent"
        android:layout_height="0dp"
        android:layout_marginTop="20dp"
        android:layout_weight="0.8"
        android:src="@drawable/login_screen_top_image"/>

    <LinearLayout
        android:layout_width="match_parent"
        android:layout_height="0dp"
        android:layout_weight="2"
        android:paddingLeft="25dp"
        android:gravity="bottom"
        android:layout_gravity="bottom"
        android:paddingRight="25dp"
        android:paddingBottom="20dp"
        android:orientation="vertical">
        <TextView
            android:layout_width="match_parent"
            android:layout_height="wrap_content"
            android:layout_marginTop="15dp"
            android:text="@string/welcome_text"
            android:textColor="@color/white"
            android:textStyle="bold"
            android:textSize="@dimen/title_text"/>
        <TextView
            android:layout_width="match_parent"
            android:layout_height="wrap_content"
            android:layout_marginTop="5dp"
            android:text="@string/login_tegline"
            android:textColor="@color/white"
            android:textSize="@dimen/body_text"
            />

        <LinearLayout
            android:id="@+id/llPhone"
            android:layout_width="match_parent"
            android:layout_height="wrap_content"
            android:orientation="horizontal"
            android:layout_marginLeft="10dp"
            android:layout_marginTop="30dp"
            android:paddingLeft="10dp"
            android:layout_marginRight="10dp"
            android:background="@drawable/edit_text"
            android:gravity="center_vertical"
            >

            <com.rilixtech.widget.countrycodepicker.CountryCodePicker
                android:id="@+id/ccp"
                android:layout_width="wrap_content"
                android:layout_height="wrap_content"
                android:layout_centerInParent="true"
                app:ccp_hideNameCode="false"
                app:ccp_hidePhoneCode="false"
                app:ccp_defaultNameCode="in"
                app:ccp_keyboardAutoPopOnSearch="false"
                app:ccp_showFullName="false"
                />

            <EditText
                android:id="@+id/et_phone"
                android:layout_width="match_parent"
                android:layout_height="50dp"
                android:drawableTint="@color/grey2"
                android:maxLength="10"
                android:background="@android:color/transparent"
                android:textColor="@color/grey4"
                android:inputType="number"
                android:hint="Phone Number"/>

        </LinearLayout>


        <EditText
            android:id="@+id/et_Password"
            android:layout_width="match_parent"
            android:layout_height="50dp"
            android:layout_marginTop="20dp"
            android:inputType="textPassword"
            android:textColor="@color/grey4"
            android:layout_marginLeft="10dp"
            android:layout_marginRight="10dp"
            android:drawableTint="@color/grey2"
            android:drawableLeft="@drawable/visibility_off_icons"
            android:drawablePadding="10dp"
            android:paddingLeft="20dp"
            android:background="@drawable/edit_text"
            android:hint=" Password"/>

        <TextView
            android:id="@+id/tv_forgot_psd"
            android:layout_width="match_parent"
            android:layout_height="wrap_content"
            android:text="@string/forgotpass"
            android:layout_marginRight="12dp"
            android:layout_marginTop="10dp"
            android:gravity="right"
            android:textSize="@dimen/body_text"
            android:textColor="@color/white"
            android:textStyle="bold"/>

        <androidx.appcompat.widget.AppCompatButton
            android:id="@+id/LoginButton"
            android:layout_width="match_parent"
            android:layout_height="50dp"
            android:text="@string/loginbtn"
            android:textAllCaps="false"
            android:layout_marginLeft="10dp"
            android:layout_marginRight="10dp"
            android:layout_marginTop="30dp"
            android:textSize="@dimen/text_btn"
            android:background="@drawable/edit_text"
            android:textColor="@color/colorPrimary"
            />

        <LinearLayout
            android:layout_width="match_parent"
            android:layout_height="wrap_content"
            android:gravity="center"
            android:layout_marginTop="10dp"
            android:layout_gravity="bottom"
            android:orientation="horizontal">

            <TextView
                android:layout_width="wrap_content"
                android:layout_height="wrap_content"
                android:text="Don't have an account? "
                android:gravity="center"
                android:textSize="@dimen/body_text"
                android:textColor="@color/white" />
            <TextView
                android:id="@+id/SingupBtn"
                android:layout_width="wrap_content"
                android:layout_height="wrap_content"
                android:text="Singup"
                android:gravity="center"
                android:textSize="@dimen/body_text"
                android:textColor="@color/white"
                android:textStyle="bold"/>

        </LinearLayout>
    </LinearLayout>

</LinearLayout>
Step 3 Create a Drawable xml file edit_text for input file background UI .
<?xml version="1.0" encoding="utf-8"?>
<shape xmlns:android="http://schemas.android.com/apk/res/android">
    <solid android:color="@color/white"/>
    <stroke android:width="1dip" android:color="@color/grey2" />
    <corners android:radius="30dip"/>
    <padding android:left="0dip" android:top="0dip"
        android:right="0dip" android:bottom="0dip" />
</shape>
Step 4: MainActivity.java Class Code.
import static android.content.ContentValues.TAG;

import androidx.annotation.NonNull;
import androidx.appcompat.app.AppCompatActivity;
import androidx.lifecycle.ViewModelProvider;

import android.app.ProgressDialog;
import android.content.Intent;
import android.net.Uri;
import android.os.Bundle;
import android.util.Log;
import android.view.View;
import android.widget.Button;
import android.widget.EditText;
import android.widget.TextView;
import android.widget.Toast;
import com.rilixtech.widget.countrycodepicker.Country;
import com.rilixtech.widget.countrycodepicker.CountryCodePicker;


import java.util.List;
import java.util.regex.Pattern;

public class LoginActivity extends AppCompatActivity implements View.OnClickListener {

    Button LoginButton;
    TextView SingupBtn,tvForgotPsd;
    LoginViewModel loginViewModel;
    EditText et_phone, et_Password;
    CountryCodePicker ccp;
    private ProgressDialog dialog;


    @Override
    protected void onCreate(Bundle savedInstanceState) {
        super.onCreate(savedInstanceState);
        setContentView(R.layout.activity_login);
        loginViewModel = new ViewModelProvider(this).get(LoginViewModel.class);
        FindViewById();

    }


    public void FindViewById(){
        tvForgotPsd =findViewById(R.id.tv_forgot_psd);
        SingupBtn = findViewById(R.id.SingupBtn);
        LoginButton =  findViewById(R.id.LoginButton);
        tvForgotPsd.setOnClickListener(this);
        SingupBtn.setOnClickListener(this);
        LoginButton.setOnClickListener(this);
        et_phone = findViewById(R.id.et_phone);
        et_Password = findViewById(R.id.et_Password);
        ccp = findViewById(R.id.ccp);
//        ccp.registerPhoneNumberTextView(et_phone);
        ccp.setOnCountryChangeListener(new CountryCodePicker.OnCountryChangeListener() {
            @Override
            public void onCountrySelected(Country selectedCountry) {
                Toast.makeText(LoginActivity.this, "Updated " + selectedCountry.getPhoneCode(), Toast.LENGTH_SHORT).show();

            }

        });

    }


    @Override
    public void onClick(View v) {
        switch (v.getId()){
            case R.id.tv_forgot_psd:


                break;
            case R.id.LoginButton:
                Validation();

                break;
            case  R.id.SingupBtn:

                break;
            default:
                break;

        }
    }


    public void Validation(){
       String Mobile =  et_phone.getText().toString();
        String Password = et_Password.getText().toString();
        String CountryCode = ccp.getSelectedCountryCode();
        String MobileNumber = "+"+CountryCode+"-"+Mobile;
        if (!Utils.isValidPhoneNumber(Mobile)){
            Toast.makeText(this,"Please enter a valid mobile number", Toast.LENGTH_LONG).show();
        }else if(!Utils.isValidPassword(Password)){
            Toast.makeText(this,"Please enter a valid Password", Toast.LENGTH_LONG).show();
        }else {
            userLogin(MobileNumber,Password);
        }

    }


    private void userLogin(String Mobile, String Password) {
        dialog = new ProgressDialog(this);
        LoginRequest loginRequest = new LoginRequest();
        loginRequest.setPhone(Mobile);
        loginRequest.setPassword(Utils.MD5(Password));
        dialog.setMessage("Please wait........");
        dialog.show();
        loginViewModel.getLoginResponseLiveData(this,loginRequest).observe(this, loginResponse -> {
            if (loginResponse != null) {
                dialog.dismiss();
                Intent Login = new Intent(LoginActivity.this, HomeActivity.class);
                startActivity(Login);
                overridePendingTransition(R.anim.left_slide, R.anim.right_slide);
                finish();
            }else {
                Toast.makeText(this,"Invalid phone No & password Please try with  ", Toast.LENGTH_LONG).show();
                dialog.dismiss();
            }
        });

    }
}
Step 5: Create a Folder With Name View_Model
in the View_Model folder you can create a new java file with the name LoginViewModel. And follow below setep. in your view model class create a method for API call for repository.
import android.app.Application;
import android.content.Context;

import androidx.annotation.NonNull;
import androidx.lifecycle.AndroidViewModel;
import androidx.lifecycle.LiveData;


public class LoginViewModel extends AndroidViewModel {

    private UserRepository userRepository;
    private LiveData<LoginResponse> loginResponseLiveData ;

    public LoginViewModel(@NonNull Application application) {
        super(application);
        userRepository = new UserRepository();

    }


    public LiveData<LoginResponse> getLoginResponseLiveData(Context context, LoginRequest loginRequest) {
        loginResponseLiveData = null;
        if(loginResponseLiveData==null){
            this.loginResponseLiveData = userRepository.PostUserLogin(context,loginRequest);
        }

        return loginResponseLiveData;
    }

}
Step 6 : Create a Folder Name Repository and In Repository create java file with the name UserRepository.
import android.app.Application;
import android.content.Context;
import android.util.Log;
import android.widget.Toast;

import androidx.lifecycle.LiveData;
import androidx.lifecycle.MutableLiveData;

import com.google.gson.Gson;

import java.util.List;

import retrofit2.Call;
import retrofit2.Callback;
import retrofit2.Response;
import retrofit2.http.Header;

public class UserRepository {

    private static final String TAG = UserRepository.class.getSimpleName();
    private ApiRequest apiRequest;

    Context context;
    public UserRepository() {
        apiRequest = RetrofitRequest.getRetrofitInstance().create(ApiRequest.class);


    public LiveData<LoginResponse> PostUserLogin(Context context,LoginRequest loginRequest) {

        Log.d(TAG, "Request:: " + new Gson().toJson(loginRequest));
        final MutableLiveData<LoginResponse> data = new MutableLiveData<>();
        apiRequest.UserLogin(loginRequest)
                .enqueue(new Callback<LoginResponse>() {
                    @Override
                    public void onResponse(Call<LoginResponse> call, Response<LoginResponse> response) {
                        Log.d(TAG, "onResponse response:: " + response);


                        if (response.code()==200) {

                            data.postValue(response.body());
                            Log.d(TAG, "LoginWith Password:-  " + response.body());

                            Log.d(TAG, "Request:: " + new Gson().toJson(response.body()));

                        }else {
                            data.postValue(response.body());
                            Log.d(TAG, "erroro:: "+ response.code());
                        }
                    }

                    @Override
                    public void onFailure(Call<LoginResponse> call, Throwable t) {
                        data.postValue(null);
                    }
                });
        return data;
    }
}
Step 7: Create a Response Model Class.
import com.google.gson.annotations.Expose;
import com.google.gson.annotations.SerializedName;

import java.util.List;

public class LoginResponse {


    @SerializedName("id")
    @Expose
    private String id;

    @SerializedName("phone")
    @Expose
    private String phone;

    @SerializedName("name")
    @Expose
    private String name;


    public String getId() {
        return id;
    }

    public void setId(String id) {
        this.id = id;
    }

    public String getPhone() {
        return phone;
    }

    public void setPhone(String phone) {
        this.phone = phone;
    }

    public String getName() {
        return name;
    }

    public void setName(String name) {
        this.name = name;
    }


}
Step 8 :- Create a Retrofit Folder and in folder create java class with name RetrofitRequest & ApiRequest
RetrofitRequest
import retrofit2.Retrofit;
import retrofit2.converter.gson.GsonConverterFactory;

public class RetrofitRequest {

    private static Retrofit retrofit;
    private static Retrofit retrofitPlant;


    public static Retrofit getRetrofitInstance() {
        if (retrofit == null) {
            retrofit = new retrofit2.Retrofit.Builder()
                    .baseUrl(BASE_URL)
                    .addConverterFactory(GsonConverterFactory.create())
                    .build();
        }
        return retrofit;
    }

    public static Retrofit getRetrofitPlant() {
        if (retrofitPlant == null) {
            retrofitPlant = new retrofit2.Retrofit.Builder()
                    .baseUrl(BASE_URL1)
                    .addConverterFactory(GsonConverterFactory.create())
                    .build();
        }
        return retrofitPlant;
    }
}
ApiRequest
import retrofit2.Call;
import retrofit2.Response;
import retrofit2.http.Body;
import retrofit2.http.GET;
import retrofit2.http.Header;
import retrofit2.http.Headers;
import retrofit2.http.POST;
import retrofit2.http.Path;
import retrofit2.http.Query;

public interface ApiRequest {

    @POST("v1/users/login")
    Call<LoginResponse> UserLogin(
            @Body LoginRequest LoginRequest);

}
Run your App and Check
Read More Tutorial


