
Hi, Android developer in this article we learn about the android ci cd pipeline and its process. How To Implement CI CD For Android App Development. So that let’s start with a question, As an Android developer how much time do you make deploying an APK for someone to test?
Let’s divide the whole procedure into smaller steps and be able to comprehend the process.
- There are three environments that are Development, Staging, and Release. Based on the environment we build, we need to generate change backend URLsfor change, firebase files, and other dependencies that differ according to the environment.
- Compile it, create APK.
- Upload APK to a third-party distribution (e.g Google drive, Firebase distribution).
- Inform testers via announcements to let them know that your build is available to be tested.
It is a tedious and tiring task that requires much time and energy each and every moment you wish to accomplish it. Automatization can help us make our lives easier. It is possible to automate the manual procedure and eliminate the time-consuming issue. With CI/CD, we can do this. But, hey!
What Is CI CD pipeline?
Let me explain what is CI CD is in a nutshell?
The abbreviation CI CD stands for Continuous Integration, Continuous Delivery, or Continuous Deployment.
Continuous Integration(CI):-
ci is a development method that requires very programmers to use this flow of sources into a shared repository regularly. Every check-in(commit) is checked with an automated build, which helps the team identify the issue early and resolve issues swiftly.
Continuous Delivery(CD) is the capability to bring modifications of all kinds–including new features, changes to configurations, or bug fixes tests–to production or into people’s hands securely and swiftly in a sustainable manner.
I’m going to present my CI CD implementation for Android. It is comprised of four steps.
1. Environment Setup: I’ve mentioned earlier, there are three different environments, in order to automate this, we’ll be able to be aware of what changes we will need to create.
2. Firebase Installation: Firebase has an app distribution service that makes the process of distributing your apps to testers easy. You’ll get feedback from the beginning when your apps are delivered quick access to testers’ devices.
3. Fastlane: Fastlane is an open-source platform that aims to simplify Android as well as iOS deployment. Fastlane can automate all aspects of the development and release process.
4. Jenkins is a free open-source industrialization server that is able to achieve Continuous Integration and Continuous Delivery development.
Do I Know How To Do CI CD process in Android?
Environment Configuration:
What is the reason we’ve got three distinct API environments?
Separate API environments for testing, development, and production, each is built with its own database, code-base, and various backend services. This lets developers continue working and making adjustments even when the application is in testing mode. This also makes sure that (beta) testing users don’t cause damage to databases used for production.
My need from my environment is to have multiple backends and various firebase projects. Additionally, I would like to install three different apps on my mobile at the same time. This way, I can keep track of the capabilities and testers can distinguish between different versions.
To distinguish builds, we can identify our app as “DEV APPNAME”, “STAG APPNAME”, “APPNAME”.
1. Create property files
Create an entirely New directory “Config” and inside that create three property files-
- development. properties
- staging. properties
- release.properties
The function of the files is to keep constant variables that change between different environments, such as BASE_URL, S3 BUCKET_URL AWS credentials, and so on. In our scenario, we have several names for apps, as well as various app IDs. We’ll keep all the properties in these files.
As you can see, I have declared 3 variables in a properties file, APPNAME, APPLICATION_ID_SUFFIX, API_URL.
Now, we’ll need to access these variables inside Gradle as well as inside the code. To access this variable in Gradle we need to write a function that loads the variables in a property file. Include this function at end of the app/build.Gradle
def getProps(path)
The above program uses the path to the property file then loads the properties.
We now need to define these properties so they can be read by the code.
At the time of building when the build is completed, Gradle creates the BuildConfig class so that your application program can examine details about the present build. You can add custom fields to the BuildConfig class by importing the Gradle Build Configuration file by using BuildConfigField() method, and then using those fields in your app’s runtime script.
Now we want to set APPNAME and APPLICATION_ID_SUFFIX and CONSTANTs according to build type. Therefore, add or replace the build type block using the following code in app/build.Gradle
buildTypes {

       release {

           minifyEnabled false

           proguardFiles getDefaultProguardFile('proguard-android-optimize.txt'), 'proguard-rules.pro'

           ext.config = getProps('../config/release.properties')

           ext.config.each { p ->

               if(p.key == "your app name "){

                   resValue "string","app_name", p.value

               }

               else if(p.key=="APPLICATION_ID_SUFFIX"){

                   applicationIdSuffix p.value

               }else

                   buildConfigField 'String', p.key, p.value

           }


       }

       staging {

           minifyEnabled false

           proguardFiles getDefaultProguardFile('proguard-android-optimize.txt'), 'proguard-rules.pro'


           ext.config = getProps('../config/staging.properties')

           ext.config.each { p ->

               if (p.key == "you app name") {

                   resValue "string", "app_name", p.value.replace('"', '')

               } else if (p.key == "APPLICATION_ID_SUFFIX") {

                   applicationIdSuffix p.value

               } else {

                   buildConfigField 'String', p.key, p.value

               }

           }

       }

       debug {

           minifyEnabled false

           proguardFiles getDefaultProguardFile('proguard-android.txt'), 'proguard-rules.pro'

           ext.config = getProps('../config/development.properties')

           ext.config.each { p ->

               if (p.key == "you app anem ") {

                   resValue "string", "app_name", p.value

               } else if (p.key == "APPLICATION_ID_SUFFIX") {

                   applicationIdSuffix p.value

               } else

                   buildConfigField 'String', p.key, p.value


           }

       }

   }
Learn more information about types of build.
Now we are setting the app name from the Gradle so we have to delete the pre-created app name string variable from the app/src/main/res/values/strings.xml file.
2. An Easy way to Make CI/CD Build Variants in Android.
Just make a package in your App base build Gradle. And change your app type like Dev, stage for build variants. Like the below example.
Step 1: – Add Package for all Types.
 flavorDimensions "flavor"

    productFlavors {
        production {
            applicationId "com.codeplayon.fitness"
            versionName "2.0.0"
            versionCode 5
            resValue "string", "app_name", "Kids Fitness"

        }
        stage {
            applicationId "com.Codeplayon.Fitness.stageapp"
            versionName "3.0.0"
            versionCode 10
            resValue "string", "app_name", "Stage Kids Fitness"
        }
        dev {
            applicationId "com.codeplayon.Fitness.devapp"
            versionName "5.0.1"
            versionCode 15
            resValue "string", "app_name", "Dev Kids Fitness"
        }
    }
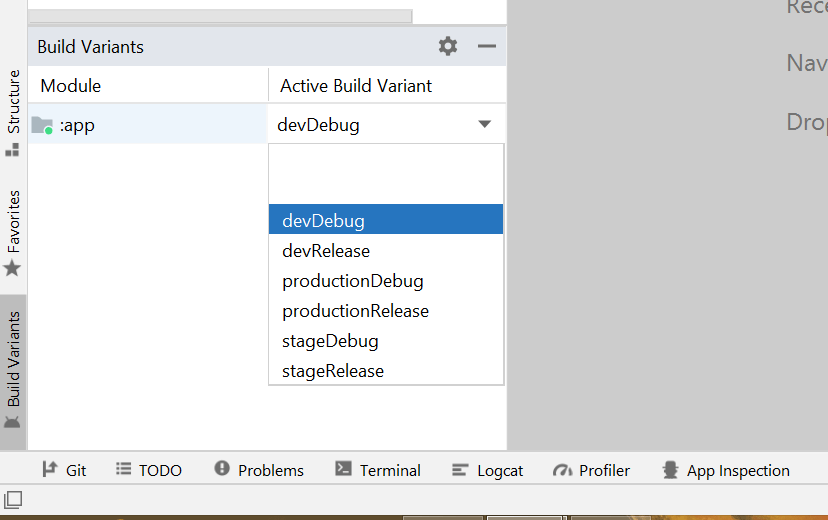
Step 2 Change Build Variants of your app.
In the left bottom corner of your android studio click on the Build Variants tab select you build type you want to make like dev, stage, Prod. See in Image.
Firebase CI CD Tools:
To make the app available to test There are several distribution service providers on the market. We will utilize the firebase application distribution services. This service allows us to handle distributions and versions that the application runs.
Firebase App Distribution makes distributing your applications to trusted testers a breeze. When you get your app on the devices of your testers quickly, you will receive quick and frequent feedback.
The steps to set up firebase:
1. Create a firebase project
There are 3 applications for three different environments, so you can create 3 different projects. Be sure to input the app ID.
For development => com.appname.dev
To stage a stage => com.appname.staging
For release = com.appname
2. Enable Firebase application distribution service for all your apps.
3. Copy App ID.
4. If you’re using any other service offered by firebase, such as firestore that needs googleservices.json file, download it.
In this particular case, there are three googleservices.json files to accommodate different environments. To ensure this, android offers an easy directory structure. This google-services.json file is usually stored within the directory app/ (at in the middle of the Android Studio app module). Since version 2.2.0 this plugin can support builds with a build type and product flavor-specific JSON files.
// the debug and stage and release are the three flavors of Google's product. app/ src/debug/google-services.json src/staging/google-services.json src/release/google-services.json ....
Recommend Reading:
How Is Fastlane? ci cd pipeline.
Fastlane is described as the simplest method to create and release the apps you have created for iOS and Android applications, using the use of a set of tools that work independently or in tandem to complete tasks on Android like:
- Generating the build
- Enter APK with Keystore
- Firebase upload distribution
- Notify Testers
Now that we are aware of What Fastlane is and the reason it’s being utilized? Now let’s look at what you can do with Fastlane?
Install Fastlane ci cd process.
There are a variety of methods to set up Fastlane. You can pick any of them.
Starting using the fastlane on iOS
After you have successfully installed Fastlane. First, we will initialize Fastlane.
$ cd project_root $ fastlane init
It will create it to create a Gemfile as well as a Fastlane folder inside the root.
It is based on simple guidelines that are laid out in the fastfile. After you’ve established Fastlane along with Your Fastfile is created, you can connect the App Distribution into Your Fastlane configuration. The Fastfile must be located in the ./fastlane directory.
To include App Distribution into Your Fastlane configuration, you must run the following script from within your Android project:
$ fastlane add_plugin firebase_app_distribution
./fastlane/Fastfile
default_platform(:android)
platform :android do
 desc "Generate build and upload to firebase"
 lane :build do
   slack_send(':crossed_fingers: Generating '+ENV['BUILD_TYPE']+' build')
   gradle(
     task: "assemble",
     build_type: ENV['BUILD_TYPE'],
     properties: {
       "android.injected.signing.store.file" => ENV['KEYSTORE_FILE'],
       "android.injected.signing.store.password" => ENV['KEYSTORE_PASS'],
       "android.injected.signing.key.alias" => ENV['KEY_ALIAS'],
       "android.injected.signing.key.password" => ENV['KEY_PASS'],
     }
   )
   slack_send(ENV['BUILD_TYPE']+' Build Successfully completed...:star-struck: \n Uploading to Firebase')
   firebase_app_distribution(
     app: ENV["FIREBASE_APP_ID"],
     release_notes_file: "releaseNotes.txt",
     groups: "Internal",
     firebase_cli_token: ENV['FIREBASE_CI_TOKEN'],
     debug: false
   )
   slack_send(':tada: Hooooooorrrayyyyy!!! '+ENV['BUILD_TYPE']+' Build is successfully uploaded on Firebase  Distribution!! :dancer::man_dancing:')
  end
end

def slack_send(msg)
    slack(
      message: msg,
      success: true,
      channel: '#'+ENV['CHANNEL'],
      default_payloads: []
    )
end
Fastlane's buildlane will compile and then sign APK file using Keystore notifying its status to Slack, and it will upload to the firebase app distribution.
You will notice that we have used the environment variable within Fastfile. These variables can be exported, or use the file for environment variables during the run of Fastlane.
Let’s include environment variable files. We’ll use this Fastfile for different environments.
Create environment variable file for development
./fastlane/.env.development
BUILD_TYPE=Debug
KEYSTORE_FILE = "CICDDemoAppDev.jks"
KEYSTORE_PASS = "CICDApp@123"
KEY_ALIAS = "CICDDemoApp"
KEY_PASS="CICDApp@123"

FIREBASE_APP_ID="1:304151838b3434a0491c"
FIREBASE_CI_TOKEN="1//0gPzWx8kEFjOjfdefefetU1VbDIxLq78"
CHANNEL="jenkins"
SLACK_URL="https://hooks.slack.com/services/T04PdMmD45d"
We will use the same variables for release and staging. Only the build type keys, build type, and Firebase app ID variables will be altered to accommodate different environments.
The name of the channel, Firebase token, and the slack URL will be identical.
./fastlane/.env.staging
BUILD_TYPE=Staging
KEYSTORE_FILE = "CICDAppStag.jks"
KEYSTORE_PASS = "CICDApp@123"
KEY_ALIAS = "CICDDemoApp"
KEY_PASS="CICDApp@123"

FIREBASE_APP_ID="1:8b333a03445c30415183"
FIREBASE_CI_TOKEN="1//0gPzWx8kEFjgKAdgyhfgtU1VbDIxLq78"
CHANNEL="jenkins"
SLACK_URL="https://hooks.slack.com/services/T04PdgfDa3s5"
./fastlane/.env.master
BUILD_TYPE=Release
KEYSTORE_FILE = "CICDDemoAPp.jks"
KEYSTORE_PASS = "CICDApp@123"
KEY_ALIAS = "CICDDemoApp"
KEY_PASS="CICDApp@123"

FIREBASE_APP_ID="1:151838b333a45635c304"
FIREBASE_CI_TOKEN="1//0gPzWx8kEFjferfsfSnvtU1VbDIxLq78"
CHANNEL="jenkins"
SLACK_URL="https://hooks.slack.com/services/T0dddMmDa3s5"
You can test this build on a Fastlane,
$ fastlane android build --env <env-file>
Eg:
$ fastlane android build --env development
What is Jenkins? What Can We Do With It? ci cd meaning.
Jenkins(r) is an open-source and free automatization server. With Jenkins, companies can speed up the process of developing software through automation. Jenkins oversees and manages software delivery processes across the entire lifecycle of the software, including build document, test package, stage deployment, static analysis of code, and more.
It is possible to set up Jenkins to monitor any changes to code in sites such as GitHub, Bitbucket, or GitLab and then automatically build using tools like Maven as well as Gradle. Container technology can be utilized like Docker and Kubernetes to start tests, and then perform actions such as rolling back or forward in production.
What is The Jenkins Pipeline?
Jenkins Pipeline (or simply “Pipeline”) is a collection of plug-ins that help in the integration of continuously delivered pipelines in Jenkins.
Continuous delivery pipelines are an automated description of your procedure for delivering the software you need from your version control all the way to your users and your customers.
It is possible to write a single text file that can define various phases of the process, which can then be committed to the source control repository of the project. This is the foundation for “Pipeline-as-code”; treating the CD pipeline as a component of the program to be reviewed and versioned as every other code.
Jenkinsfile is a Jenkinsfile that can be written in two kinds of syntax
- Declarative
- scripted
A declarative Pipeline is a new option of Jenkins Pipeline that:
- It has more advanced syntactical features than Scripted Pipeline syntax, and is made to assist in writing and reading Pipeline code simpler
To make an Android build we must install the Android SDK, Fastlane on the Jenkins agent. To prevent this we will be using containers that run Jenkins. Jenkins pipeline.
- Docker container contains three SDKs: android SDK, git Fastlane, Android SDK
Let’s write Pipeline using code
Create a Jenkinsfile within the root directory. Paste the following code.
slack_channel = 'android-ci-cd'

pipeline
{
    agent{
        docker{
            image 'mindbowser/android-30-sdk:1.0'
            args '-u root:root'
        }
    }
    stages{
        stage('Init')
        {
            //check git commit message contains "skip ci" if found don't run the pipeline

            steps {
                script {

                    lastCommitInfo = sh(script: "git log -1", returnStdout: true).trim()

                    commitContainsSkip = sh(script: "git log -1 | grep 'skip ci'", returnStatus: true)

                    slackMessage = "*${env.JOB_NAME}* *${env.BRANCH_NAME}* received a new commit. \nHere is commmit info: ${lastCommitInfo}\n*Console Output*: <${BUILD_URL}/console | (Open)>"

                    slack_send(slackMessage)

                    if(commitContainsSkip == 0) {
                        skippingText = " Skipping Build for *${env.BRANCH_NAME}* branch."
                        currentBuild.result = 'ABORTED'
                        slack_send(skippingText,"warning")
                        error('BUILD SKIPPED')
                    }
                }
            }
        }
        stage('build')
        {
            // call fastlane lane for generate apk and uploading to testflight
                 steps{

                    sh "chmod +x gradlew"

                    sh "chmod +x Gemfile"

                    sh "fastlane build --env ${env.BRANCH_NAME}"    //eg. fastlane build --env development
                }
        }

    }
    post {
        always {
            // delete the workspace

            sh "chmod -R 777 ."

            deleteDir()
        }
        success{

             slack_send("Jenkins job  for *${env.BRANCH_NAME}* completed successfully. ","#0066ff")
        }
        aborted{
            slack_send("Jenkins job  for *${env.BRANCH_NAME}* Skipped/Aborted.","warning")
        }
        failure {

          slack_send("*${env.BRANCH_NAME}* Something went wrong.Build failed. Check here: Console Output*: <${BUILD_URL}/console | (Open)>","danger")
        }
    }

}

def slack_send(slackMessage,messageColor="good")
{
    slackSend channel: slack_channel , color: messageColor, message: slackMessage
}
The above file contains two-stage:
In the first stage we check the commit message, if it contains ‘skip ci’ then the Jenkins job is aborted.
The next stage is the build stage, which we call Fastlane to build a lane that will generate and distribute the app according to the branch.