Android Navigation Drawer Example Tutorial
Hiiii everyone, here is another tutorial for one of the most common things in any android application, navigation drawer. So in this Android Navigation Drawer Example, you will learn how you can use the Android Navigation Drawer easy way.
Step 1 : First one to Start Android Studio
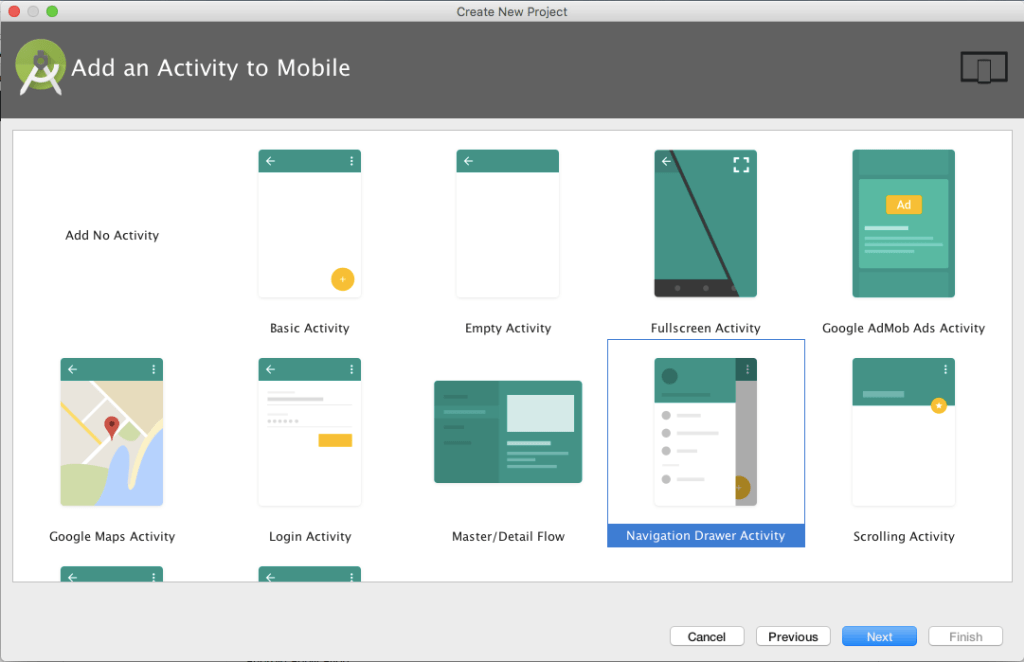
Step 2 : Seconds step to Create a New Project Project ClickOn ==> File ==> NEW ==> New Project
- If you want to add Navigation Drawer Activity to your existing project you can simply add it by going to your package -> right click -> new -> activity -> navigation drawer activity
- Now you can change the menus given in the drawer to whatever you want. To change the menu open the activity_home_drawer.xml inside menu folder.
<?xml version="1.0" encoding="utf-8"?>
<menu xmlns:android="http://schemas.android.com/apk/res/android">

    <group android:checkableBehavior="single">
        <item
            android:id="@+id/nav_Profile"
            android:icon="@drawable/ic_perm_identity_white_24dp"
            android:title="Profile" />
        <item
            android:id="@+id/nav_Cart"
            android:icon="@drawable/ic_add_shopping_cart_white_24dp"
            android:title="Cart" />
        <item
            android:id="@+id/nav_Order"
            android:icon="@drawable/ic_work_white_24dp"
            android:title="Order History" />
        <item
            android:id="@+id/nav_about"
            android:icon="@drawable/ic_speaker_notes_white_48dp"
            android:title="about" />
    </group>

    <item android:title="Communicate">
        <menu>
            <item
                android:id="@+id/nav_Change_Password"
                android:icon="@drawable/ic_lock_outline_white_24dp"
                android:title="Change Password" />
            <item
                android:id="@+id/nav_Logout"
                android:icon="@drawable/shutdown"
                android:title="Log out" />
        </menu>
    </item>

</menu>
Step 4 Open Your Home.java file and add this code.
public class Home extends AppCompatActivity implements NavigationView.OnNavigationItemSelectedListener{
@Override
    protected void onCreate(Bundle savedInstanceState) {
        super.onCreate(savedInstanceState);
        setContentView(R.layout.activity_home);

        Toolbar toolbar = (Toolbar) findViewById(R.id.toolbar);
        setSupportActionBar(toolbar);
        DrawerLayout drawer = (DrawerLayout) findViewById(R.id.drawer_layout);
        ActionBarDrawerToggle toggle = new ActionBarDrawerToggle(
                this, drawer, toolbar, R.string.navigation_drawer_open, R.string.navigation_drawer_close);
        drawer.setDrawerListener(toggle);
        toggle.syncState();
        NavigationView navigationView = (NavigationView) findViewById(R.id.nav_view);
        navigationView.setNavigationItemSelectedListener(this);
    }
@Override
    public void onBackPressed() {
        DrawerLayout drawer = (DrawerLayout) findViewById(R.id.drawer_layout);
        if (drawer.isDrawerOpen(GravityCompat.START)) {
            drawer.closeDrawer(GravityCompat.START);
        } else {
            super.onBackPressed();
        }
    }

    @Override
    public boolean onCreateOptionsMenu(Menu menu) {
        // Inflate the menu; this adds items to the action bar if it is present.
        getMenuInflater().inflate(R.menu.shopcart, menu);


        return true;
    }

    @Override
    public boolean onOptionsItemSelected(MenuItem item) {
        // Handle action bar item clicks here. The action bar will
        // automatically handle clicks on the Home/Up button, so long
        // as you specify a parent activity in AndroidManifest.xml.
        int id = item.getItemId();

        //noinspection SimplifiableIfStatement
//        if (id == R.id.action_settings) {
//            return true;
//        }

        return super.onOptionsItemSelected(item);
    }

    @SuppressWarnings("StatementWithEmptyBody")
    @Override
    public boolean onNavigationItemSelected(MenuItem item) {
        // Handle navigation view item clicks here.
        int id = item.getItemId();

        if (id == R.id.nav_Profile) {

        } else if (id == R.id.nav_Order) {


        } else if (id == R.id.nav_Cart) {


        } else if (id == R.id.nav_about) {


        } else if (id == R.id.nav_Change_Password) {


        } else if (id == R.id.nav_Logout) {

        }

        DrawerLayout drawer = (DrawerLayout) findViewById(R.id.drawer_layout);
        drawer.closeDrawer(GravityCompat.START);
        return true;
    }
Step 5: Open Your activity_home.XML file and add this code.
?xml version="1.0" encoding="utf-8"?>
<android.support.v4.widget.DrawerLayout xmlns:android="http://schemas.android.com/apk/res/android"
    xmlns:app="http://schemas.android.com/apk/res-auto"
    xmlns:tools="http://schemas.android.com/tools"
    android:id="@+id/drawer_layout"
    android:layout_width="match_parent"
    android:layout_height="match_parent"
    android:fitsSystemWindows="true"
    tools:openDrawer="start">

    <include
        layout="@layout/app_bar_home"
        android:layout_width="match_parent"
        android:layout_height="match_parent" />

    <android.support.design.widget.NavigationView
        android:id="@+id/nav_view"
        android:layout_width="150dp"
        android:layout_height="match_parent"
        android:layout_gravity="start"
        android:fitsSystemWindows="true"
        app:headerLayout="@layout/nav_header_home"
        app:menu="@menu/activity_home_drawer" />

</android.support.v4.widget.DrawerLayout>
Step 6: Open Your nav_header_home and add this code.
<?xml version="1.0" encoding="utf-8"?>
<LinearLayout xmlns:android="http://schemas.android.com/apk/res/android"
xmlns:app="http://schemas.android.com/apk/res-auto"
android:layout_width="match_parent"
android:layout_height="@dimen/nav_header_height"
android:background="@color/colorPrimary"
android:gravity="bottom"
android:orientation="vertical"
android:paddingBottom="@dimen/activity_vertical_margin"
android:paddingLeft="@dimen/activity_horizontal_margin"
android:paddingRight="@dimen/activity_horizontal_margin"
android:paddingTop="@dimen/activity_vertical_margin"
android:theme="@style/ThemeOverlay.AppCompat.Dark">

<ImageView
android:id="@+id/imageView"
android:layout_width="wrap_content"
android:layout_height="wrap_content"
android:paddingTop="@dimen/nav_header_vertical_spacing"
android:tint="@color/white"
app:srcCompat="@drawable/logo1" />

</LinearLayout>
Step 7: Open Your app_bar_home.XML file
<?xml version="1.0" encoding="utf-8"?>
<android.support.design.widget.CoordinatorLayout xmlns:android="http://schemas.android.com/apk/res/android"
    xmlns:app="http://schemas.android.com/apk/res-auto"
    xmlns:tools="http://schemas.android.com/tools"
    android:layout_width="match_parent"
    android:layout_height="match_parent"
    tools:context="rocareindia.com.restaurant.Home">

    <android.support.design.widget.AppBarLayout
        android:layout_width="match_parent"
        android:layout_height="wrap_content"
        android:theme="@style/AppTheme.AppBarOverlay">

        <android.support.v7.widget.Toolbar
            android:id="@+id/toolbar"
            android:layout_width="match_parent"
            app:layout_scrollFlags="scroll|enterAlways"
            android:layout_height="?attr/actionBarSize"
            android:background="?attr/colorPrimary"
            app:popupTheme="@style/AppTheme.PopupOverlay" />

    </android.support.design.widget.AppBarLayout>

    <include layout="@layout/content_home" />

    <android.support.design.widget.BottomNavigationView
        android:id="@+id/navigation"
        android:layout_width="match_parent"
        android:layout_height="wrap_content"
        android:layout_gravity="bottom|end"
        android:background="@color/colorPrimary"
        app:itemIconTint="@color/white"
        app:itemTextColor="@color/white"
        app:menu="@menu/bottom_navigation_items"/>

</android.support.design.widget.CoordinatorLayout>


