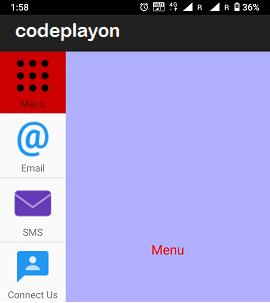
Hii everyone in this, Article I am sharing how to create a menu list using fragments in android. I am using two fragments in an activity and in Fragment A is show the Menu list. And Fragment B shows there product according to Menu.
Today market UI is one of the best parts for developing a good app for any platform. So today I am creating a UI for Android. Create a menu bar using fragments. and show a list of products according to the selected menu in Fragment B.
How to create a menu List using fragments in Android.
Let’s Start on Project and Do this UI for your Apps.
Step: 1 Create an Android Project with Empty Activity. First, of simple, you can start your android studio, And create a Project with an Empty activity.
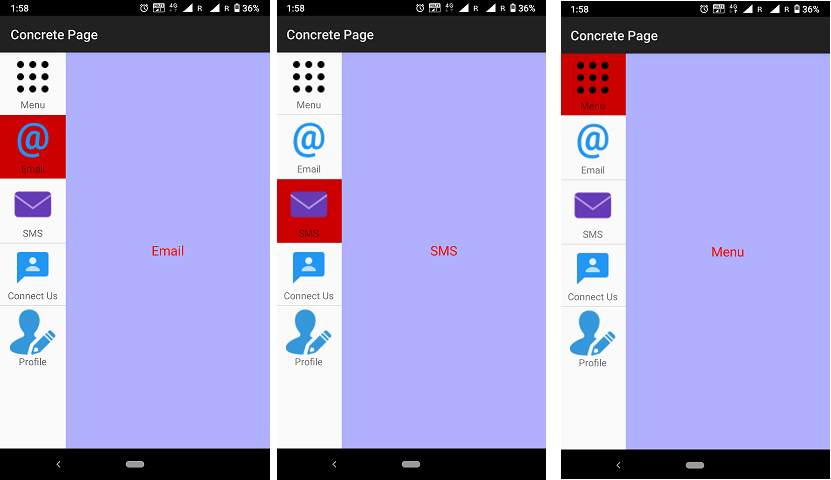
Step: 2 Create Two Fragment MenuList and OutputFragment. After complete syn your project you can create two fragments. One is for Show menu list and second other show output for according to the selected menu bar.
Step 3: MainActivity java code.
public class MainActivity extends FragmentActivity {

    @Override
    protected void onCreate(Bundle savedInstanceState) {
        super.onCreate(savedInstanceState);
        setContentView(R.layout.main);
    }
}
Step 4: main_activity.XML Source Code.
in your main Activity XML, you can add you, fragment class. and fragment.
<?xml version="1.0" encoding="utf-8"?>
<LinearLayout xmlns:android="http://schemas.android.com/apk/res/android"
    xmlns:tools="http://schemas.android.com/tools"
    android:layout_width="match_parent"
    android:layout_height="match_parent"
    android:orientation="horizontal" >
    <fragment
        android:layout_height="match_parent"
        android:layout_width="100dp"
        class="com.codeplayon.android.AlphabetListFragment"
        android:id="@+id/menu"/>
    <fragment
        android:layout_width="match_parent"
        android:layout_height="match_parent"
        class="com.codeplayon.android.OutputFragment"
        android:id="@+id/output"/>
</LinearLayout>
Step 5: MenuList Fragment XML file source code.
in your menu list fragment, you can add a list to show the menu with Image and Text.
<?xml version="1.0" encoding="utf-8"?>
<LinearLayout xmlns:android="http://schemas.android.com/apk/res/android"
android:orientation="vertical"
android:layout_width="match_parent"
android:layout_height="match_parent">
<ListView
android:layout_width="match_parent"
android:layout_height="wrap_content"
android:id="@android:id/list" />
</LinearLayout>
Step 6: MenuList Fragment Java Source code.
public class AlphabetListFragment extends ListFragment {
// Array of strings storing country names
String[] countries = new String[] {
"Menu",
"Email",
"SMS",
"Connect Us",
"Profile",
};
int[] flags = new int[]{
R.drawable.icons_menu,
R.drawable.icons_email,
R.drawable.icons_new_post,
R.drawable.icons_newtopic,
R.drawable.icons_registration,
};
String[] word = new String[]{"Menu", "Email", "SMS","Connect Us","Profile",};
@Override
public View onCreateView(LayoutInflater inflater,ViewGroup viewGroup, Bundle savedInstanceState) {
View view =inflater.inflate(R.layout.menu_fragment, viewGroup, false);

// Each row in the list stores country name, currency and flag
List<HashMap<String,String>> aList = new ArrayList<HashMap<String,String>>();
for(int i=0;i<5;i++){
HashMap<String, String> hm = new HashMap<String,String>();
hm.put("txt", countries[i]);
hm.put("flag", Integer.toString(flags[i]) );
aList.add(hm);
}

// Keys used in Hashmap
String[] from = { "flag","txt",};
// Ids of views in listview_layout
int[] to = { R.id.flag,R.id.txt,};

// Instantiating an adapter to store each items
// R.layout.listview_layout defines the layout of each item
SimpleAdapter adapter = new SimpleAdapter(getActivity().getBaseContext(), aList, R.layout.listview_layout, from, to);
setListAdapter(adapter);
return view;
}
@Override
public void onListItemClick(ListView listView, View view, int position, long id) {
OutputFragment txt = (OutputFragment)getFragmentManager().findFragmentById(R.id.output);
txt.display(word[position]);
getListView().setSelector(android.R.color.holo_red_dark);
}
}
Step: 7 Create a ListItemView XML and add this source code.
<?xml version="1.0" encoding="utf-8"?>
<LinearLayout xmlns:android="http://schemas.android.com/apk/res/android"
android:layout_width="match_parent"
android:layout_height="match_parent"
android:gravity="center"
android:padding="5dp"
android:orientation="vertical" >

<ImageView
android:id="@+id/flag"
android:layout_width="wrap_content"
android:layout_height="wrap_content" />
<TextView
android:id="@+id/txt"
android:layout_width="wrap_content"
android:layout_height="wrap_content"
android:textSize="15dp" />

</LinearLayout>
Step 8 Open your Output fragment XML and add this code.
<?xml version="1.0" encoding="utf-8"?>
<LinearLayout xmlns:android="http://schemas.android.com/apk/res/android"
android:orientation="vertical"
android:layout_width="match_parent"
android:gravity="center"
android:background="#b0b0ff"
android:layout_height="match_parent">
<TextView
android:layout_width="wrap_content"
android:layout_height="wrap_content"
android:layout_gravity="center"
android:textColor="#FF0000"
android:textSize="20sp"
android:id="@+id/word"/>
</LinearLayout>
Step: 9 Open your Output fragment java file and add this.
public class OutputFragment extends Fragment {
TextView output;
@Override
public View onCreateView(LayoutInflater inflater,ViewGroup viewGroup, Bundle savedInstanceState) {
View view = inflater.inflate(R.layout.output_fragment, viewGroup, false);
output= (TextView)view.findViewById(R.id.word);
return view;
}
public void display(String txt)
{
output.setText(txt);
}
}