Hi, Android developer in this article we learn about Razorpay payment gateway integration in android. And Also we learn what is a payment gateway how it’s working. To get more details about to Difference Payment Gateway vs Payment Processor
Table of Content:
- What is the payment gateway?
- Difference Payment Gateway vs Payment Processor
- Razorpay payment gateway integration in android
- Android SDK Integration – Razorpay Standard Checkout
- How To Integrate Razorpay In Android
- Its payment success response in Android
- Razorpay payment gateway integration in Java
- Android payment gateway integration
- Razorpay payment success response in Android
What is Payment Gateway?
Payment gateways are online payment services that, when connected to an E-commerce platform, serve as a channel for making and taking payments.
The process for receiving payments requires the client to provide certain information including credit/debit card information the expiry date, as well as CVV.
Following this, the client is able to pay and the money is transferred from the account of the buyer onto the seller’s (merchant’s) bank account.
What is Payment Gateway and is Role
The primary function of an internet-based payment processor is to authorize the process of transactions between the customers and merchants.
It plays an essential role in the process of online transactions and allows transactions between customers and merchants.
It allows the e-commerce platform to enhance its standing by providing a variety of payment options to its customers.
In addition, it leads to the e-commerce platform developing a reputation for bringing not just quick and secure transactions but also ease of use and success each time.
The payment gateway service could be offered by banks directly or a third-party payment service provider that is authorized by banks.
Difference Payment Gateway vs Payment Processor.
Once we have mastered the basics, let’s proceed to more specific. This is a quick overview of the differences between payment gateways and payment processors.
Payment processors facilitate transactions between two parties feasible.
But, a payment gateway (PG) captures the details of the payment made by the customer and sends this information back to the processor. Thereafter, the PG transmits the status of the transaction between the buyer and the seller. (the merchant)
Which one do I require Payment gateway vs. processor?
After we’ve gone over the basics of PG and PP, let’s go more deeply.
Do you need a PG and a permanent PP?
Razorpay payment gateway integration In Android :
- This article will discuss the payment gateways that we can use for Android, IOS, and Web.
- Here we make an example Razorpay Payment Gateway in Android.
- Razorpay SDK Integration.
Gradle
dependencies {

    implementation 'androidx.appcompat:appcompat:1.4.0'
    implementation 'com.google.android.material:material:1.4.0'
    implementation 'androidx.constraintlayout:constraintlayout:2.1.2'
    testImplementation 'junit:junit:4.+'
    implementation'com.razorpay:checkout:1.6.9'
    androidTestImplementation 'androidx.test.ext:junit:1.1.3'
    androidTestImplementation 'androidx.test.espresso:espresso-core:3.4.0'
}
AndroidManifest.xml
Then, open AndroidManifest.xml and then add this singleton class into the tag by using the android: name property. It will start the class at the moment the app is launched. Make sure to add the INTERNET permission since we will be making network calls.
<uses-permission android:name="android.permission.INTERNET" />
  <meta-data
     android:name="com.razorpay.ApiKey"
     android:value="rzp_test_0Q9QUVz0kaWmK3" />
And follow the below steps for Razorpay payment gateway integration in your android app. Let’s make Ui and for payment screen and implication in java class.
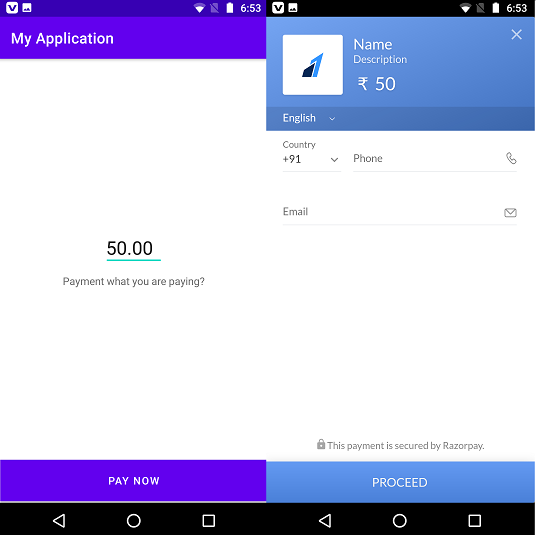
Razorpay payment gateway integration UI Screen Source code activity_payment.xml
you can use the below code for making UI for your payment screen you can customize it according to your requirements. In this UI we used an input layout edit text for input amount and pay now button.
activity_payment.xml
<LinearLayout xmlns:android="http://schemas.android.com/apk/res/android"
    xmlns:app="http://schemas.android.com/apk/res-auto"
    xmlns:tools="http://schemas.android.com/tools"
    android:layout_width="match_parent"
    android:layout_height="match_parent"
    android:orientation="vertical"
    android:weightSum="10">

    <ScrollView
        android:layout_width="match_parent"
        android:layout_height="0dp"
        android:layout_weight="9"
        android:fillViewport="true">

        <LinearLayout
            android:id="@+id/linearLayoutCheckout"
            android:layout_width="match_parent"
            android:layout_height="0dp"
            android:layout_weight="9"
            android:background="#ffffff"
            android:gravity="center"
            android:orientation="vertical"
            android:weightSum="10">

            <EditText
                android:id="@+id/editTextPayment"
                android:layout_width="80dp"
                android:layout_height="50dp"
                android:padding="3dp"
                android:text="50.00"
                android:textSize="25sp" />

            <TextView
                android:layout_width="wrap_content"
                android:layout_height="wrap_content"
                android:layout_marginTop="10dp"
                android:text="Payment what you are paying?" />
        </LinearLayout>
    </ScrollView>

    <LinearLayout
        android:id="@+id/linearLayoutButtonPlaceOrder"
        android:layout_width="match_parent"
        android:layout_height="0dp"
        android:layout_gravity="bottom"
        android:layout_weight="1"
        android:background="#FFFFFF"
        android:orientation="vertical">

        <Button
            android:id="@+id/buttonConfirmOrder"
            android:layout_width="match_parent"
            android:layout_height="match_parent"
            android:layout_margin="2dp"
            android:background="#008577"
            android:text="Pay Now"
            android:textColor="#ffffff"
            android:visibility="visible" />
    </LinearLayout>
</LinearLayout>
Payment Activity Java Source Code
public class MainActivity extends AppCompatActivity implements PaymentResultListener {
    private Button buttonConfirmOrder;
    private EditText editTextPayment;

    @Override
    protected void onCreate(Bundle savedInstanceState) {
        super.onCreate(savedInstanceState);
        setContentView(R.layout.activity_main);
        findViews();
        listeners();
    }
    public void findViews() {
        buttonConfirmOrder = (Button) findViewById(R.id.buttonConfirmOrder);
        editTextPayment = (EditText) findViewById(R.id.editTextPayment);
    }
    public void listeners() {
        buttonConfirmOrder.setOnClickListener(new View.OnClickListener() {
            @Override
            public void onClick(View view) {
                if(editTextPayment.getText().toString().equals(""))
                {
                    Toast.makeText(MainActivity.this, "Please fill payment", Toast.LENGTH_LONG).show();
                    return;
                }
                startPayment();
            }
        });
    }
    public void startPayment() {
        final Activity activity = this;
        final Checkout co = new Checkout();
        try {
            JSONObject options = new JSONObject();
            options.put("name", "Name");
            options.put("description", "Description");
            //You can omit the image option to fetch the image from dashboard
            options.put("image", "https://rzp-mobile.s3.amazonaws.com/images/rzp.png");
            options.put("currency", "INR");
            String payment = editTextPayment.getText().toString();
            double total = Double.parseDouble(payment);
            total = total * 100;
            options.put("amount", total);
            JSONObject preFill = new JSONObject();
            preFill.put("email", "");
            preFill.put("contact", "");
            options.put("prefill", preFill);
            co.open(activity, options);
        } catch (Exception e) {
            Toast.makeText(activity, "Error in payment: " + e.getMessage(), Toast.LENGTH_SHORT).show();
            e.printStackTrace();
        }
    }
    @Override
    public void onPaymentSuccess(String razorpayPaymentID) {
        Toast.makeText(this, "Payment successfully done! " + razorpayPaymentID, Toast.LENGTH_SHORT).show();
    }
    @Override
    public void onPaymentError(int code, String response) {
        try {
            Toast.makeText(this, "Payment error please try again", Toast.LENGTH_SHORT).show();
        } catch (Exception e) {
            Log.e("OnPaymentError", "Exception in onPaymentError", e);
        }
    }
}
Done you can test your app. if you have any issue with live integration contact to Razorpay customer care number and also Connect with the Razorpay dashboard.
Razorpay customer care number and Razorpay dashboard Support.
For assistance to the Razorpay support team
- Log in to your Razorpay dashboard.
- Click the headphone icon in order to start the Help and Support pop-up.
- There are a few more options available:
- Have a query?
It is possible to check the status of your existing support tickets or open a new support ticket on the Razorpay Dashboard for any issue. - Contact us to chat
Live chat with us today to have your questions answered promptly or to learn about the features more clearly. - Dashboard Guide
Discover the many features that are available on the Dashboard through this Razorpay Dashboard Guide.
- Have a query?
- It is also possible to refer to these Razorpay Documents regarding the various Razorpay products, integrations and APIs.
Have a query?
Raise a New Ticket
-
To raise a new ticket: - Log in to your Razorpay Accounts.
- Click on the headphone icon to start the Help and Support pop-up.
- Click Have a query?
- Select the purpose of the request.
- Select the subcategory under which you want to raise tickets.
- Read the FAQs before submitting a ticket. If your issue isn’t resolved, then you need to explain the concern and attach the relevant documents or photos If you can and click submit.
Chat with us
This feature is accessible to exclusive users. If it’s available for your account, then you can talk to a representative from our Support Team using the Chat with us option (between 10 a.m. between 10 and 10 p.m. during every working day) to communicate instantly.
To begin chat live with us:
- Log in to your Razorpay dashboard.
- Click the headphone icon in order to start the Help and Support pop-up.
- Click to for a chat. Chat to us.
- On the pop-up, you can select the subject of your question and begin talking to our support staff.