MVVM (Model View ViewModel) Architecture Pattern in Android. Developers prefer clean and well-structured code for their projects. In organizing their code in accordance with a design pattern assists in maintaining the application. With a thorough understanding of the important logic components in an Android application, it’s simpler to add or remove features from the application. Furthermore, design patterns ensure that all code are covered in Unit Testing without the interference of other classes. Model — View ViewModel (MVVM) is the well-known Software design pattern that eliminates the drawbacks associated with MVP or MVC designs. MVVM recommends separating the presentation logic(Views also known as the User Interface) from the main business logic component that makes up the app.
What is mvvm design pattern
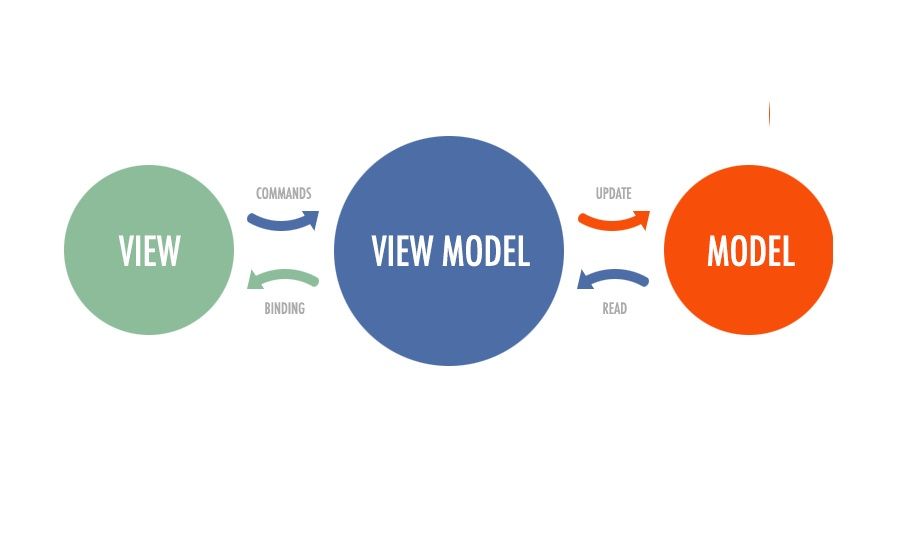
The different layers of code that makeup MVVM are:
- Model It is the layer that is accountable for abstraction of the sources of data. Model and ViewModel work in tandem to retrieve and store the data.
- View This layer’s purpose is to notify the ViewModel of the user’s actions. The layer monitors the ViewModel but does not contain any type of application logic.
- ViewModel The ViewModel exposes data streams that have relevance to the View. Additionally, it acts as a bridge between the Model as well as the View.
The MVVM pattern shares a few similarities to the MVP(Model -View Presenter) design pattern since the role of the Presenter is taken by the ViewModel. However, the disadvantages that come with MVP pattern are being addressed with MVVM in this manner:
- ViewModel is not a sort of connection towards the View.
- There are many to-one relationship between View and Model.
- There are no trigger methods for updating the View.
Ways to Implement MVVM in the Project
There are two methods to implement the MVVM style patterns in Android apps:
- Utilizing the DataBinding library, which was released by Google
- Utilizing any tool, such as RxJava to do DataBinding.
Data Binding:
Google launches Google’s Data Binding Library for Android which lets developers connect UI parts in their XML layouts to the app’s data repositories. This assists in making it easier to code the core logic of an application that connects to View. Furthermore, Two-way data Binding is utilized to bind the objects to XML layouts in order that the layout and object are able to send data to each and each other. This can be illustrated by using the example provided in this tutorial.
Syntax for two-way the data is @=variable
Example of MVVM Architecture Pattern
Here is an example of a single-activity User-Login Android application that demonstrates how you can implement the MVVM architecture pattern in projects. The application will prompt users to enter their Email account ID as well as password. Based on inputs received, the ViewModel will inform the View which information to display as toast messages. The ViewModel does not be able to reference the View.
To enable DataBinding in the android application, following codes needs to be added in the app’s build.gradle(build.gradle (:app)) file:
Enable DataBinding:
android {
 {
dataBinding DataBinding
enabled = true
  }
}
Add lifecycle dependency:
implementation 'android.arch.lifecycle:extensions:1.1.1'
Here is the complete step-by step application of the User-Login android application that uses MVVM patterns.
How to use MVVM in android
Following steps are carried out with Android Studio Version 4.0
First, create a brand new project
- Click on File, and then New > New Project.
- Choose empty activity
- Choose the language to be Java/Kotlin.
- Choose the minimum SDK according to your needs.
Step 2: Creating the Model class
Create a new class named Model to store an account for the Email account and Password provided by the user. Here is the code needed to make the appropriate Model class.
import androidx.annotation.Nullable;

public class Model {

  @Nullable
  String email,password;

  public Model(String email, String password){
    this.email = email;
    this.password = password;
  }

  @Nullable
  public String getEmail() {
    return email;
  }

  public void setEmail(@Nullable String email) {
    this.email = email;
  }

  @Nullable
  public String getPassword() {
    return password;
  }

  public void setPassword(@Nullable String password) {
    this.password = password;
  }

}
Step 3: Working on the activity_main.xml file
Access your activity_main.xml file and add two EditText to obtain entries to enter Email as well as Password. One Login Button is needed to verify the inputs of the user and display the correct Toast messages. Here is the code to assist in making a good activity layout.
In order to ensure that the Data Binding Library functions properly Data Binding Library, it is essential to put the layout tag to the top of the page. It is important to note that the constraints layout tag in XML is not a good choice in this situation.
 <?xml version="1.0" encoding="utf-8"?>
<layout xmlns:android="http://schemas.android.com/apk/res/android"
xmlns:app="http://schemas.android.com/apk/res-auto"
xmlns:bind="http://schemas.android.com/tools">

<!-- binding object of ViewModel to the XML layout -->
<data>
    <variable
        name="viewModel"
        type="com.example.mvvmarchitecture.AppViewModel" />
</data>

<!-- Provided Linear layout for the activity components -->
<LinearLayout
    android:layout_width="match_parent"
    android:layout_height="match_parent"
    android:layout_gravity="center"
    android:layout_margin="8dp"
    android:background="#168BC34A"
    android:orientation="vertical">

    <!-- TextView for the heading of the activity -->
    <TextView
        android:id="@+id/textView"
        android:layout_width="match_parent"
        android:layout_height="wrap_content"
        android:text="@string/heading"
        android:textAlignment="center"
        android:textColor="@android:color/holo_green_dark"
        android:textSize="36sp"
        android:textStyle="bold" />

    <!-- EditText field for the Email -->
    <EditText
        android:id="@+id/inEmail"
        android:layout_width="match_parent"
        android:layout_height="wrap_content"
        android:layout_marginStart="10dp"
        android:layout_marginTop="60dp"
        android:layout_marginEnd="10dp"
        android:layout_marginBottom="20dp"
        android:hint="@string/email_hint"
        android:inputType="textEmailAddress"
        android:padding="8dp"
        android:text="@={viewModel.userEmail}" />

    <!-- EditText field for the password -->
    <EditText
        android:id="@+id/inPassword"
        android:layout_width="match_parent"
        android:layout_height="wrap_content"
        android:layout_marginStart="10dp"
        android:layout_marginEnd="10dp"
        android:hint="@string/password_hint"
        android:inputType="textPassword"
        android:padding="8dp"
        android:text="@={viewModel.userPassword}" />

    <!-- Login Button of the activity -->
    <Button
        android:layout_width="match_parent"
        android:layout_height="wrap_content"
        android:layout_marginStart="20dp"
        android:layout_marginTop="60dp"
        android:layout_marginEnd="20dp"
        android:background="#4CAF50"
        android:fontFamily="@font/roboto"
        android:onClick="@{()-> viewModel.onButtonClicked()}"
        android:text="@string/button_text"
        android:textColor="@android:color/background_light"
        android:textSize="30sp"
        android:textStyle="bold"
        bind:toastMessage="@{viewModel.toastMessage}" />

</LinearLayout>
</layout>
Step 4: Creating the ViewModel class
This class will have all methods that are needed in the layout of the application. The ViewModel class extends BaseObservable since it transforms the data into streams, and alerts the ViewModel that the Toast message properties can change.
import android.text.TextUtils;
        import android.util.Patterns;
        import androidx.databinding.BaseObservable;
        import androidx.databinding.Bindable;

public class AppViewModel extends BaseObservable {

    private Model model;
    private String successMessage = "User Login successful";
    private String errorMessage = "Please enter a valid Email or Password";

    @Bindable
    private String toastMessage = null;

    public String getToastMessage() {
        return toastMessage;
    }

    private void setToastMessage(String toastMessage) {
        this.toastMessage = toastMessage;
        notifyPropertyChanged(BR.toastMessage);
    }

    @Bindable
    public String getUserEmail() {
        return model.getEmail();
    }

    public void setUserEmail(String email) {
        model.setEmail(email);
        notifyPropertyChanged(BR.userEmail);
    }


    @Bindable
    public String getUserPassword() {
        return model.getPassword();
    }

    public void setUserPassword(String password) {
        model.setPassword(password);
        notifyPropertyChanged(BR.userPassword);
    }

    public AppViewModel() {
        model = new Model("","");
    }

    public void onButtonClicked() {
        if (isValid())
            setToastMessage(successMessage);
        else
            setToastMessage(errorMessage);
    }

    public boolean isValid() {
        return !TextUtils.isEmpty(getUserEmail()) && Patterns.EMAIL_ADDRESS.matcher(getUserEmail()).matches()
                && getUserPassword().length() > 5;
    }
}
Step 6: Define functionalities of View in the MainActivity file
View class is responsible for updating the UI of an application. View Class is accountable to update the UI of the application. In accordance with the changes made to the toast message sent by the ViewModel, it is the Binding Adapter would trigger the View layer. The setting of the Toast message will inform the observer(View) about any changes to the data. Then, View will take appropriate actions.
import android.os.Bundle;
        import android.view.View;
        import android.widget.Toast;

        import androidx.appcompat.app.AppCompatActivity;
        import androidx.databinding.BindingAdapter;
        import androidx.databinding.DataBindingUtil;

        import com.example.mvvmarchitecture.databinding.ActivityMainBinding;

public class MainActivity extends AppCompatActivity {

    @Override
    protected void onCreate(Bundle savedInstanceState) {
        super.onCreate(savedInstanceState);

        ActivityMainBinding activityMainBinding = DataBindingUtil.setContentView(this, R.layout.activity_main);
        activityMainBinding.setViewModel(new AppViewModel());
        activityMainBinding.executePendingBindings();

    }

    @BindingAdapter({"toastMessage"})
    public static void runMe( View view, String message) {
        if (message != null)
            Toast.makeText(view.getContext(), message, Toast.LENGTH_SHORT).show();
    }
}
Advantages of MVVM Architecture
- Increase the reuse of code.
- Each module is independent, which improves the testability of every layer.
- Project files are easily maintained and easy to change.
Disadvantages of MVVM Architecture
- This design isn’t suitable for small-scale projects.
- If the logic for data binding is complex, the debugging of the application may be a bit difficult.
Read More Tutorial