The floating action button (FAB) is a circular button that initiates the primary action within your app’s UI. This page explains how to integrate the FAB into your layout, alter some aspects of its appearance and react to tapping.
To find out more about how to incorporate floating action buttons in your app, in accordance with the Material Design Guidelines, also look up Buttons floating action Button.
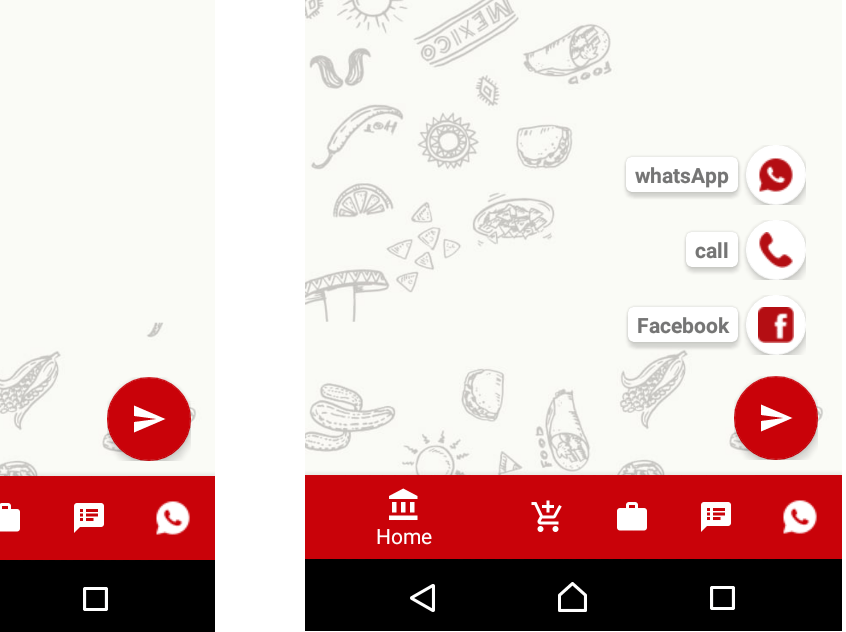
Floating Action Button and Sub Floating button.
Hey everyone least starts on how to Add a Floating Action Button and Sub Floating button in android and implement its and create with multi-pal sub floating button, friends its show easy not be take presser so let’s start. The following code shows how the FloatingActionButton ui XML code.
<com.google.android.material.floatingactionbutton.FloatingActionButton
android:id="@+id/fabSave"
android:layout_width="wrap_content"
android:layout_height="wrap_content"
android:src="@drawable/outline_add_24"
android:tint="@color/colorPrimaryDark"
app:backgroundTint="@android:color/white"
app:fabSize="mini" />
The default color of the FAB will be colored using it’s ColorAccent the attribute which you are able to alter using your theme’s colors palette.
You can also configure additional FAB properties using XML attributes or the corresponding methods, like the following:
- The dimension of the FAB is determined by with its
application:fabSizeattribute as well as it’ssetSize()method. - The color of the ripples of the FABis determined by employing an
application:rippleColorattribute, or using it’ssetRippleColor()method. - The FAB icon, which uses the
android:srcattribute orsetImageDrawable()method.
Step 1: First one to Start Android Studio
Step 2 : Seconds step to Create a New Project Project Click On ==> File ==> NEW ==> New Project
Step 3: After create on your project open your java file and XML file and you can just copy the code and paste on your file and run your project.
Step 4: Create a layout XML File fab_subfab_menu.xml
fab_subfab_menu.xml file compete Code
<?xml version="1.0" encoding="utf-8"?>
<FrameLayout
    xmlns:android="http://schemas.android.com/apk/res/android"
    xmlns:app="http://schemas.android.com/apk/res-auto"
    android:id="@+id/fabFrame"
    android:layout_width="match_parent"
    android:layout_height="match_parent"
    android:layout_marginTop="?attr/actionBarSize"
    android:paddingBottom="@dimen/activity_vertical_margin"
    android:paddingLeft="@dimen/activity_horizontal_margin"
    android:paddingRight="@dimen/activity_horizontal_margin"
    android:paddingTop="@dimen/activity_vertical_margin"
    android:orientation="vertical">

    <LinearLayout
        android:id="@+id/layoutFb"
        android:layout_width="wrap_content"
        android:layout_height="wrap_content"
        android:gravity="center_vertical"
        android:layout_gravity="bottom|end"
        android:layout_marginRight="8dp"
        android:layout_marginBottom="120dp"
        android:layout_marginEnd="8dp"
        android:orientation="horizontal">

        <androidx.cardview.widget.CardView
            android:layout_width="wrap_content"
            android:layout_height="wrap_content"
            app:cardBackgroundColor="@color/cardview_light_background"
            app:cardCornerRadius="5dp"
            app:cardElevation="5dp"
            app:cardUseCompatPadding="true" >
            <TextView
                android:id="@+id/cvtSave"
                android:layout_width="wrap_content"
                android:layout_height="wrap_content"
                android:text="APF report"
                android:textAppearance="?android:attr/textAppearanceSmall"
                android:textStyle="bold"
                android:paddingRight="5dp"
                android:paddingLeft="5dp"
                android:paddingBottom="5dp"
                android:paddingTop="5dp" />
        </androidx.cardview.widget.CardView>

        <com.google.android.material.floatingactionbutton.FloatingActionButton
            android:id="@+id/fabSave"
            android:layout_width="wrap_content"
            android:layout_height="wrap_content"
            android:src="@drawable/outline_add_24"
            android:tint="@color/colorPrimaryDark"
            app:backgroundTint="@android:color/white"
            app:fabSize="mini" />

    </LinearLayout>

    <LinearLayout
        android:id="@+id/layoutCall"
        android:layout_width="wrap_content"
        android:layout_height="wrap_content"
        android:gravity="center_vertical"
        android:layout_gravity="bottom|end"
        android:layout_marginRight="8dp"
        android:layout_marginEnd="8dp"
        android:layout_marginBottom="170dp"
        android:orientation="horizontal">

        <androidx.cardview.widget.CardView
            android:layout_width="wrap_content"
            android:layout_height="wrap_content"
            app:cardBackgroundColor="@color/cardview_light_background"
            app:cardCornerRadius="5dp"
            app:cardElevation="5dp"
            app:cardUseCompatPadding="true" >

            <TextView
                android:id="@+id/cvtEdit"
                android:layout_width="wrap_content"
                android:layout_height="wrap_content"
                android:text="One Pager Report"
                android:textAppearance="?android:attr/textAppearanceSmall"
                android:textStyle="bold"
                android:paddingRight="5dp"
                android:paddingLeft="5dp"
                android:paddingBottom="5dp"
                android:paddingTop="5dp" />

        </androidx.cardview.widget.CardView>

        <com.google.android.material.floatingactionbutton.FloatingActionButton
            android:id="@+id/fabEdit"
            android:layout_width="wrap_content"
            android:layout_height="wrap_content"
            android:tint="@color/colorPrimaryDark"
            android:src="@drawable/outline_add_24"
            app:backgroundTint="@android:color/white"
            app:fabSize="mini" />

    </LinearLayout>


    <LinearLayout
        android:id="@+id/layoutFabSettings"
        android:layout_width="wrap_content"
        android:layout_height="wrap_content"
        android:gravity="center_vertical"
        android:layout_gravity="bottom|end"
        android:layout_marginBottom="50dp"
        android:orientation="horizontal">

        <com.google.android.material.floatingactionbutton.FloatingActionButton
            android:id="@+id/fabSetting"
            android:layout_width="wrap_content"
            android:layout_height="wrap_content"
            android:layout_gravity="bottom|end"
            android:src="@drawable/outline_add_24"
            app:backgroundTint="?attr/colorPrimary"
            android:tint="@color/white"
            app:fabSize="normal" />

    </LinearLayout>
</FrameLayout>
After Complete these Step you can include the xml file to main.xml file
Step 5: Main.xml file compete Code
<?xml version="1.0" encoding="utf-8"?>
<android.support.design.widget.CoordinatorLayout
 xmlns:android="http://schemas.android.com/apk/res/android"
    xmlns:app="http://schemas.android.com/apk/res-auto"
    xmlns:tools="http://schemas.android.com/tools"
    android:layout_width="match_parent"
    android:layout_height="match_parent"
    tools:context="codeplayon.com.jewwllery.Home">

    <com.google.android.material.appbar.AppBarLayout
        android:layout_width="match_parent"
        android:layout_height="wrap_content"
        android:theme="@style/AppTheme.AppBarOverlay">

        <androidx.appcompat.widget.Toolbar
            android:id="@+id/toolbar"
            android:layout_width="match_parent"
            app:layout_scrollFlags="scroll|enterAlways"
            android:layout_height="?attr/actionBarSize"
            android:background="?attr/colorPrimary"
            app:popupTheme="@style/AppTheme.PopupOverlay" />

    </com.google.android.material.appbar.AppBarLayout>

    <include layout="@layout/layout_fab_submenu"/>

</android.support.design.widget.CoordinatorLayout>
Step 6: After complete these step Open your java file and used these In your java file inside your fav button and use his id to implement these
Main.java File Complete Code
public class Home extends AppCompatActivity { private boolean fabExpanded = false;
private FloatingActionButton fabSettings;
private LinearLayout layoutFb;
private LinearLayout layoutCall;
private LinearLayout layoutWhatsApp;    @Override
    protected void onCreate(Bundle savedInstanceState) {
        super.onCreate(savedInstanceState);
        setContentView(R.layout.activity_home);
//        setupSlider();
        Toolbar toolbar = (Toolbar) findViewById(R.id.toolbar);
        setSupportActionBar(toolbar);

        fabSettings = (FloatingActionButton) this.findViewById(R.id.fabSetting);

        layoutFb = (LinearLayout) this.findViewById(R.id.layoutFb);
        layoutFb.setOnClickListener(new View.OnClickListener() {
            @Override
            public void onClick(View v) {

            }
        });
        layoutCall = (LinearLayout) this.findViewById(R.id.layoutCall);
        layoutCall.setOnClickListener(new View.OnClickListener() {
            @Override
            public void onClick(View v) {

            }
        });
        layoutWhatsApp = (LinearLayout) this.findViewById(R.id.layoutWhatsApp);
        layoutWhatsApp.setOnClickListener(new View.OnClickListener() {
            @Override
            public void onClick(View v) {

            }
        });
        //layoutFabSettings = (LinearLayout) this.findViewById(R.id.layoutFabSettings);
        //When main Fab (Settings) is clicked, it expands if not expanded already.
        //Collapses if main FAB was open already.
        //This gives FAB (Settings) open/close behavior
        fabSettings.setOnClickListener(new View.OnClickListener() {
            @Override
            public void onClick(View view) {
                if (fabExpanded == true){
                    closeSubMenusFab();
                } else {
                    openSubMenusFab();
                }
            }
        });

        //Only main FAB is visible in the beginning
        closeSubMenusFab(); }       //closes FAB submenus
private void closeSubMenusFab(){
    layoutFb.setVisibility(View.INVISIBLE);
    layoutCall.setVisibility(View.INVISIBLE);
    layoutWhatsApp.setVisibility(View.INVISIBLE);
    fabSettings.setImageResource(R.drawable.ic_menu_send);
    fabExpanded = false;
}

//Opens FAB submenus
private void openSubMenusFab(){
    layoutFb.setVisibility(View.VISIBLE);
    layoutCall.setVisibility(View.VISIBLE);
    layoutWhatsApp.setVisibility(View.VISIBLE);
    //Change settings icon to 'X' icon
    fabSettings.setImageResource(R.drawable.ic_menu_send);
    fabExpanded = true;
}
And Used the dependency in your App base build.Gradle
dependencies {
    compile fileTree(dir: 'libs', include: ['*.jar'])
    androidTestCompile('com.android.support.test.espresso:espresso-core:2.2.2', {
        exclude group: 'com.android.support', module: 'support-annotations'
    })
    compile 'com.android.support:appcompat-v7:27.0.2'
    compile 'com.android.support:design:27.0.2'
    compile 'com.android.support:support-v4:27.0.2'
    compile 'com.android.support.constraint:constraint-layout:1.0.2'
    compile 'com.joanzapata.iconify:android-iconify-fontawesome:2.1.+'
    testCompile 'junit:junit:4.12'
}
Also Read: