Hi everyone is this article we learn share and explore new things in a flutter. Here we learn how to use an image picker in a flutter with a camera and gallery. In this tutorial, we share the easiest way to implement an image picker in flutter using a library example.
Flutter user for both android and iOS to make a mobile App so hare we create this example for both android and iOS. first of creating a flutter project and hare we user image picker, icons for camera and gallery when clicking on icons the work according to icons open camera and gallery and pic image for and show on.
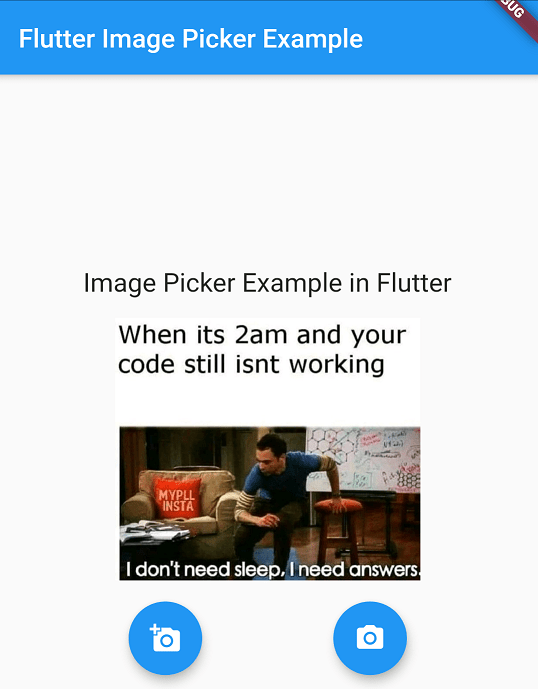
Flutter image picker camera and gallery example.
So let’s start to make these examples of images pickers so just follow these step and make it. Let’s open your project if you have otherwise created a new flutter project. And Open pubspec.yaml then add the below lines.
Step 1: Open pubspec.yaml and add a dependency for the image picker.
Step2: Configuration for Android and iOS.
Step3: Make UI and Implement it.
add Image Picker flutter library.
A Flutter plugin library for both Android and iOS that is been used to pick an image from a mobile phone gallery or camera. let’s straight away start to implement the flutter image picker in our flutter app.
Step 1: Adding image picker dependency.
Once you have created your Flutter project or open an existing flutter project to implement an image picker flutter library. Then you need to add image picker dependencies,
Open pubspec.yaml then add the below lines
dependencies:
image_picker: ^0.6.3+4
Step 2: Configuration for Android and iOS
1. ANDROID IMAGE PICKER CONFIGURATION
When it comes to android there is no configuration required – the plugin should work out of the box. Just we need to set request Legacy External Storage to true Android > app > src > main >AndroidManifest.xml
<application
     android:label="pick_images_camera_and_gallery"
    android:requestLegacyExternalStorage="true"
    android:icon="@mipmap/ic_launcher">
2. IOS IMAGE PICKER CONFIGURATION
Add the following keys to your Info.plist file, located in
Project > ios > Runner > Info.plist
Copy-paste the below permission in info.plist. This app requires read and write permission Photo Library is used to ask uses to give permission for accessing the photo library. This is Called Privacy – Photo Library Usage Description. and Used to take photos from the device camera itself. This app requires to get access to micro phone
Step3: Explanation of flutter image picker.
here we make UI and implementation of camera and gallery to pick images and show them on. So least makes it open you main .dart file if you make it main file other you can create a new dart file and use the below code. hare full for how do you use camera and gallery in a flutter
Main.dart file full source code.
import 'dart:ffi';
import 'dart:io';

import 'package:flutter/cupertino.dart';
import 'package:flutter/material.dart';
import 'package:image_picker/image_picker.dart';

void main() => runApp(MyApp());

class MyApp extends StatelessWidget {
  // This widget is the root of your application.
  @override
  Widget build(BuildContext context) {
    return MaterialApp(
      title: 'Flutter Demo',
      theme: ThemeData(
        primarySwatch: Colors.blue,
      ),
      home: MyHomePage(),
    );
  }
}

class MyHomePage extends StatefulWidget {
  @override
  _MyHomePageState createState() => _MyHomePageState();
}

class _MyHomePageState extends State<MyHomePage> {
  File _image;

  Future getImagefromcamera() async {
    var image = await ImagePicker.pickImage(source: ImageSource.camera);

    setState(() {
      _image = image;
    });
  }

  Future getImagefromGallery() async {
    var image = await ImagePicker.pickImage(source: ImageSource.gallery);

    setState(() {
      _image = image;
    });
  }

  @override
  Widget build(BuildContext context) {
    return Scaffold(
      appBar: AppBar(
        title: Text("Flutter Image Picker Example -codeplayon"),
      ),
      body: Column(
        mainAxisAlignment: MainAxisAlignment.center,
        children: <Widget>[
          Center(
            child: Text(
              "Image Picker Example in Flutter -codeplayon",
              style: TextStyle(fontSize: 20),
            ),
          ),
          Padding(
            padding: const EdgeInsets.all(16.0),
            child: Container(
              width: MediaQuery.of(context).size.width,
              height: 200.0,
              child: Center(
                child: _image == null
                    ? Text("No Image is picked")
                    : Image.file(_image),
              ),
            ),
          ),
          Row(
            mainAxisAlignment: MainAxisAlignment.spaceEvenly,
            children: <Widget>[
              FloatingActionButton(
                onPressed: getImagefromcamera,
                tooltip: "Pick Image form gallery",
                child: Icon(Icons.add_a_photo),
              ),
              FloatingActionButton(
                onPressed: getImagefromGallery,
                tooltip: "Pick Image from camera",
                child: Icon(Icons.camera_alt),
              )
            ],
          )
        ],
      ),
    );
  }
}
done just run your project and see the output. learn more flutter tutorials click hare