The tutorial will we will discover the MVVM architecture of Android first, and then we will develop a program using the MVVM architecture. This tutorial is intended for novices who wish to begin using the MVVM structure. Since this tutorial is geared towards beginners I’ve done some simplifying. Let’s get started.
The following will be covered within this lesson:
- What is the MVVM architecture?
- Create a new project using Kotlin and any other dependencies needed.
- Project Structure.
- Set up the utils program.
- Configure the layer of data.
- Create a UI layer, then build then run your project.
- Project Source Code and What Next?
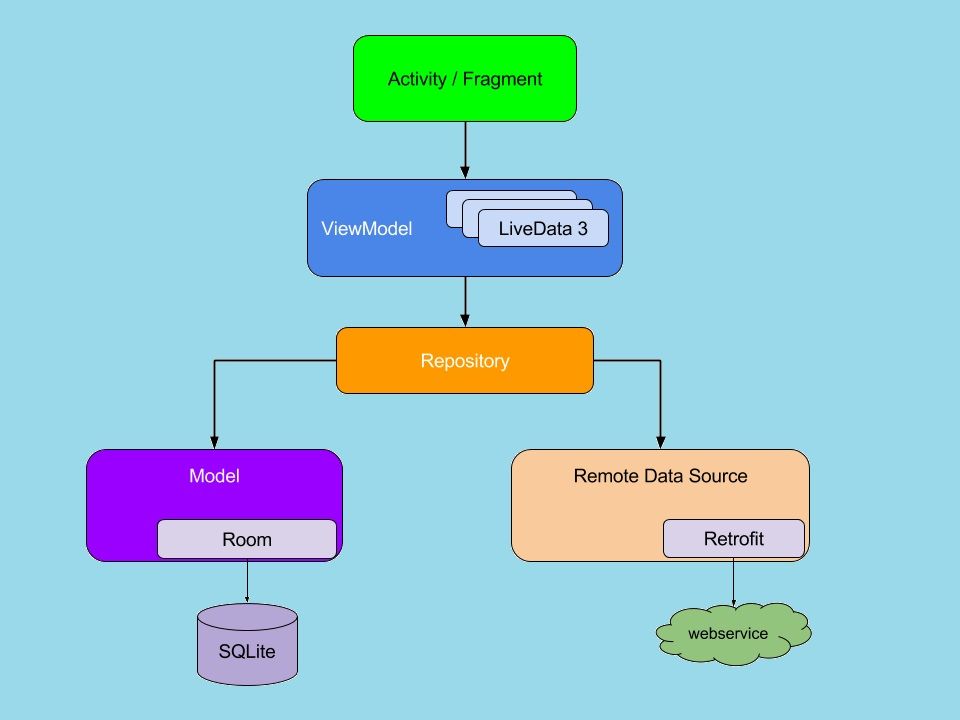
What is the MVVM Architecture?
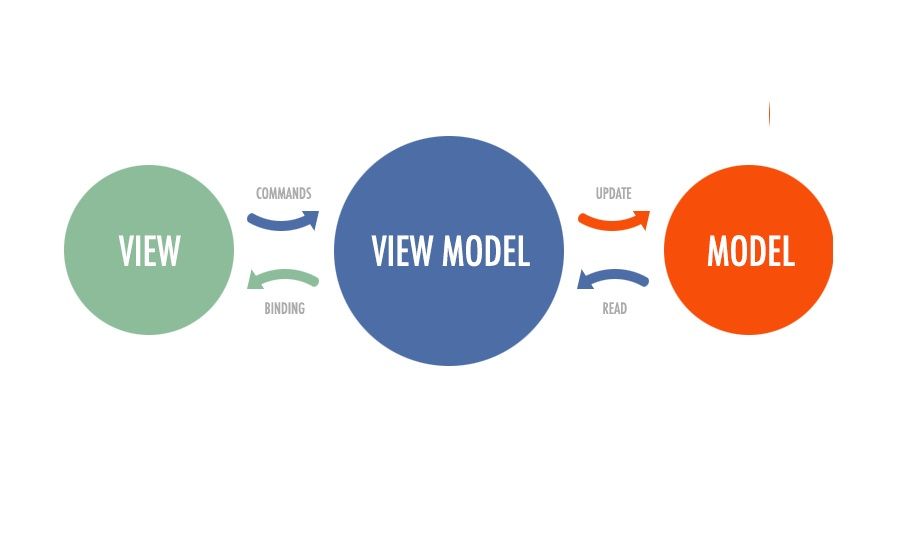
The MVVM Architecture is a Model-View-ViewModel design that eliminates an encapsulated coupling among the component. The most important thing is that in this model, children do not have direct link to the parent. They just have that reference through the observables.
- Model The Model represents data as well as the enterprise logic that runs it’s Android Application. It is comprised of the business logic , remote and local data source model classes as well as the repository.
- ViewModel: It consists of the UI Code(Activity fragment), XML. It transmits the user’s action to the ViewModel however it doesn’t not receive the response directly. To receive the response it must subscribe to the observables the ViewModel provides to the ViewModel.
- ViewModel This is the bridge that connects View as well as the Model(business reasoning). It doesn’t have any idea of what View must use it , as it doesn’t have any direct connection directly to the View. In essence, the ViewModel is not aware of the View it interacts with. It is in contact in a way with Model and exposes the observer which can be observed by the View.
The whole thing is about mvvm architecture Now let’s get into the implementation aspect of it.
Create a new project using Kotlin and the other dependencies that are required
In this article, we will learn how to create an Android Project.
Create a Project mvvm architecture example
- Start a new Android Studio Project
- Select Empty Activity and Next
- Name: MVVM-Architecture-Android-Beginners
- Package name: com.codeplayon.framework.mvvm
- Language: Kotlin
- Finish
- The project you are planning to start is complete right now.
Add dependencies
Add the dependencies listed below to the app’s build.gradle.
implementation "androidx.recyclerview:recyclerview:1.1.0"
implementation 'android.arch.lifecycle:extensions:1.1.1'
implementation 'com.github.bumptech.glide:glide:4.9.0'
implementation 'com.amitshekhar.android:rx2-android-networking:1.0.2'
implementation 'io.reactivex.rxjava2:rxjava:2.2.18'
implementation 'io.reactivex.rxjava2:rxandroid:2.1.1'
The project is now ready with dependencies.
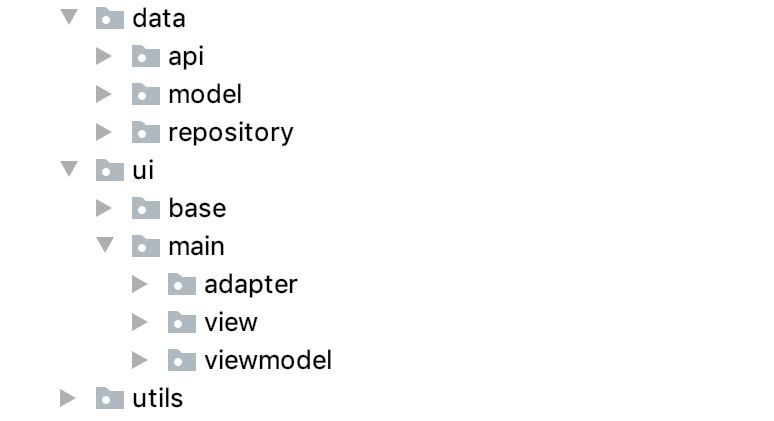
Project Structure for mvvm architecture example
In the project, we’ll to use a basic Version of MVVM. The package we will use in the project will look as follows:
Install the utils program mvvm architecture wpf.
Now, we are able to install our utils package.
The enum must symbolize that of the UI State. This will be created within our utils module.
package com.codeplayon.framework.mvvm.utils

enum class Status {
    SUCCESS,
    ERROR,
    LOADING
}
We require a utility class that is responsible for relay the current status in Network Call to the UI Layer. We will name it Resource. Resource.
Create the Kotlin Data class Resource within this utils program. Then, include below code.
package com.codeplayon.framework.mvvm.utils

data class Resource<out T>(val status: Status, val data: T?, val message: String?) {

    companion object {

        fun <T> success(data: T?): Resource<T> {
            return Resource(Status.SUCCESS, data, null)
        }

        fun <T> error(msg: String, data: T?): Resource<T> {
            return Resource(Status.ERROR, data, msg)
        }

        fun <T> loading(data: T?): Resource<T> {
            return Resource(Status.LOADING, data, null)
        }

    }

}
 Configure the data layer
In this section, you will create the data layer. Make a package with data
In the data, create a package – model This is the API JSON response. Therefore, we must create our data class. Create a Kotlin user file in the model package.
This data class will be User as shown below.
package com.codeplayon.framework.mvvm.data.model

import com.google.gson.annotations.SerializedName

data class User(
    @SerializedName("id")
    val id: Int = 0,
    @SerializedName("name")
    val name: String = "",
    @SerializedName("email")
    val email: String = "",
    @SerializedName("avatar")
    val avatar: String = ""
)
Now we must set up our network layer.
Create package – API within the data
Next, create an interface called ApiService within the api package. Add the following code.
package com.codeplayon.framework.mvvm.data.api

import com.codeplayon.framework.mvvm.data.model.User
import io.reactivex.Single

interface ApiService {

    fun getUsers(): Single<List<User>>

}
Create an ApiServiceImpl Class that implements the interface ApiService within the api package. Add the following code.
package com.codeplayon.framework.mvvm.data.api

import com.codeplayon.framework.mvvm.data.model.User
import com.rx2androidnetworking.Rx2AndroidNetworking
import io.reactivex.Single

class ApiServiceImpl : ApiService {

    override fun getUsers(): Single<List<User>> {
        return Rx2AndroidNetworking.get("Enter your API here")
            .build()
            .getObjectListSingle(User::class.java)
    }

}
Create a class ApiHelper in the api package, and then add the following code.
package com.codeplayon.framework.mvvm.data.api

class ApiHelper(private val apiService: ApiService) {

    fun getUsers() = apiService.getUsers()

}
Create a new class MainRepository in the repository package, and then add the following code.
package com.codeplayon.framework.mvvm.data.repository

import com.codeplayon.framework.mvvm.data.api.ApiHelper
import com.codeplayon.framework.mvvm.data.model.User
import io.reactivex.Single

class MainRepository(private val apiHelper: ApiHelper) {

    fun getUsers(): Single<List<User>> {
        return apiHelper.getUsers()
    }

}
Make a package and store it in the data. Now create a MainRepository class in the repository. Our data layer is now ready.
Create a UI layer, then build and manage the project
This section will set up the UI, create the project, and then run the application on the device. Create package – Ui
Create package – Main inside the ui Package. View inside the main package to create a package Move the MainActivity to your view package . Viewmodel in the main package. Create package. Create a MainViewModel Kotlin class in the same viewmodel package, and then add the following code.
package com.mindorks.framework.mvvm.ui.main.viewmodel

import androidx.lifecycle.LiveData
import androidx.lifecycle.MutableLiveData
import androidx.lifecycle.ViewModel
import com.mindorks.framework.mvvm.data.model.User
import com.mindorks.framework.mvvm.data.repository.MainRepository
import com.mindorks.framework.mvvm.utils.Resource
import io.reactivex.android.schedulers.AndroidSchedulers
import io.reactivex.disposables.CompositeDisposable
import io.reactivex.schedulers.Schedulers

class MainViewModel(private val mainRepository: MainRepository) : ViewModel() {

    private val users = MutableLiveData<Resource<List<User>>>()
    private val compositeDisposable = CompositeDisposable()

    init {
        fetchUsers()
    }

    private fun fetchUsers() {
        users.postValue(Resource.loading(null))
        compositeDisposable.add(
            mainRepository.getUsers()
                .subscribeOn(Schedulers.io())
                .observeOn(AndroidSchedulers.mainThread())
                .subscribe({ userList ->
                    users.postValue(Resource.success(userList))
                }, { throwable ->
                    users.postValue(Resource.error("Something Went Wrong", null))
                })
        )
    }

    override fun onCleared() {
        super.onCleared()
        compositeDisposable.dispose()
    }

    fun getUsers(): LiveData<Resource<List<User>>> {
        return users
    }

}
Create package – adapter inside the main package
Now, create a Kotlin class MainAdapter inside the same adapter package and add the following code.
package com.codeplayon.framework.mvvm.ui.main.adapter

import android.view.LayoutInflater
import android.view.View
import android.view.ViewGroup
import androidx.recyclerview.widget.RecyclerView
import com.bumptech.glide.Glide
import com.codeplayon.framework.mvvm.R
import com.codeplayon.framework.mvvm.data.model.User
import kotlinx.android.synthetic.main.item_layout.view.*

class MainAdapter(
    private val users: ArrayList<User>
) : RecyclerView.Adapter<MainAdapter.DataViewHolder>() {

    class DataViewHolder(itemView: View) : RecyclerView.ViewHolder(itemView) {
        fun bind(user: User) {
            itemView.textViewUserName.text = user.name
            itemView.textViewUserEmail.text = user.email
            Glide.with(itemView.imageViewAvatar.context)
                .load(user.avatar)
                .into(itemView.imageViewAvatar)
        }
    }

    override fun onCreateViewHolder(parent: ViewGroup, viewType: Int) =
        DataViewHolder(
            LayoutInflater.from(parent.context).inflate(
                R.layout.item_layout, parent,
                false
            )
        )

    override fun getItemCount(): Int = users.size

    override fun onBindViewHolder(holder: DataViewHolder, position: Int) =
        holder.bind(users[position])

    fun addData(list: List<User>) {
        users.addAll(list)
    }

}
Let’s now set up the XML layout.
Update the activity_main.xml in the layout folder with the following code
<androidx.constraintlayout.widget.ConstraintLayout
    xmlns:android="http://schemas.android.com/apk/res/android"
    xmlns:app="http://schemas.android.com/apk/res-auto"
    xmlns:tools="http://schemas.android.com/tools"
    android:layout_width="match_parent"
    android:layout_height="match_parent"
    tools:context=".ui.main.view.MainActivity">

    <androidx.recyclerview.widget.RecyclerView
        android:id="@+id/recyclerView"
        android:layout_width="match_parent"
        android:layout_height="match_parent"
        android:visibility="gone" />

    <ProgressBar
        android:id="@+id/progressBar"
        android:layout_width="wrap_content"
        android:layout_height="wrap_content"
        app:layout_constraintBottom_toBottomOf="parent"
        app:layout_constraintEnd_toEndOf="parent"
        app:layout_constraintStart_toStartOf="parent"
        app:layout_constraintTop_toTopOf="parent" />

</androidx.constraintlayout.widget.ConstraintLayout>
Add item_layout.xml in the layout folder and add the following code:
<?xml version="1.0" encoding="utf-8"?>
<androidx.constraintlayout.widget.ConstraintLayout xmlns:android="http://schemas.android.com/apk/res/android"
    xmlns:app="http://schemas.android.com/apk/res-auto"
    xmlns:tools="http://schemas.android.com/tools"
    android:id="@+id/container"
    android:layout_width="match_parent"
    android:layout_height="60dp">

    <ImageView
        android:id="@+id/imageViewAvatar"
        android:layout_width="60dp"
        android:layout_height="0dp"
        android:padding="4dp"
        app:layout_constraintBottom_toBottomOf="parent"
        app:layout_constraintStart_toStartOf="parent"
        app:layout_constraintTop_toTopOf="parent" />

    <androidx.appcompat.widget.AppCompatTextView
        android:id="@+id/textViewUserName"
        style="@style/TextAppearance.AppCompat.Large"
        android:layout_width="0dp"
        android:layout_height="wrap_content"
        android:layout_marginStart="8dp"
        android:layout_marginLeft="8dp"
        android:layout_marginTop="4dp"
        app:layout_constraintEnd_toEndOf="parent"
        app:layout_constraintStart_toEndOf="@+id/imageViewAvatar"
        app:layout_constraintTop_toTopOf="parent"
        tools:text="codeplayon" />

    <androidx.appcompat.widget.AppCompatTextView
        android:id="@+id/textViewUserEmail"
        android:layout_width="0dp"
        android:layout_height="wrap_content"
        app:layout_constraintEnd_toEndOf="parent"
        app:layout_constraintStart_toStartOf="@+id/textViewUserName"
        app:layout_constraintTop_toBottomOf="@+id/textViewUserName"
        tools:text="learn share and explore " />

</androidx.constraintlayout.widget.ConstraintLayout>
Create package – base inside the ui package
Now, create a Kotlin class ViewModelFactory inside the base package and add the following code.
package com.codeplayon.framework.mvvm.ui.base

import androidx.lifecycle.ViewModel
import androidx.lifecycle.ViewModelProvider
import com.codeplayon.framework.mvvm.data.api.ApiHelper
import com.codeplayon.framework.mvvm.data.repository.MainRepository
import com.codeplayon.framework.mvvm.ui.main.viewmodel.MainViewModel

class ViewModelFactory(private val apiHelper: ApiHelper) : ViewModelProvider.Factory {

    override fun <T : ViewModel?> create(modelClass: Class<T>): T {
        if (modelClass.isAssignableFrom(MainViewModel::class.java)) {
            return MainViewModel(MainRepository(apiHelper)) as T
        }
        throw IllegalArgumentException("Unknown class name")
    }

}
Now, we need to complete our MainActivity class.
package com.codeplayon.framework.mvvm.ui.main.view

import android.os.Bundle
import android.view.View
import android.widget.Toast
import androidx.appcompat.app.AppCompatActivity
import androidx.lifecycle.Observer
import androidx.lifecycle.ViewModelProviders
import androidx.recyclerview.widget.DividerItemDecoration
import androidx.recyclerview.widget.LinearLayoutManager
import com.codeplayon.framework.mvvm.R
import com.codeplayon.framework.mvvm.data.api.ApiHelper
import com.codeplayon.framework.mvvm.data.api.ApiServiceImpl
import com.codeplayon.framework.mvvm.data.model.User
import com.codeplayon.framework.mvvm.ui.base.ViewModelFactory
import com.codeplayon.framework.mvvm.ui.main.adapter.MainAdapter
import com.codeplayon.framework.mvvm.ui.main.viewmodel.MainViewModel
import com.codeplayon.framework.mvvm.utils.Status
import kotlinx.android.synthetic.main.activity_main.*

class MainActivity : AppCompatActivity() {

    private lateinit var mainViewModel: MainViewModel
    private lateinit var adapter: MainAdapter

    override fun onCreate(savedInstanceState: Bundle?) {
        super.onCreate(savedInstanceState)
        setContentView(R.layout.activity_main)
        setupUI()
        setupViewModel()
        setupObserver()
    }

    private fun setupUI() {
        recyclerView.layoutManager = LinearLayoutManager(this)
        adapter = MainAdapter(arrayListOf())
        recyclerView.addItemDecoration(
            DividerItemDecoration(
                recyclerView.context,
                (recyclerView.layoutManager as LinearLayoutManager).orientation
            )
        )
        recyclerView.adapter = adapter
    }

    private fun setupObserver() {
        mainViewModel.getUsers().observe(this, Observer {
            when (it.status) {
                Status.SUCCESS -> {
                    progressBar.visibility = View.GONE
                    it.data?.let { users -> renderList(users) }
                    recyclerView.visibility = View.VISIBLE
                }
                Status.LOADING -> {
                    progressBar.visibility = View.VISIBLE
                    recyclerView.visibility = View.GONE
                }
                Status.ERROR -> {
                    //Handle Error
                    progressBar.visibility = View.GONE
                    Toast.makeText(this, it.message, Toast.LENGTH_LONG).show()
                }
            }
        })
    }

    private fun renderList(users: List<User>) {
        adapter.addData(users)
        adapter.notifyDataSetChanged()
    }

    private fun setupViewModel() {
        mainViewModel = ViewModelProviders.of(
            this,
            ViewModelFactory(ApiHelper(ApiServiceImpl()))
        ).get(MainViewModel::class.java)
    }
}
mvvm architecture Finally, add the Internet Permission in your project. Add the following in the AndroidManifest.xml:
<uses-permission android:name=“android.permission.INTERNET”/>
Create the project and run the application on your device. The app should load the data in the UI.
We have made some simplifications to this project to make it easier for beginners stage, we can enhance this project to reach the advanced level. A some of the areas we can improve include the following:
- Introduce Dependency Inject Framework Implement Dependency Inject Framework Dagger within the project.
- Create an ApiService Singleton, and then reuse the same instance to access all functions.
- Create base classes like BaseActivity.
- Manage all API errors in one location in a more efficient way.
- Create Interfaces for classes whenever they are required.
- You can master Kotlin Coroutines step-by- the step and move on to Coroutines.
- Utilize Android extensions for Kotlin.
- Write Unit Test
- and so on.
Read More Tutorial
- Codeplayon Jetpack Compose Tutorial
- Codeplayon Android Tutorial
- Codeplayon Flutter Tutorial
- Codeplayon on Github