Hi mobile app developer in this flutter tutorial I am sharing how to use the flutter date picker. Are you creating an application form for mobile applications with data input fields for dates? Look at the example below to discover how to add an option to select dates on TextField() along with a TextFormFiled() widget in order that every time the user taps the field, a date picker dialogue will pop up.
To Implement Date Picker on TextField()
In the beginning, you must include the intl Flutter in your dependency list to receive formatted date output from the date picker. Include the following line in the pubspec.yaml file to add the intl packages to the project you are working on.
Let’s Start to Make a Flutter Date Picker Example.
Firstly create a flutter project and build is successful. if you have an old project you can follow the below steps.
Add Depandacy in your pubspec.yaml file
dependencies:
  flutter:
    sdk: flutter
  intl: ^0.18.0
after adding dependencies update your pubspec file to get the dependencies function. after that, you can open your main. dart file and add the below code.
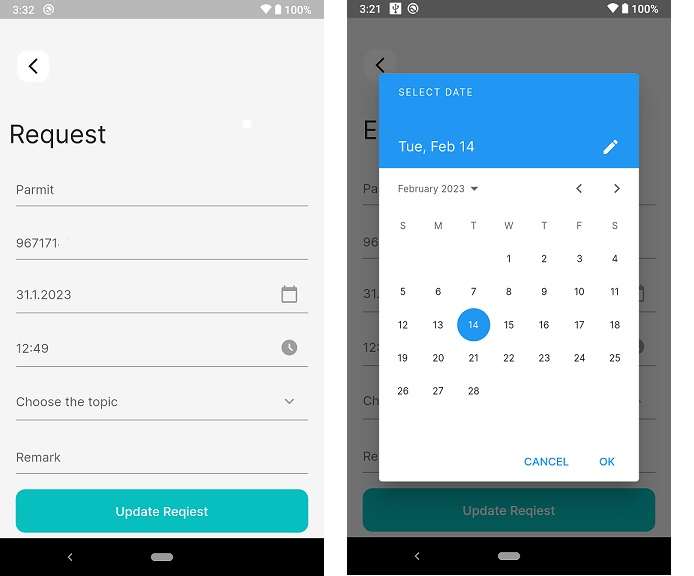
For Date Picker, you can add this method. and set the start date year and last date year and the DateFormate for getting the string for a date. Also, you can set the team color of the date picker using with Theme.
DateTime currentDate = DateTime.now();
Future<void> _selectDate(BuildContext context) async {
  final DateTime? pickedDate = await showDatePicker(
      context: context,
      initialDate: currentDate,
      firstDate: DateTime(2015),
      lastDate: DateTime(2050),
    builder: (context, child) {
      return Theme(
        data: Theme.of(context).copyWith(
          colorScheme: ColorScheme.light(
            primary: COLOR_THEME, // <-- SEE HERE
            onPrimary: COLOR_GRAY, // <-- SEE HERE
            onSurface: Colors.blue, // <-- SEE HERE
          ),
          textButtonTheme: TextButtonThemeData(
            style: TextButton.styleFrom(
              primary: Colors.black, // button text color
            ),
          ),
        ),
        child: child!,
      );
    },
  );
  if (pickedDate != null && pickedDate != currentDate)
    setState(() {
      currentDate = pickedDate;
      formattedDate = DateFormat('yyyy-MM-dd').format(currentDate);
    });
}
Flutter Date Picker Final Code
here you can see the full example source code on UI we use a TextField and on Tep on TextField date picker shows. after selecting the date selected date shown on the text view.
import 'package:flutter/material.dart';
import 'package:intl/intl.dart';

void main() {
  runApp(MyApp());
}

class MyApp extends StatelessWidget{
  @override
  Widget build(BuildContext context) {
    return MaterialApp(
      title: "Test App",
      home: HomePage(),
    );
  }
}

class HomePage extends StatefulWidget{
  @override
  State<StatefulWidget> createState() {
    return _HomePage();
  }
}

class _HomePage extends State<HomePage>{
  TextEditingController dateinput = TextEditingController();
  //text editing controller for text field

  @override
  void initState() {
    dateinput.text = ""; //set the initial value of text field
    super.initState();
  }

  @override
  Widget build(BuildContext context) {
    return Scaffold(
        appBar: AppBar(
          title:Text("DatePicker on TextField"),
          backgroundColor: Colors.redAccent, //background color of app bar
        ),
        body:Container(
            padding: EdgeInsets.all(15),
            height:150,
            child:Center(
                child:TextField(
                  controller: dateinput, //editing controller of this TextField
                  decoration: InputDecoration(
                      icon: Icon(Icons.calendar_today), //icon of text field
                      labelText: "Enter Date" //label text of field
                  ),
                  readOnly: true,  //set it true, so that user will not able to edit text
                  onTap: () async {
                    DateTime pickedDate = await showDatePicker(
                        context: context, initialDate: DateTime.now(),
                        firstDate: DateTime(2000), //DateTime.now() - not to allow to choose before today.
                        lastDate: DateTime(2101)
                    );

                    if(pickedDate != null ){
                      print(pickedDate);  //pickedDate output format => 2021-03-10 00:00:00.000
                      String formattedDate = DateFormat('yyyy-MM-dd').format(pickedDate);
                      print(formattedDate); //formatted date output using intl package =>  2021-03-16
                      //you can implement different kind of Date Format here according to your requirement

                      setState(() {
                        dateinput.text = formattedDate; //set output date to TextField value.
                      });
                    }else{
                      print("Date is not selected");
                    }
                  },
                )
            )
        )
    );
  }
}
Its Flutter Date Range Picker is a small and lightweight application that lets users effortlessly select a single day as well as multiple dates or a variety of date. The Date Picker gives months, years decades, centuries, and views that allow users to swiftly get to the desired date.
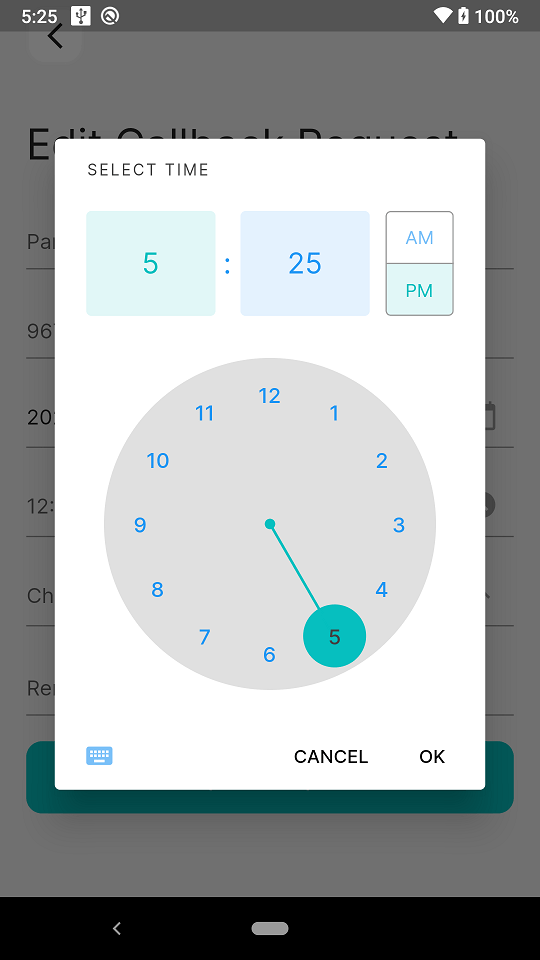
Flutter Time Picker Example
here you can find the example for the flutter time picker example code. You can just copy and paste the code on the file where you want to implementation. And just call the method the button click and any fields call. And Also you can customize the color of the time picker.
Flutter Time Picker Code
Future<void> _showTime() async {
  final TimeOfDay? result =
  await showTimePicker(
      context: context, initialTime: TimeOfDay.now(),
    builder: (context, child) {
      return Theme(
        data: Theme.of(context).copyWith(
          colorScheme: ColorScheme.light(
            primary: COLOR_THEME, // <-- SEE HERE
            onPrimary: COLOR_GRAY, // <-- SEE HERE
            onSurface: Colors.blue, // <-- SEE HERE
          ),
          textButtonTheme: TextButtonThemeData(
            style: TextButton.styleFrom(
              primary: Colors.black, // button text color
            ),
          ),
        ),
        child: child!,
      );
    },
  );
  if (result != null) {
    setState(() {
      _selectedTime = result.format(context);
    });
  }
}
Call time picker method on click like below
suffixIcon: IconButton(
  icon: Icon(
    isShowPass
        ? Icons.access_time_filled
        : Icons.access_time_filled,
    color: Colors.grey,
  ),
  onPressed: () {
    _showTime();
    setState(() {
      isShowPass = !isShowPass;
    });
  },
),
Read More:-
- flutter the bottom sheet open from the top of the screen
- Flutter How to render ListView items in sections
- Codeplayon Jetpack Compose Tutorial
- Codeplayon Android Tutorial
- Codeplayon Flutter Tutorial
- Codeplayon on Github