In this swiftui tutorial we are learn about the new filed like swiftui Button and swiftui TextField & image to make a great ui for your App. In the example i am create a screen UI using with Customer Button and TextField. Like create a image for two button Singin and singup. let make an example and learn swiftui for ios App developments.
Create a Customer ui for SwiftUi Button with image
Let’s create a view and customize the button ui adding with a image and text with rounded backgrounds.
struct SocalLoginButton: View {

    var image: Image
    var text: Text
    var action = {}


    var body: some View {
        HStack {
            image
                .padding(.horizontal)
            Spacer()
            text
                .font(.title2)
            Spacer()
        }
        .padding()
        .frame(maxWidth: .infinity)
        .background(Color.white)
        .cornerRadius(50.0)
        .shadow(color: Color.black.opacity(0.08),
radius: 60, x:0.0 , y: 16)
    }

}
SwiftUi Button With Backgroun color
struct PrimaryButton: View {

    var title: String
    var body: some View {
        Text(title)
            .font(.title3)
            .fontWeight(.bold)
            .foregroundColor(.white)
            .frame(maxWidth: .infinity)
            .padding()
            .background(Color.blue)
            .cornerRadius(50)

    }
}
How to Create a Customer SwifitUi TextField
once Button Ui is done let’s create a custom swiftui TextField and enter the hind and inout value like user name , password etc. See the below code for the textField in ios swiftui.
TextField("Work email address", text: $email)
                            .font(.title3)
                            .padding()
                            .frame(maxWidth: .infinity)
                            .background(Color.white)
                            .cornerRadius(50.0)
                            .shadow(color: Color.black.opacity(0.08), radius: 60, x: 0.0, y: 16)
                            .padding(.vertical)
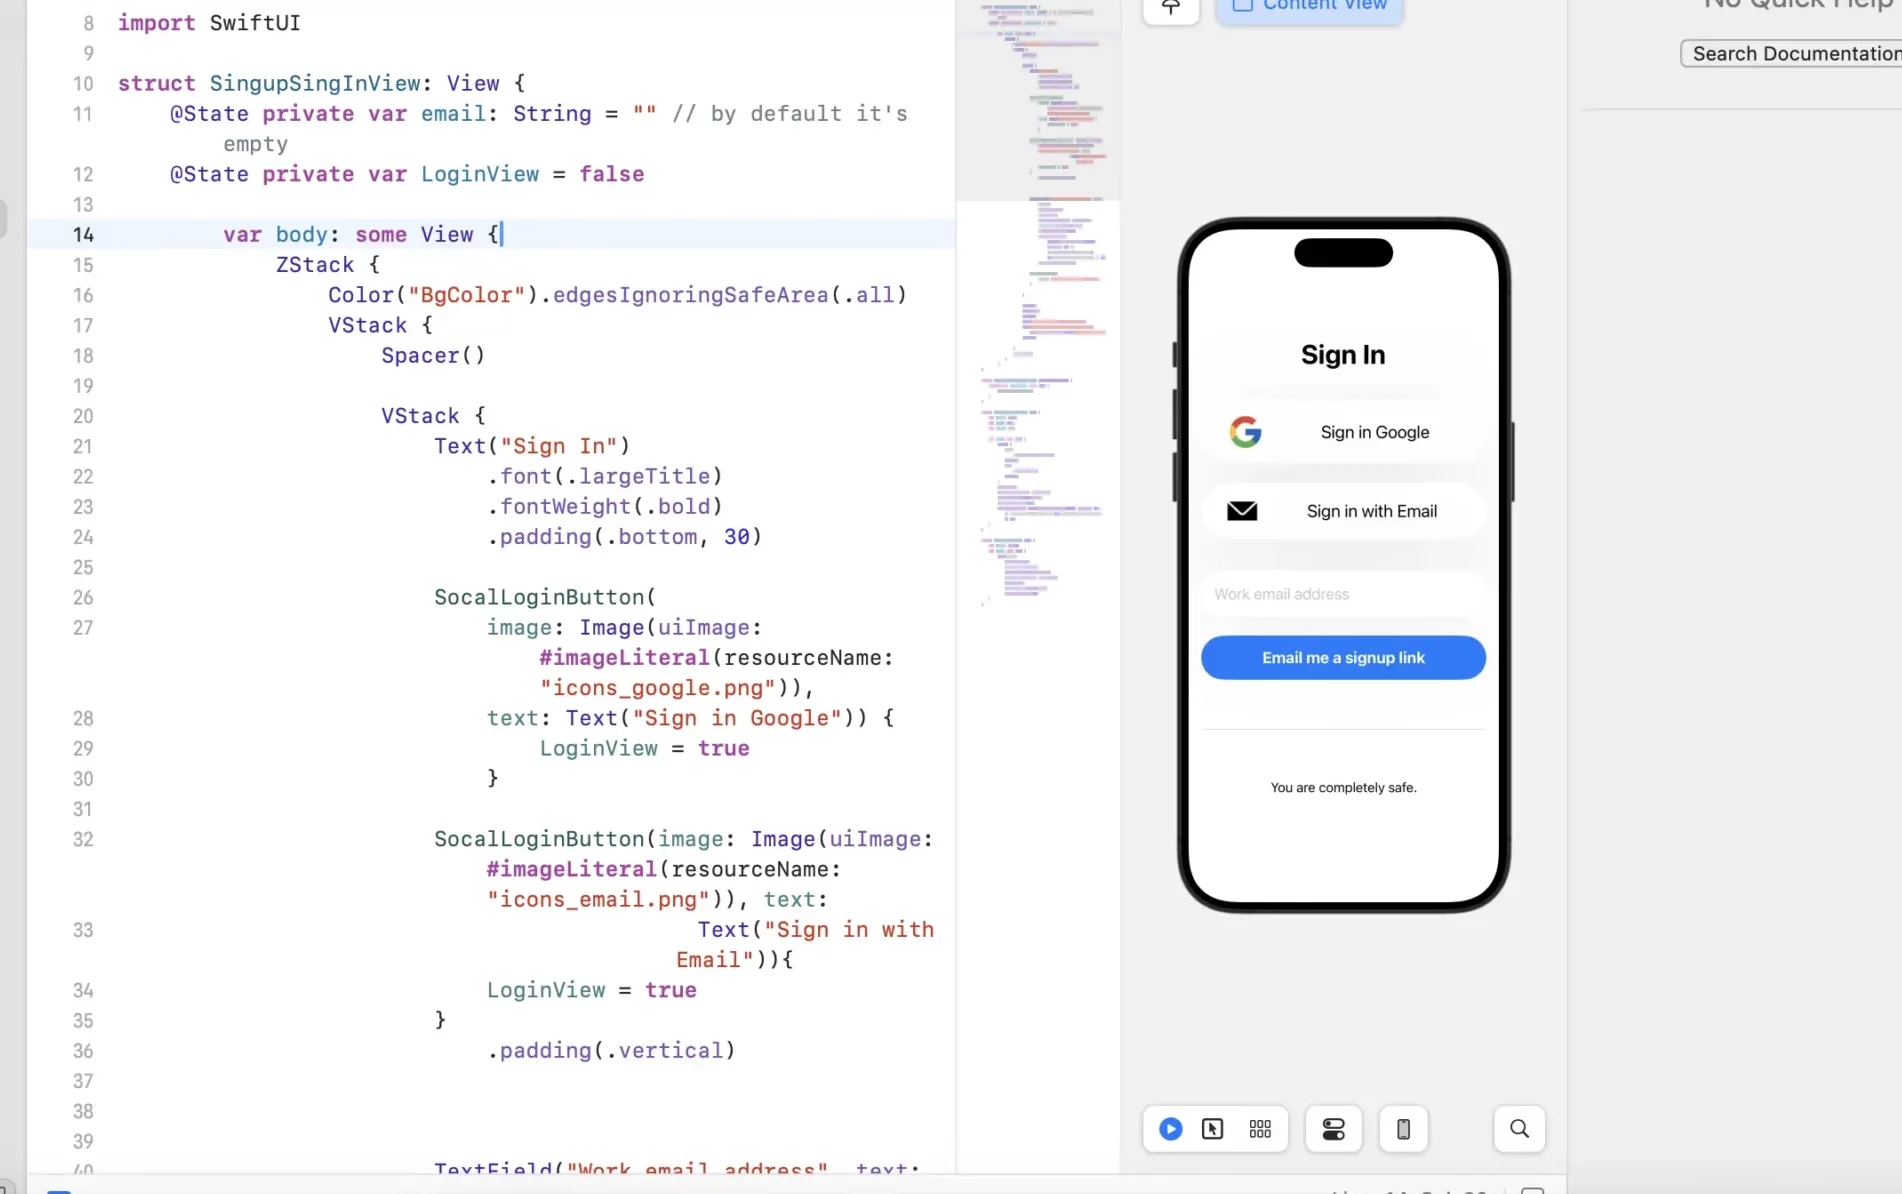
Now let’s create a full screen of Ui in the screen i create a swiftui button with including a image in the left side and create Swiftui InputFiled for enter username , eamil, password etc.
How to used swiftui button & TextField – iOS Complete Code.
import SwiftUI
struct SingupSingInView: View {

    @State private var email: String = "" // by default it's empty
    @State private var LoginView = false


        var body: some View {
            ZStack {
                Color("BgColor").edgesIgnoringSafeArea(.all)
                VStack {
                    Spacer()


                    VStack {

                        Text("Sign In")
                            .font(.largeTitle)
                            .fontWeight(.bold)
                            .padding(.bottom, 30)


                        SocalLoginButton(
                            image: Image(uiImage: #imageLiteral(resourceName: "icons_google.png")),
                            text: Text("Sign in Google")) {
                                LoginView = true
                            }

                        SocalLoginButton(image: Image(uiImage: #imageLiteral(resourceName: "icons_email.png")),
                          text: Text("Sign in with Email")){
                            LoginView = true
                        }
                            .padding(.vertical)


                        TextField("Work email address", text: $email)
                            .font(.title3)
                            .padding()
                            .frame(maxWidth: .infinity)
                            .background(Color.white)
                            .cornerRadius(50.0)
                            .shadow(color: Color.black.opacity(0.08), radius: 60, x: 0.0, y: 16)
                            .padding(.vertical)


                        PrimaryButton(
                            title: "Email me a signup link"
                        )

                    }


                    Spacer()
                    Divider()
                    Spacer()

                    Text("You are completely safe.")
                    Text("Read our Terms & Conditions.")
                        .foregroundColor(Color("PrimaryColor"))
                    Spacer()

                }
                .padding()
            }
        }
}

struct ContentView_Previews: PreviewProvider {

    static var previews: some View {

        SingupSingInView()

    }

}

struct SocalLoginButton: View {

    var image: Image

    var text: Text

    var action = {}


    var body: some View {

        HStack {

            image

                .padding(.horizontal)

            Spacer()

            text

                .font(.title2)

            Spacer()

        }

        .padding()

        .frame(maxWidth: .infinity)

        .background(Color.white)

        .cornerRadius(50.0)

        .shadow(color: Color.black.opacity(0.08), radius: 60, x: 0.0, y: 16)

    }

}

struct PrimaryButton: View {

    var title: String

    var body: some View {

        Text(title)

            .font(.title3)

            .fontWeight(.bold)

            .foregroundColor(.white)

            .frame(maxWidth: .infinity)

            .padding()

            .background(Color.blue)

            .cornerRadius(50)

    }

}
above code your can used copy and past in your file to se Ui of screen if you happy with the solution read more swiftui tutorial on codeplayon.
Read More Tutorial