Hi developer in this article i am sharing a android solution. intel haxm installation failed | Failed to install HAXM during Android Studio installation. When you Install HAXM throw android studio they throw error like :- intel haxm installation failed. to install intel haxm follow the instructions found at: https://github.com/intel/haxm/wiki/installation-instructions-on-windows
HAXM installation failed is a common error when installing Android Studio. This guide will explain what Intel HAXM is and how to install it. We’ll also discuss the possible causes of HAXM failure and how to fix them.
What is Intel HAXM?
HAXM is Hardware Accelerated Execution Manager. It is a cross platform hardware-assisted virtualization engines ( hypervisor), and the Android Emulator uses HAXM on intel platforms to speed up & improve performance
intel haxm installation failed | Failed to install HAXM during Android Studio installation
Why HAXM Installation Failed
When you install Android Studio, the Android Studio Installs Intel HXM. You may receive the HAXM installation failed message for the following reasons
- Android is already up and running
- This processor is not Intel-based
- Unsupported OS
- Hyper-V Manager needs to be disabled
- Bios must support virtualization (VT-x).
- Virtualisation must be supported by the PC
- Antivirus (Avast), may cause HAXM Installation to be disrupted
If the Android emulator is running, you should stop it.
It can be stopped via the AVD manager. Click Stop on the action column. This will stop the emulator.
You can also restart your computer.
This processor is not Intel-based
Intel HAXM can’t be used on systems that don’t have an Intel processor. Even though the processor is Intel, the system must support VT-x and EM64T. Execute Disable bit cannot be used on systems without an Intel processor.
Hyper-V can be used to run the Android Emulator on a AMD-based PC.
OS Not supported
- Windows OS supported: 7, 8, 8.1, and 10.
- MacOS 10.12, 10.13 and 10.14 are supported
- Only 64-bit OS is supported.
Deactivate the Hyper-V manager
Hyper-V, a Virtualization technique similar to Intel HAXM, is also available. Both cannot be used simultaneously. Hyper-V cannot be used simultaneously.
- Go to Control Panel > Programs and Features > Turn Windows features on/off
- In the window, disable Hyper-V options
- Reboot your computer
Hyper-V may not be disabled
Hyper-V can be prevented from being disabled if you enable Windows 10 features like Device Guard or Credential Guard.
Microsoft’s Device Guardian and Credential Guard hardware readiness tool can disable these Windows 10 features, along with Hyper-V.
- Get the latest Device Guardian and Credential Guard hardware readiness tool.
- Unzip
- Start the Command Prompt with and log in as administrator
- The following command should be executed
@powershell -ExecutionPolicy RemoteSigned -Command "X:\path\to\dgreadiness_v3.6\DG_Readiness_Tool_v3.6.ps1 -Disable"- Reboot.
Bios does not allow virtualization
Virtualization must be enabled in your BIOS if it is disabled.
Turn the computer off and then on. To enter the startup’s BIOS, press F2, DEL or F10. (The key may vary depending on your computer). You’ll likely see a message from the startup indicating the key to press in order to enter the BIOS.
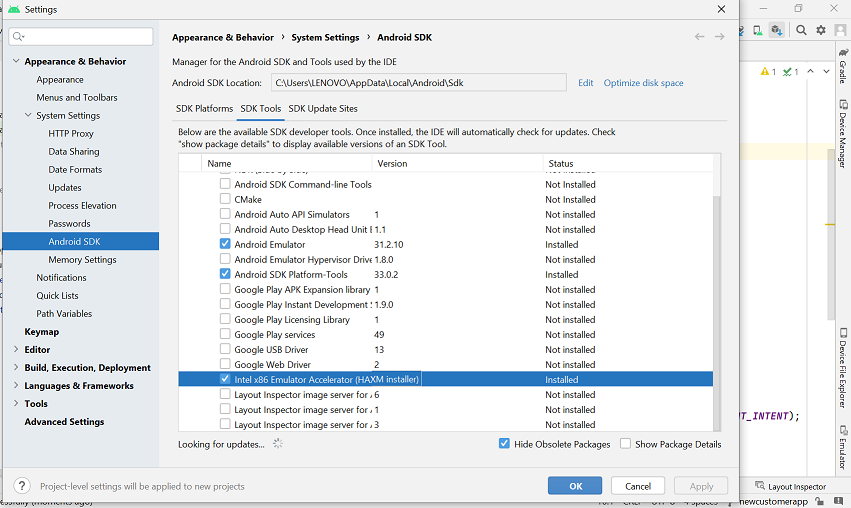
How to Install HAXM
You can install Intel HAXM in two ways.
- Use the Android SDK Manager
- Direct Download & Installation
Android SDK Manager – Installing
Select SDK Tools and go to Android SDK Manager ( tools -> SDK Manager). Here you will find the Intel x86 Emulator Accelerator HAXM installation. Click on OK to confirm.
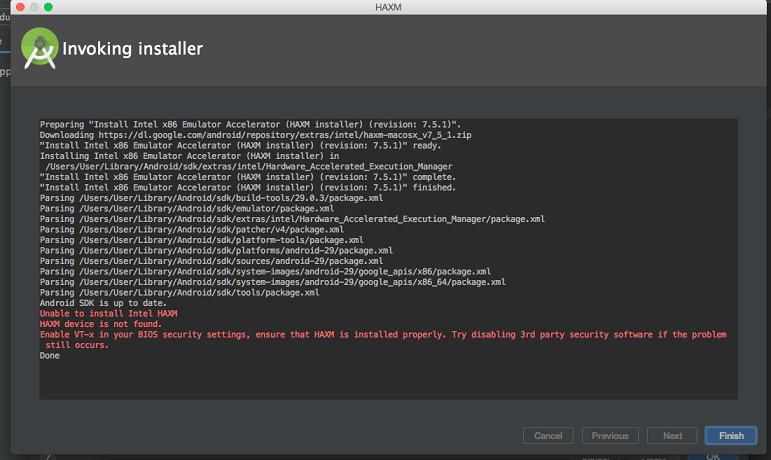
Installer Intel x86 Emulator Accelerator HAXM