
Navigation Drawer using Jetpack Compose. Jetpack Compose is the latest most innovative Android toolkit by Google to build the native Android UI. If you haven’t had the chance to try it yet, this is the perfect moment to begin using it since it’s still in beta (as as of April 20, 2021) However, it is expected to soon be able to release a stable version. This is an official code lab to start by using Compose Basics.
In this article, we’ll explore the possibility of creating an ad-hoc navigation drawer that allows users to navigate between various screens by using the element for navigation from Compose.
In the beginning, we’ll begin by creating an interface that can serve as an organizer.
Navigation Drawer using Jetpack Compose Example
Let’s Start to create the example for jetpack compose navigation. Start your android studio and Create a project to select the jetpack to compose the activity. After the Build, your project successfully adds the below dependency.
Dependency:-
dependencies {

    implementation 'androidx.core:core-ktx:1.3.2'
    implementation 'androidx.appcompat:appcompat:1.2.0'
    implementation 'com.google.android.material:material:1.3.0'
    implementation "androidx.compose.ui:ui:$compose_version"
    implementation "androidx.compose.material:material:$compose_version"
    implementation "androidx.compose.ui:ui-tooling:$compose_version"
    implementation "androidx.navigation:navigation-compose:1.0.0-alpha10"
    implementation 'androidx.lifecycle:lifecycle-runtime-ktx:2.3.1'
    implementation 'androidx.activity:activity-compose:1.3.0-alpha06'

    testImplementation 'junit:junit:4.+'
    androidTestImplementation 'androidx.test.ext:junit:1.1.2'
    androidTestImplementation 'androidx.test.espresso:espresso-core:3.3.0'
    androidTestImplementation "androidx.compose.ui:ui-test-junit4:$compose_version"
}
Step 2: Create a Kotlin file with the Name Drawer.kt
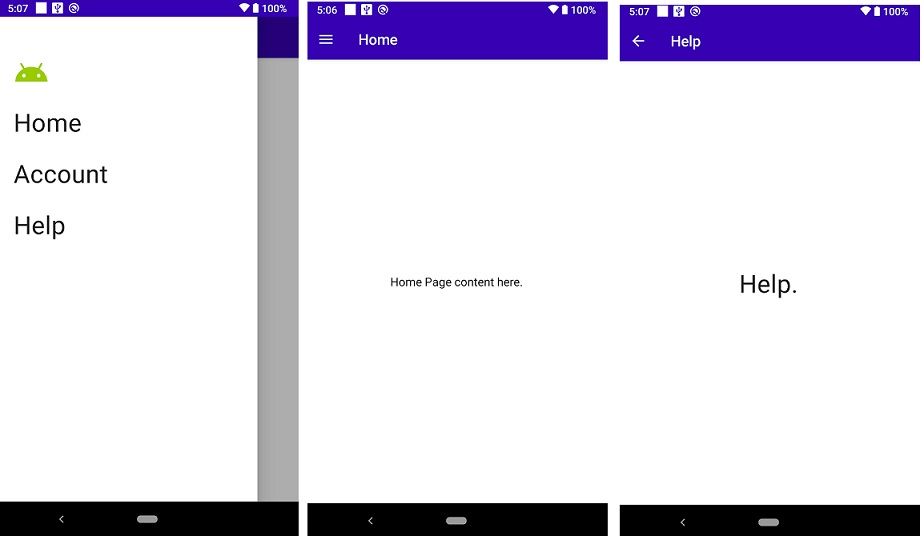
This is three screens we’ll use to move across the drawer. The drawer composable can be described as a simple column that contains three screens with an image on the top. The drawer’s preview could look like this: Navigation Drawer using Jetpack Compose.
import androidx.compose.foundation.Image
import androidx.compose.foundation.clickable
import androidx.compose.foundation.layout.*
import androidx.compose.material.MaterialTheme
import androidx.compose.material.Text
import androidx.compose.runtime.Composable
import androidx.compose.ui.Modifier
import androidx.compose.ui.res.painterResource
import androidx.compose.ui.tooling.preview.Preview
import androidx.compose.ui.unit.dp
import com.walnash.navigationdrawer.ui.theme.NavigationDrawerTheme

sealed class DrawerScreens(val title: String, val route: String) {
    object Home : DrawerScreens("Home", "home")
    object Account : DrawerScreens("Account", "account")
    object Help : DrawerScreens( "Help", "help")
}

private val screens = listOf(
    DrawerScreens.Home,
    DrawerScreens.Account,
    DrawerScreens.Help
)

@Composable
fun Drawer(
    modifier: Modifier = Modifier,
    onDestinationClicked: (route: String) -> Unit
) {
    Column(
        modifier
            .fillMaxSize()
            .padding(start = 24.dp, top = 48.dp)
    ) {
        Image(
            painter = painterResource(R.drawable.ic_baseline_android_24),
            contentDescription = "App icon"
        )
        screens.forEach { screen ->
            Spacer(Modifier.height(24.dp))
            Text(
                text = screen.title,
                style = MaterialTheme.typography.h4,
                modifier = Modifier.clickable {
                    onDestinationClicked(screen.route)
                }
            )
        }
    }
}

@Preview
@Composable
fun DrawerPreview() {
    NavigationDrawerTheme {
        Drawer{}
    }
}
Step 3: Create a New Kotlin file Screens.kt
The three screens are similar, with the exception of The screen for Help. screen. This Screen for Help screen has the back button instead of an option button located in the TopBar. We’re transmitting NavController into this Screen Help screen in order to return on the screen that was previously displayed with a pressing on the return button.
To those on the screen that is the Home as well as the account screen, we provide an additional callback “openDrawer” which can open the drawer that will be called after it is pressed. Navigation Drawer using Jetpack Compose
Host for navigation
We require a navigation host that can host and navigate across these screen. The original documentationon navigation in composition:
import androidx.compose.foundation.layout.Arrangement
import androidx.compose.foundation.layout.Column
import androidx.compose.foundation.layout.fillMaxSize
import androidx.compose.material.MaterialTheme
import androidx.compose.material.Text
import androidx.compose.material.icons.Icons
import androidx.compose.material.icons.filled.ArrowBack
import androidx.compose.material.icons.filled.Menu
import androidx.compose.runtime.Composable
import androidx.compose.ui.Alignment
import androidx.compose.ui.Modifier
import androidx.navigation.NavController

@Composable
fun Home(openDrawer: () -> Unit) {
    Column(modifier = Modifier.fillMaxSize()) {
        TopBar(
            title = "Home",
            buttonIcon = Icons.Filled.Menu,
            onButtonClicked = { openDrawer() }
        )
        Column(
            modifier = Modifier.fillMaxSize(),
            verticalArrangement = Arrangement.Center,
            horizontalAlignment = Alignment.CenterHorizontally) {
            Text(text = "Home Page content here.")
        }
    }
}

@Composable
fun Account(openDrawer: () -> Unit) {
    Column(modifier = Modifier.fillMaxSize()) {
        TopBar(
            title = "Account",
            buttonIcon = Icons.Filled.Menu,
            onButtonClicked = { openDrawer() }
        )
        Column(
            modifier = Modifier.fillMaxSize(),
            verticalArrangement = Arrangement.Center,
            horizontalAlignment = Alignment.CenterHorizontally) {
            Text(text = "Account.", style = MaterialTheme.typography.h4)
        }
    }
}

@Composable
fun Help(navController: NavController) {
    Column(modifier = Modifier.fillMaxSize()) {
        TopBar(
            title = "Help",
            buttonIcon = Icons.Filled.ArrowBack,
            onButtonClicked = { navController.popBackStack() }
        )
        Column(
            modifier = Modifier.fillMaxSize(),
            verticalArrangement = Arrangement.Center,
            horizontalAlignment = Alignment.CenterHorizontally) {
            Text(text = "Help.", style = MaterialTheme.typography.h4)
        }
    }
}
Step 4: Create an App Bar for Navi bar UI with File Name UIComponent.kt
Our TopBar utilizes the Compose included component for the creation of a TopBar named TopAppBar. We’re providing the title and icons for navigation. Clicking on the navigation icon will initiate the onButtonClicked Callback that will take care of opening the drawer or going back to the previous screen. This will be used on all our screens. You can modify the TopAppBar according to your requirements. Go through the documentation of TopAppBar for the options of customization.
Now let’s create UI for the three screens we included to our drawer.
import androidx.compose.material.*
import androidx.compose.runtime.Composable
import androidx.compose.ui.graphics.vector.ImageVector

@Composable
fun TopBar(title: String = "", buttonIcon: ImageVector, onButtonClicked: () -> Unit) {
    TopAppBar(
        title = {
            Text(
                text = title
            )
        },
        navigationIcon = {
            IconButton(onClick = { onButtonClicked() } ) {
                Icon(buttonIcon, contentDescription = "")
            }
        },
        backgroundColor = MaterialTheme.colors.primaryVariant
    )
}
Step 5: Let’s Implement it Mainactivity Class.
In this composable, we’ve made an NavController that will be used to build a navigation host and navigate between various composable screens. To create a drawer for navigation We are using the ModalDrawer, a composable component of Compose. It is a convenient method to build drawers. The parameters that are used in this case for ModalDrawer include:
drawerState Controls the open/close status that the drawer is in.
gestureEnabled is used to allow the gesture of opening or closing the drawer. We have enabled the gesture to open the drawer. is opened so that it can be closed with a swipe.
drawerContent It is an opcode that will display the user interface of the drawer once it opens. Here we are passing the Drawer composable that we made in the beginning.
The final one is the data passed by an lambda. The composable that appears as the remainder on the screen. We connect to our NavHost here , which will display all the screens we would like to see.
If we use the Callback OnDestinationClicked of the drawer we close the drawer, and then navigating to the screen we need. We also push the backstack until the destination that is home (not popping home) so that when we press of back, we are brought back to home screen.
The new screen is launched as a singleTop, so you only have one screen regardless of whether an item has been chosen multiple times within the drawer. Navigation Drawer using Jetpack Compose.
We will be using the AppMainScreen compatible in our work.
import android.os.Bundle
import androidx.activity.ComponentActivity
import androidx.activity.compose.setContent
import androidx.compose.material.*
import androidx.compose.runtime.Composable
import androidx.compose.runtime.rememberCoroutineScope
import androidx.compose.ui.tooling.preview.Preview
import androidx.navigation.compose.NavHost
import androidx.navigation.compose.composable
import androidx.navigation.compose.navigate
import androidx.navigation.compose.rememberNavController
import com.walnash.navigationdrawer.ui.theme.NavigationDrawerTheme
import kotlinx.coroutines.launch

class MainActivity : ComponentActivity() {
    override fun onCreate(savedInstanceState: Bundle?) {
        super.onCreate(savedInstanceState)
        setContent {
            NavigationDrawerTheme {
                AppMainScreen()
            }
        }
    }
}

@Composable
fun AppMainScreen() {
    val navController = rememberNavController()
    Surface(color = MaterialTheme.colors.background) {
        val drawerState = rememberDrawerState(DrawerValue.Closed)
        val scope = rememberCoroutineScope()
        val openDrawer = {
            scope.launch {
                drawerState.open()
            }
        }
        ModalDrawer(
            drawerState = drawerState,
            gesturesEnabled = drawerState.isOpen,
            drawerContent = {
                Drawer(
                    onDestinationClicked = { route ->
                        scope.launch {
                            drawerState.close()
                        }
                        navController.navigate(route) {
                            popUpTo = navController.graph.startDestination
                            launchSingleTop = true
                        }
                    }
                )
            }
        ) {
            NavHost(
                navController = navController,
                startDestination = DrawerScreens.Home.route
            ) {
                composable(DrawerScreens.Home.route) {
                    Home(
                        openDrawer = {
                            openDrawer()
                        }
                    )
                }
                composable(DrawerScreens.Account.route) {
                    Account(
                        openDrawer = {
                            openDrawer()
                        }
                    )
                }
                composable(DrawerScreens.Help.route) {
                    Help(
                        navController = navController
                    )
                }
            }
        }
    }
}

@Preview(showBackground = true)
@Composable
fun DefaultPreview() {
    NavigationDrawerTheme {
        AppMainScreen()
    }
}
Read More Tutorial

