MLKit Text Recognition Find out how you can use the latest ML Kit library from Google to utilize computer vision and machine learning to recognize text within an image.
at Google I/O 2018 Google has announced an updated software library called the ML Kit that allows developers to make use of machine learning on mobile devices. It allows you to add some standard machine learning features to your app without being an expert in machine learning!
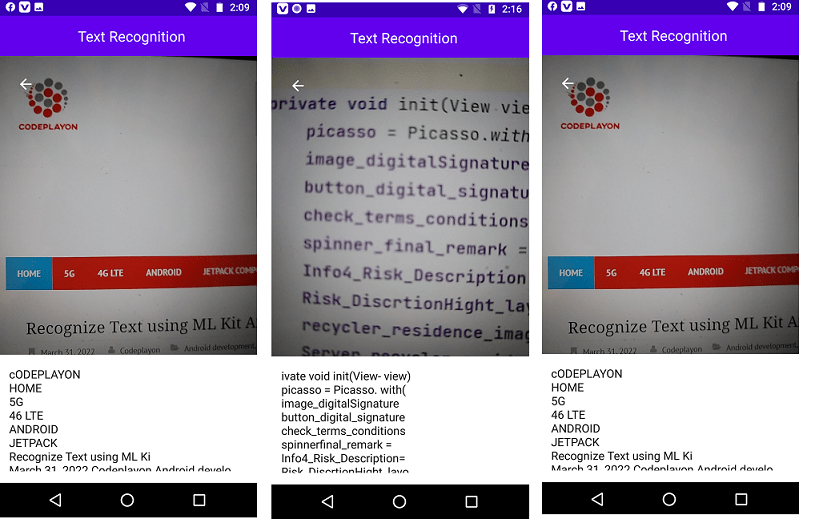
Recognize Text using ML Kit Android Jetpack Compose
In this video tutorial, you’ll learn to set up and use the Google ML Kit in your Android applications by creating an application to display a Twitter profile by displaying a photo of the Twitter profile’s Twitter handle. In the final lesson, you’ll be able to:
- What exactly ML Kit is, and what it can provide
- How do you setup ML Kit with your Android app and Firebase
- How do I run an application that recognizes text on the device?
- How can you perform text recognition on the cloud
- How can you make use of the results from running text recognition using the ML Kit
What exactly is ML Kit?
Machine learning allows computers to have the capability to “learn” by an algorithm that trains an model by using a variety of inputs, which result in known outputs. In feeding a machine-learning algorithm with lots of information, the model can make predictions, like the likelihood that there is a cute cat in a photograph. If you don’t have the aid of fantastic libraries The machine learning training process involves a lot of math and specific knowledge.
There’s an ML Kit! There are numerous common reasons that make use of machine learning in mobile applications that often incorporate an image processing component. Google has been using machine learning to accomplish various of these tasks they have made their expertise available to us via an API that is simple to use. They developed ML Kit built on top of TensorFlow Lite as well as cloud vision API Cloud Vision API and the Neural Networks API to ensure that developers can use their models to:
- Recognition of text
- Face detection
- Barcode scanning
- Image labeling
- Recognition of the Landmark
Google plans to add additional APIs in the near future and more! With these options, you’ll be capable of incorporating intelligent functions into your application without the need to know about machine learning or train the models yourself.
TextRecognition-MLKit-jetPackCompose
Implement Text Recognition using MLKit in Jetpack Compose using Kotlin.
The application is developed with Kotlin Programming Language with Jetpack Compose Navigation.
Android mlkit object detection Example Source Code
Let’s Start to make an android example app for text recognition using ml kit android. So let’s Start your android studio and make an Android project with jetpack activity. And wait for the build project when the project is successfully built add below Gradle depandancy.
Step 1: Gradle dependency.
dependencies {

    implementation 'androidx.core:core-ktx:1.7.0'
    implementation 'androidx.appcompat:appcompat:1.4.1'
    implementation 'com.google.android.material:material:1.5.0'
    implementation "androidx.compose.ui:ui:$compose_version"
    implementation "androidx.compose.material:material:$compose_version"
    implementation "androidx.compose.ui:ui-tooling-preview:$compose_version"
    implementation 'androidx.lifecycle:lifecycle-runtime-ktx:2.4.0'
    implementation 'androidx.activity:activity-compose:1.4.0'
    testImplementation 'junit:junit:4.+'
    androidTestImplementation 'androidx.test.ext:junit:1.1.3'
    androidTestImplementation 'androidx.test.espresso:espresso-core:3.4.0'
    androidTestImplementation "androidx.compose.ui:ui-test-junit4:$compose_version"
    debugImplementation "androidx.compose.ui:ui-tooling:$compose_version"

    def camerax_version = "1.0.2"
    implementation "androidx.camera:camera-core:${camerax_version}"
    implementation "androidx.camera:camera-camera2:${camerax_version}"
    implementation "androidx.camera:camera-lifecycle:${camerax_version}"
    implementation "androidx.camera:camera-view:1.0.0-alpha29"

    //Camera Permission
    implementation "com.google.accompanist:accompanist-permissions:0.19.0"

    //MLKit
    implementation 'com.google.android.gms:play-services-mlkit-text-recognition:16.1.1'
}
Step 2:- Create a MLKitTextRecognition kotlin file.
create a mlkit test recognition kotlin file and use the below source code.
@Composable
fun MLKitTextRecognition() {
    val context = LocalContext.current
    val lifecycleOwner = LocalLifecycleOwner.current
    val extractedText = remember { mutableStateOf("") }

    Column(
        modifier = Modifier.fillMaxSize()
    ) {
        TextRecognitionView(
            context = context,
            lifecycleOwner = lifecycleOwner,
            extractedText = extractedText
        )
        Text(
            text = extractedText.value,
            modifier = Modifier
                .fillMaxWidth()
                .background(Color.White)
                .padding(16.dp)
        )
    }
}

@Composable
fun TextRecognitionView(
    context: Context,
    lifecycleOwner: LifecycleOwner,
    extractedText: MutableState<String>
) {
    val cameraProviderFuture = remember { ProcessCameraProvider.getInstance(context) }
    var preview by remember { mutableStateOf<Preview?>(null) }
    val executor = ContextCompat.getMainExecutor(context)
    val cameraProvider = cameraProviderFuture.get()
    val textRecognizer = remember { TextRecognition.getClient() }
    val cameraExecutor = remember { Executors.newSingleThreadExecutor() }

    Box {
        AndroidView(
            modifier = Modifier
                .fillMaxWidth()
                .fillMaxHeight(0.7f),
            factory = { ctx ->
                val previewView = PreviewView(ctx)
                cameraProviderFuture.addListener({
                    val imageAnalysis = ImageAnalysis.Builder()
                        .setBackpressureStrategy(ImageAnalysis.STRATEGY_KEEP_ONLY_LATEST)
                        .build()
                        .apply {
                            setAnalyzer(cameraExecutor, ObjectDetectorImageAnalyzer(textRecognizer, extractedText))
                        }
                    val cameraSelector = CameraSelector.Builder()
                        .requireLensFacing(CameraSelector.LENS_FACING_BACK)
                        .build()
                    cameraProvider.unbindAll()
                    cameraProvider.bindToLifecycle(
                        lifecycleOwner,
                        cameraSelector,
                        imageAnalysis,
                        preview
                    )
                }, executor)
                preview = Preview.Builder().build().also {
                    it.setSurfaceProvider(previewView.surfaceProvider)
                }
                previewView
            }
        )

        Row(
            verticalAlignment = Alignment.CenterVertically,
            modifier = Modifier
                .fillMaxWidth()
                .padding(15.dp)
                .align(Alignment.TopStart)
        ) {
            IconButton(
                onClick = { Toast.makeText(context, "Back Clicked", Toast.LENGTH_SHORT).show() }
            ) {
                Icon(
                    imageVector = Icons.Filled.ArrowBack,
                    contentDescription = "back",
                    tint = Color.White
                )
            }
        }
    }
}

class ObjectDetectorImageAnalyzer(
    private val textRecognizer: TextRecognizer,
    private val extractedText: MutableState<String>
): ImageAnalysis.Analyzer {
    @SuppressLint("UnsafeOptInUsageError")
    override fun analyze(imageProxy: ImageProxy) {
        val mediaImage = imageProxy.image
        if (mediaImage != null) {
            val image = InputImage.fromMediaImage(mediaImage, imageProxy.imageInfo.rotationDegrees)

            textRecognizer.process(image)
                .addOnCompleteListener {
                    if (it.isSuccessful) {
                        extractedText.value = it.result?.text ?: ""
                    }
                    imageProxy.close()
                }
        }
    }
}
Step 3: MainActivity.Kt Class Source code.
private const val REQUEST_FOREGROUND_ONLY_PERMISSIONS_REQUEST = 34
private fun foregroundPermissionApproved(context: Context): Boolean {
    return PackageManager.PERMISSION_GRANTED == ActivityCompat.checkSelfPermission(
        context, Manifest.permission.CAMERA
    )
}

private fun requestForegroundPermission(context: Context) {
    val provideRationale = foregroundPermissionApproved(context)

    if (provideRationale) {
        ActivityCompat.requestPermissions(
            context as Activity,
            arrayOf(Manifest.permission.CAMERA), REQUEST_FOREGROUND_ONLY_PERMISSIONS_REQUEST
        )
    } else {
        ActivityCompat.requestPermissions(
            context as Activity,
            arrayOf(Manifest.permission.CAMERA), REQUEST_FOREGROUND_ONLY_PERMISSIONS_REQUEST
        )
    }
}

class MainActivity : ComponentActivity() {
    override fun onCreate(savedInstanceState: Bundle?) {
        super.onCreate(savedInstanceState)
        setContent {
            TextRecognitionTheme {
                Surface(color = MaterialTheme.colors.background) {
                    Column(
                        horizontalAlignment = Alignment.CenterHorizontally
                    ) {
                        requestForegroundPermission(this@MainActivity)
                        TopAppBar(
                            title = {
                                Text(
                                    text = "Text Recognition",
                                    modifier = Modifier.fillMaxWidth(),
                                    textAlign = TextAlign.Center
                                )
                            }
                        )
                        MLKitTextRecognition()
                    }
                }
            }
        }
    }
}
Now you can run your project and see the results you can scan a doc text etc more.
Read More Tutorial
- Bluetooth 5 and its uses in IoT explained
- Bluetooth Thermal Receipt Printer Android Integration Printer
- Jetpack Compose Tutorial
- Android Tutorial
- Flutter Tutorial