In this Android tutorial I share wireless debugging android studio | Run/install/debug Android applications over Wi-Fi?. Wireless ADB debugging is made much simpler by Android Studio Bumblebee. In the past, I published an article on how to set the wireless ADB debugging by using commands.
In the latest version of Android Studio named Bumblebee the Bumblebee, a brand new and much more user-friendly wireless debugging tool was introduced into the IDE. However, this tool is currently only available for Android devices that are running API 11 or greater. This article will show you how to configure wireless ADB debugging using the most recent Android Studio Bumblebee version. Run/install/debug Android applications over Wi-Fi?
How wireless debugging android studio
The prerequisites for connecting you device over the wireless debugging android studio 11 and above device.
Prerequisites:
- It is essential to make sure that you are running the most recent version of Android Studio which is Android Studio Bumblebee 2021.1.1 or later.
- A physical device that runs Android 11 or later
- Options for Developers must be turned on in the device’s physical settings.
- Connect via the identical WiFi system as you are connected to with your Android Studio. Take note of this WiFi connection must be extremely stable.
How to debug in Android Studio using adb over WiFi
Now, You can follow below steps for the wireless debugging android studio. To Run, install, debug your App over Wi-Fi you don’t need tp connection with cable. Here the cable problem is solve because with the cable we facing issue like cable disconnect continually. And Phone always connect with cable charging.
Installation
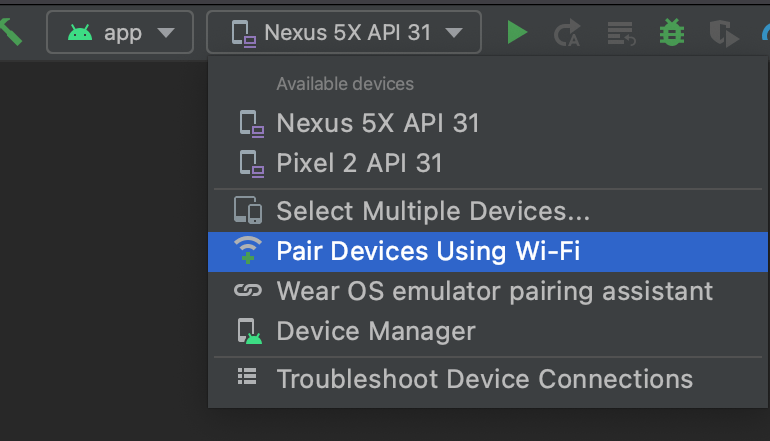
After you have the information above items in place, begin by opening the devices dropdown menu in Android Studio and selecting ” Pair Devices Using Wi-Fi“:
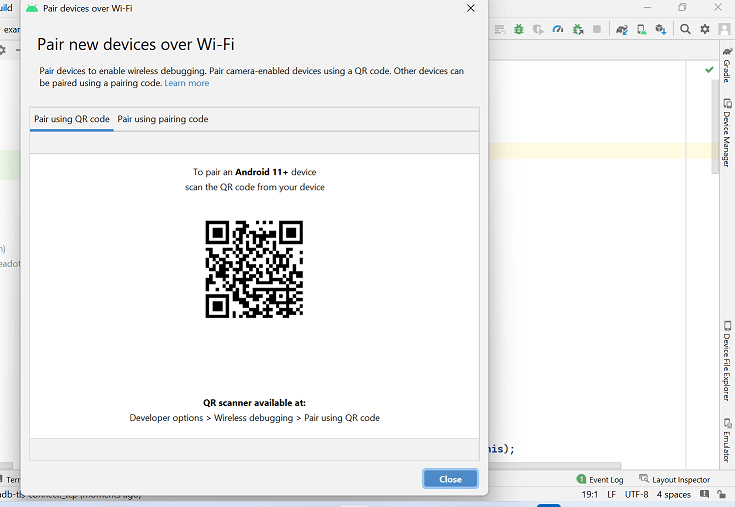
You’ll then get a dialog with the option of scanning a QR code, or pair using an pairing code. Select the default option and scan using an QR code
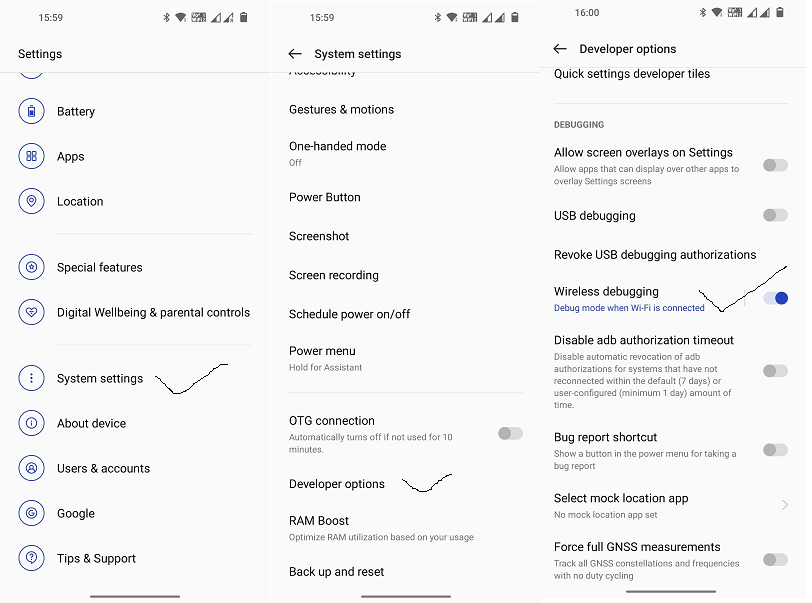
On the device you own, open ” Settings” and scroll towards ” Developer” options then scroll further and search for ” Wireless debugging” and then click to open the option (not using the toggle). You’ll be taken to the ” Wireless debugging” screen:
When you are on the ” Wireless debugging” screen, press the toggle to display additional options. After selecting the toggle, in the event that wireless debugging wasn’t present on the network your device is connected to you will then get the dialog asking you to enable wireless debugging on the network:
You can choose to click for the ” Always allow on this network” radio button , which will result in the prompt not appearing on the same network, or press ” Allow” If you would prefer to always being prompted.
If you select ” Allow” you will be presented with a variety of options, including an option that allows you of ” Pair device with QR code“, select this option:
After selecting your device will show a screen that will let you scan an QR code. The QR code you’ll need to scan is that you see within Android Studio:
After scanning the QR code in Android Studio, both your physical device as well as Android Studio will confirm that both are connected.
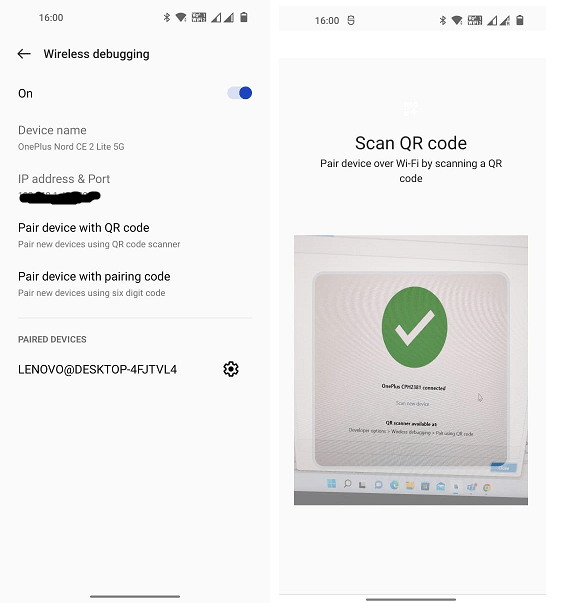
On your device’s physical side, within”applied devices,” in the ” Paired devices” section, the new connection will show: Within Android Studio, a confirmation screen will appear to verify the connection:
Close the confirmation dialog and you’ll see that your device is now in the devices list available in the menu. Now, you can transfer your designs on your physical Android 11 device or higher easily!
Read More Tutorial
- Targeting S+ (version 31 and above) requires that one of FLAG_IMMUTABLE or FLAG_MUTABLE
- Android Gradle plugin requires Java 11 to run. You are currently using Java 1.8
- intel haxm installation failed
- How to enable Virtualization (VT) on Windows 10
- Codeplayon Jetpack Compose Tutorial
- Codeplayon Android Tutorial
- Codeplayon Flutter Tutorial
- Codeplayon on Github