Android Sync SQLite Database with Server using PHP and MySQL
Let’s start to learn Android Sync SQLite Database with Server. Assume we have to send some information from the application to our web server and the internet is not available on the device at a particular time. So instead of giving an error to the user that the internet is not available we can store the data to SQLite and send it later automatically when the internet is available.
Creating Web Service and MySQL Database
Table of Contents
Creating Database
- I have the following database. I am using XAMPP you can use anything you want.
- So we have the database table. Now we will create a PHP script that will handle the insertion to the database.
Creating Web Service
Creating Script
- Create a folder in your root directory (in my case it is htdocs).
- Now create a PHP file inside the folder, I have created saveName.php. And write the following code.
<?php
/*
* Database Constants
* Make sure you are putting the values according to your database here
*/
define('DB_HOST','localhost');
define('DB_USERNAME','root');
define('DB_PASSWORD','');
define('DB_NAME', 'android');
//Connecting to the database
$conn = new mysqli(DB_HOST, DB_USERNAME, DB_PASSWORD, DB_NAME);
//checking the successful connection
if($conn->connect_error) {
die("Connection failed: " . $conn->connect_error);
}
//making an array to store the response
$response = array();
//if there is a post request move ahead
if($_SERVER['REQUEST_METHOD']=='POST'){
//getting the name from request
$name = $_POST['name'];
//creating a statement to insert to database
$stmt = $conn->prepare("INSERT INTO names (name) VALUES (?)");
//binding the parameter to statement
$stmt->bind_param("s", $name);
//if data inserts successfully
if($stmt->execute()){
//making success response
$response['error'] = false;
$response['message'] = 'Name saved successfully';
}else{
//if not making failure response
$response['error'] = true;
$response['message'] = 'Please try later';

}
}else{
$response['error'] = true;
$response['message'] = "Invalid request";
}
//displaying the data in json format
echo json_encode($response);
Testing Script
- Now its time to test the script we created. So in my case, the URL is http://localhost/SqliteSync/saveName.php
- I am using POSTMAN to test the script and you can see it in below screenshot.
Android Sync SQLite Database with Server
Creating the Android Project
- Create a new project.
- I have created AndroidMySQLSync with an Empty Activity.
Adding Permissions
We need the following permissions so first add these to AndroidManifest.xml.
<uses-permission android:name="android.permission.INTERNET" />
<uses-permission android:name="android.permission.ACCESS_NETWORK_STATE" />
Adding Dependencies
- For network requests, I am going to use Volley. So add the following line inside dependencies block of your app level build.gradle file.
dependencies {
compile fileTree(dir: 'libs', include: ['*.jar'])
androidTestCompile('com.android.support.test.espresso:espresso-core:2.2.2', {
exclude group: 'com.android.support', module: 'support-annotations'
})
compile 'com.android.support:appcompat-v7:25.0.1'
//add this line
compile 'com.android.volley:volley:1.0.0'
testCompile 'junit:junit:4.12'
}
Handling SQLite Operations
- In this case, we have to use both SQLite and MySQL. So a class named DatabaseHelper.java and write the following code.
package codeplayon.androidmysqlsync;
import android.content.ContentValues;
import android.content.Context;
import android.database.Cursor;
import android.database.sqlite.SQLiteDatabase;
import android.database.sqlite.SQLiteOpenHelper;

public class DatabaseHelper extends SQLiteOpenHelper {
    //Constants for Database name, table name, and column names
    public static final String DB_NAME = "NamesDB";
    public static final String TABLE_NAME = "names";
    public static final String COLUMN_ID = "id";
    public static final String COLUMN_NAME = "name";
    public static final String COLUMN_STATUS = "status";
    //database version
    private static final int DB_VERSION = 1;
    //Constructor
    public DatabaseHelper(Context context) {
        super(context, DB_NAME, null, DB_VERSION);
    }
    //creating the database
    @Override
    public void onCreate(SQLiteDatabase db) {
        String sql = "CREATE TABLE " + TABLE_NAME
                + "(" + COLUMN_ID +
                " INTEGER PRIMARY KEY AUTOINCREMENT, " + COLUMN_NAME +
                " VARCHAR, " + COLUMN_STATUS +
                " TINYINT);";
        db.execSQL(sql);
    }
    //upgrading the database
    @Override
    public void onUpgrade(SQLiteDatabase db, int oldVersion, int newVersion) {
        String sql = "DROP TABLE IF EXISTS Persons";
        db.execSQL(sql);
        onCreate(db);
    }

    public boolean addName(String name, int status) {
        SQLiteDatabase db = this.getWritableDatabase();
        ContentValues contentValues = new ContentValues();
        contentValues.put(COLUMN_NAME, name);
        contentValues.put(COLUMN_STATUS, status);
        db.insert(TABLE_NAME, null, contentValues);
        db.close();
        return true;
    }

    public boolean updateNameStatus(int id, int status) {
        SQLiteDatabase db = this.getWritableDatabase();
        ContentValues contentValues = new ContentValues();
        contentValues.put(COLUMN_STATUS, status);
        db.update(TABLE_NAME, contentValues, COLUMN_ID + "=" + id, null);
        db.close();
        return true;
    }

    public Cursor getNames() {
        SQLiteDatabase db = this.getReadableDatabase();
        String sql = "SELECT * FROM " + TABLE_NAME + " ORDER BY " + COLUMN_ID + " ASC;";
        Cursor c = db.rawQuery(sql, null);
        return c;
    }

   public Cursor getUnsyncedNames() {
        SQLiteDatabase db = this.getReadableDatabase();
        String sql = "SELECT * FROM " + TABLE_NAME + " WHERE " + COLUMN_STATUS + " = 0;";
        Cursor c = db.rawQuery(sql, null);
        return c;
    }
}
Handling Volley RequestQueue
- We are going to use Volley for HTTP request. So for this, we will create a singleton class.
Create a class named VolleySingleton and write the following code
package net.simplifiedcoding.androidmysqlsync;
import android.content.Context;
import android.graphics.Bitmap;
import android.support.v4.util.LruCache;
import com.android.volley.Request;
import com.android.volley.RequestQueue;
import com.android.volley.toolbox.ImageLoader;
import com.android.volley.toolbox.Volley;

public class VolleySingleton {
    private static VolleySingleton mInstance;
    private RequestQueue mRequestQueue;
    private static Context mCtx;
    private VolleySingleton(Context context) {
        mCtx = context;
        mRequestQueue = getRequestQueue();
    }
    public static synchronized VolleySingleton getInstance(Context context) {
        if (mInstance == null) {
            mInstance = new VolleySingleton(context);
        }
        return mInstance;
    }
    public RequestQueue getRequestQueue() {
        if (mRequestQueue == null) {

            mRequestQueue = Volley.newRequestQueue(mCtx.getApplicationContext());
        }
       return mRequestQueue;

    }
    public <T> void addToRequestQueue(Request<T> req) {
        getRequestQueue().add(req);
    }
}
Building Interface
MainActivity
- Now inside activity_main.xml write the following code
<?xml version="1.0" encoding="utf-8"?>
<LinearLayout xmlns:android="http://schemas.android.com/apk/res/android"
    xmlns:tools="http://schemas.android.com/tools"
    android:id="@+id/activity_main"
    android:layout_width="match_parent"
    android:layout_height="match_parent"
    android:orientation="vertical"
    tools:context="codeplayon.androidmysqlsync.MainActivity">

    <LinearLayout
        android:layout_width="match_parent"
        android:layout_height="wrap_content"
        android:orientation="horizontal">

        <EditText
            android:id="@+id/editTextName"
            android:layout_width="match_parent"
            android:layout_height="wrap_content"
            android:layout_weight="3"
            android:hint="Enter a name" />

        <Button
            android:id="@+id/buttonSave"
            android:layout_width="wrap_content"
            android:layout_height="wrap_content"
            android:layout_weight="1"
            android:text="Save" />
    </LinearLayout>

    <ListView
      android:id="@+id/listViewNames"
        android:layout_width="match_parent"
        android:layout_height="wrap_content"></ListView>
</LinearLayout>
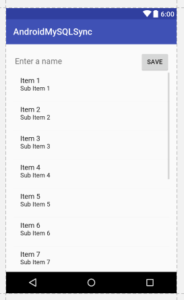
- As you can see we have an EditText, a Button and a ListView.
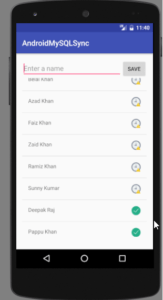
- Now let me tell you what we are going to do. We will save the Name from EditText and we will also display the saved name in ListView with the Sync Status. So the next part is designing a layout for our Custom ListView.
ListView
Create an XML file inside layout directory. I have created names.xml.
<?xml version="1.0" encoding="utf-8"?>
<RelativeLayout xmlns:android="http://schemas.android.com/apk/res/android"
android:padding="@dimen/activity_horizontal_margin"
android:layout_width="match_parent" android:layout_height="match_parent">

<TextView
android:text="Name"
android:layout_alignParentLeft="true"
android:id="@+id/textViewName"
android:layout_width="wrap_content"
android:layout_height="wrap_content" />

<ImageView
android:background="@drawable/success"
android:layout_alignParentRight="true"
android:id="@+id/imageViewStatus"
android:layout_width="wrap_content"
android:layout_height="wrap_content" />

</RelativeLayout>
- As you can see we have a TextView to display the name and an ImageView to display the status.
- Download the icons from the below link, we have two images to display queued or synced.
- You have to copy the downloaded icons inside drawable folder.
Building ListView
Now create a class Name.java and write the following code.
package net.simplifiedcoding.androidmysqlsync;

public class Name {
private String name;
private int status;
public Name(String name, int status) {
name = name;
status = status;
}

public String getName() {
return name;
}

public int getStatus() {
return status;
}
}
Adapter
- Create a class NameAdapter.java and write the following code.
package codeplayon.androidmysqlsync;
import android.content.Context;
import android.view.LayoutInflater;
import android.view.View;
import android.view.ViewGroup;
import android.widget.ArrayAdapter;
import android.widget.ImageView;
import android.widget.TextView;
import java.util.List;
public class NameAdapter extends ArrayAdapter<Name> {

private List<Name> names;
private Context context;

//constructor

public NameAdapter(Context context, int resource, List<Name> names) {
super(context, resource, names);
context = context;
names = names;
}

@Override
public View getView(int position, View convertView, ViewGroup parent) {

LayoutInflater inflater = (LayoutInflater) context.getSystemService(Context.LAYOUT_INFLATER_SERVICE);
View listViewItem = inflater.inflate(R.layout.names, null, true);
TextView textViewName = (TextView) listViewItem.findViewById(R.id.textViewName);
ImageView imageViewStatus = (ImageView) listViewItem.findViewById(R.id.imageViewStatus);
Name name = names.get(position);
setText(name.getName());
if (name.getStatus() == 0)
setBackgroundResource(R.drawable.stopwatch);
else
setBackgroundResource(R.drawable.success);
return listViewItem;
}

}
Coding MainActivity
- Now lets come inside MainActivity.java and write the following code.
package codeplayon.androidmysqlsync;
import android.Manifest;
import android.app.ProgressDialog;
import android.content.BroadcastReceiver;
import android.content.Context;
import android.content.Intent;
import android.content.IntentFilter;
import android.content.pm.PackageManager;
import android.database.Cursor;
import android.net.ConnectivityManager;
import android.support.v4.content.ContextCompat;
import android.support.v7.app.AppCompatActivity;
import android.os.Bundle;
import android.view.View;
import android.widget.Button;
import android.widget.EditText;
import android.widget.ListView;
import android.widget.Toast;
import com.android.volley.AuthFailureError;
import com.android.volley.Request;
import com.android.volley.RequestQueue;
import com.android.volley.Response;
import com.android.volley.VolleyError;
import com.android.volley.toolbox.StringRequest;
import com.android.volley.toolbox.Volley;
import org.json.JSONException;
import org.json.JSONObject;
import java.util.ArrayList;
import java.util.HashMap;
import java.util.List;
import java.util.Map;
public class MainActivity extends AppCompatActivity implements View.OnClickListener {
public static final String URL_SAVE_NAME = "http://codeplayon/Sqliteapi/saveName.php";

//database helper object
private DatabaseHelper db;
//View objects
private Button buttonSave;
private EditText editTextName;
private ListView listViewNames;
//List to store all the names
private List<Name> names;
public static final int NAME_SYNCED_WITH_SERVER = 1;
public static final int NAME_NOT_SYNCED_WITH_SERVER = 0;
public static final String DATA_SAVED_BROADCAST = "net.simplifiedcoding.datasaved";
//Broadcast receiver to know the sync status
private BroadcastReceiver broadcastReceiver;
//adapterobject for list view
private NameAdapter nameAdapter;
@Override
protected void onCreate(Bundle savedInstanceState) {
onCreate(savedInstanceState);
setContentView(R.layout.activity_main);
//initializing views and objects
db = new DatabaseHelper(this);
names = new ArrayList<>();
buttonSave = (Button) findViewById(R.id.buttonSave);
editTextName = (EditText) findViewById(R.id.editTextName);
listViewNames = (ListView) findViewById(R.id.listViewNames);
setOnClickListener(this);
loadNames();
broadcastReceiver = new BroadcastReceiver() {
@Override

public void onReceive(Context context, Intent intent) {
loadNames();
}
};
registerReceiver(broadcastReceiver, new IntentFilter(DATA_SAVED_BROADCAST));

}

private void loadNames() {
clear();
Cursor cursor = db.getNames();
if (cursor.moveToFirst()) {
do {
Name name = new Name(
getString(cursor.getColumnIndex(DatabaseHelper.COLUMN_NAME)),
getInt(cursor.getColumnIndex(DatabaseHelper.COLUMN_STATUS))
);
add(name);
} while (cursor.moveToNext());
}
nameAdapter = new NameAdapter(this, R.layout.names, names);
setAdapter(nameAdapter);
}
private void refreshList() {
notifyDataSetChanged();
}

private void saveNameToServer() {
final ProgressDialog progressDialog = new ProgressDialog(this);
setMessage("Saving Name...");
show();

final String name = editTextName.getText().toString().trim();
StringRequest stringRequest = new StringRequest(Request.Method.POST, URL_SAVE_NAME,
new Response.Listener<String>() {
@Override
public void onResponse(String response) {
dismiss();
try {
JSONObject obj = new JSONObject(response);
if (!obj.getBoolean("error")) {
saveNameToLocalStorage(name, NAME_SYNCED_WITH_SERVER);

} else {
saveNameToLocalStorage(name, NAME_NOT_SYNCED_WITH_SERVER);
}
} catch (JSONException e) {
printStackTrace();
}
}
},
new Response.ErrorListener() {
@Override
public void onErrorResponse(VolleyError error) {
dismiss();
//on error storing the name to sqlite with status unsynced
saveNameToLocalStorage(name, NAME_NOT_SYNCED_WITH_SERVER);
}
}) {
@Override
protected Map<String, String> getParams() throws AuthFailureError {
Map<String, String> params = new HashMap<>();
put("name", name);
return params;
}
};
getInstance(this).addToRequestQueue(stringRequest);
}
private void saveNameToLocalStorage(String name, int status) {
setText("");
addName(name, status);
Name n = new Name(name, status);
add(n);
refreshList();
}
@Override
public void onClick(View view) {
saveNameToServer();
}
}
- Now if you will run the application it will save the name to MySQL and SQLite with the sync or unsynced status.
- But to send the unsynced names to the server automatically we have to detect the Network Status of the phone. For this, we need one more broadcast receiver.
Detecting Network State
Creating Broadcast Receiver
- Create a class named NetworkStateChecker.java and write the following code.
package codeplayon.androidmysqlsync;
import android.content.BroadcastReceiver;
import android.content.Context;
import android.content.Intent;
import android.database.Cursor;
import android.net.ConnectivityManager;
import android.net.NetworkInfo;
import com.android.volley.AuthFailureError;
import com.android.volley.Request;
import com.android.volley.Response;
import com.android.volley.VolleyError;
import com.android.volley.toolbox.StringRequest;
import org.json.JSONException;
import org.json.JSONObject;
import java.util.HashMap;
import java.util.Map;

public class NetworkStateChecker extends BroadcastReceiver {

//context and database helper object
private Context context;
private DatabaseHelper db;
@Override
public void onReceive(Context context, Intent intent) {
context = context;
db = new DatabaseHelper(context);
ConnectivityManager cm = (ConnectivityManager) context.getSystemService(Context.CONNECTIVITY_SERVICE);
NetworkInfo activeNetwork = cm.getActiveNetworkInfo();
if (activeNetwork != null) {
//if connected to wifi or mobile data plan
if (activeNetwork.getType() == ConnectivityManager.TYPE_WIFI || activeNetwork.getType() == ConnectivityManager.TYPE_MOBILE) {
//getting all the unsynced names
Cursor cursor = db.getUnsyncedNames();
if (cursor.moveToFirst()) {
do {
saveName(
getInt(cursor.getColumnIndex(DatabaseHelper.COLUMN_ID)),
getString(cursor.getColumnIndex(DatabaseHelper.COLUMN_NAME))
);
} while (cursor.moveToNext());
}
}
}
}

private void saveName(final int id, final String name) {
StringRequest stringRequest = new StringRequest(Request.Method.POST, MainActivity.URL_SAVE_NAME,
new Response.Listener<String>() {
@Override
public void onResponse(String response) {
try {
JSONObject obj = new JSONObject(response);
if (!obj.getBoolean("error")) {
//updating the status in sqlite
updateNameStatus(id, MainActivity.NAME_SYNCED_WITH_SERVER);
//sending the broadcast to refresh the list
sendBroadcast(new Intent(MainActivity.DATA_SAVED_BROADCAST));
}
} catch (JSONException e) {
printStackTrace();
}
}
},
new Response.ErrorListener() {
@Override
public void onErrorResponse(VolleyError error) {
}
}) {

@Override
protected Map<String, String> getParams() throws AuthFailureError {
Map<String, String> params = new HashMap<>();
put("name", name);
return params;
}
};
getInstance(context).addToRequestQueue(stringRequest);
}
}
Adding Receiver in Manifest
- Add the following code in your AndroidManifest.xml file inside application tag.
<receiver android:name=".NetworkStateChecker">
<intent-filter>
<action android:name="android.net.conn.CONNECTIVITY_CHANGE" />
</intent-filter>
</receiver>
Registering Receiver
- You also need to register the receiver. So add the following line inside onCreate() method of your MainActivity.java file.
- registerReceiver(new NetworkStateChecker(), new IntentFilter(ConnectivityManager.CONNECTIVITY_ACTION));
- Now you can run your application.
Testing the Application
Run your application. And try saving the name when the internet is available also turn off the internet and again try saving your name.
- When the internet will be available again the data will be automatically sent to MySQL.


Everyone loves it when individuals get together and share ideas. Great website, stick with it!|